ASPxGridView FAQ: How to Enable Editing

Want to enable your ASPxGridView to edit data? It's very easy and similar to the GridView method. Let me show you how:
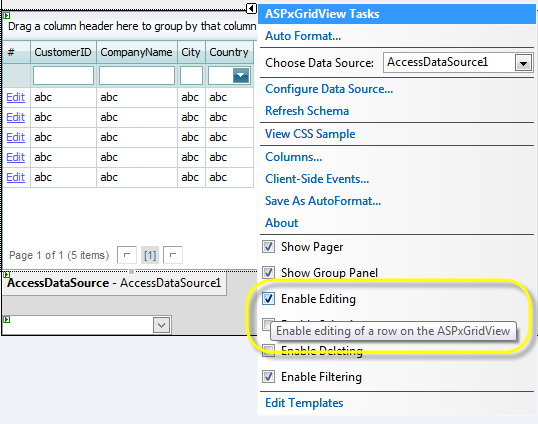
To enable editing, simply set the 'Enable Editing' checkbox from the smart tag:
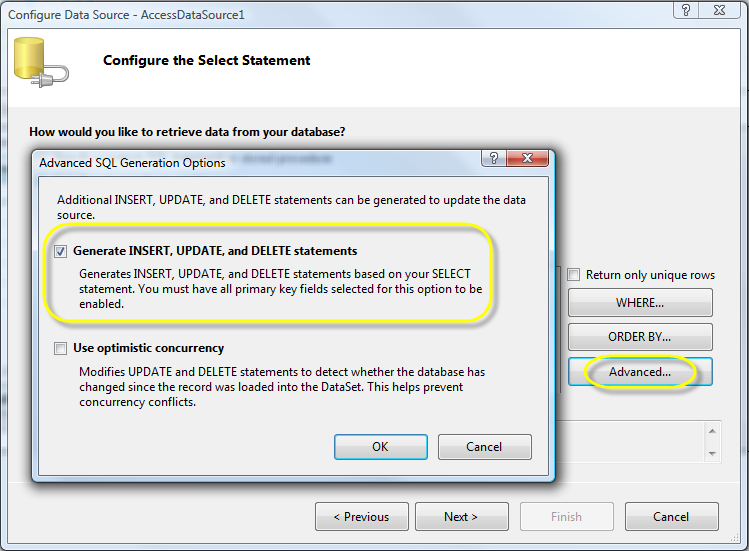
Be sure to set the DataSource to support editing by defining the InsertCommand, UpdateCommand, and DeleteCommand. There is a easy way to do this by simply configuring the DataSource:

Now after you define the connection and your SelectCommand then you have the opportunity to allow the DataSource to generate the other command statements for you. Simply click on the Advanced Button when you're on the 'Configure the Select Statement' dialog. Make sure the checkbox labeled 'Generate INSERT, UPDATE, and DELETE statements' checkbox is checked and then simply click 'OK'.
Now you're DataSource should look something like this:
<asp:AccessDataSource ID="AccessDataSource1" runat="server" DataFile="~/App_Data/nwind.mdb"
    DeleteCommand="DELETE FROM [Customers] WHERE [CustomerID] = ?" InsertCommand="INSERT INTO [Customers] ([CustomerID], [CompanyName], [City], [Country]) VALUES (?, ?, ?, ?)"
    SelectCommand="SELECT [CustomerID], [CompanyName], [City], [Country] FROM [Customers]"
    UpdateCommand="UPDATE [Customers] SET [CompanyName] = ?, [City] = ?, [Country] = ? WHERE [CustomerID] = ?">
    <DeleteParameters>
        <asp:Parameter Name="CustomerID" Type="String" />
    </DeleteParameters>
    <UpdateParameters>
        <asp:Parameter Name="CompanyName" Type="String" />
        <asp:Parameter Name="City" Type="String" />
        <asp:Parameter Name="Country" Type="String" />
        <asp:Parameter Name="CustomerID" Type="String" />
    </UpdateParameters>
    <InsertParameters>
        <asp:Parameter Name="CustomerID" Type="String" />
        <asp:Parameter Name="CompanyName" Type="String" />
        <asp:Parameter Name="City" Type="String" />
        <asp:Parameter Name="Country" Type="String" />
    </InsertParameters>
</asp:AccessDataSource>
You're now ready to start editing, inserting and deleting records within the ASPxGridView.
Note: If you've enabled editing in the ASPxGridView but your DataSource doesn't contain these commands then you'll likely see an error like this when trying to edit:

To remove this error message you can:
- Create your own customer error message
- Suppress the error message
In both cases you'll want to intercept the data changing event as soon as the button is clicked. For example, to intercept before the row is updated simply override the ASPxGridView.RowUpdating method. For the other edit events, please use these corresponding methods: RowInserting, RowDeleting, and RowValidating.
So to create your own error message simply throw an exception from the event like so:
protected void grid_RowUpdating(object sender, DevExpress.Web.Data.ASPxDataUpdatingEventArgs e)
{
    throw new InvalidOperationException("Data modifications are not allowed");
}
To suppress the message simply call the Cancel method like so:
protected void grid_RowUpdating(object sender, DevExpress.Web.Data.ASPxDataUpdatingEventArgs e)
{
    e.Cancel = true;
}
Do you need to manually update your own data without going through the DataSource?
Then you'll need to use the RowUpdating method again. This tutorial give a good example of how to implement this in your own code:
Customize data updates using the RowUpdating event
You may find this tutorial helpful if you want define your own buttons for editing or enable editing by double-clicking the row:
Switch to the edit mode by clicking a status bar button or by double-clicking a row
So do you feel like an editing guru yet?
.
Free DevExpress Products - Get Your Copy Today
 The DevExpress Team