Dogfooding our ASP.NET controls in SharePoint - part 1
Over the past couple of months, we've been creating and using an internal company portal site using the Microsoft Office SharePoint Server (MOSS).
For several years now we've used a simple wiki to do the job of tracking what the company is doing, or should be doing but isn't, or is doing but shouldn't, or could be doing but doesn't have the resources for, or any other combination. That's been a pretty good solution over the past few years but this year we've come to the conclusion that a wiki's very freeform-ness translates a little too quickly to the execution of our company plans and roadmaps. Hence, we made the decision to make this stuff more rigorous and have settled on SharePoint to track it all.
Of course, there was an ulterior motive to this decision: we get a lot of requests for how to embed our ASP.NET controls into MOSS and what better way to accomplish that than too actually do it and use it ourselves.
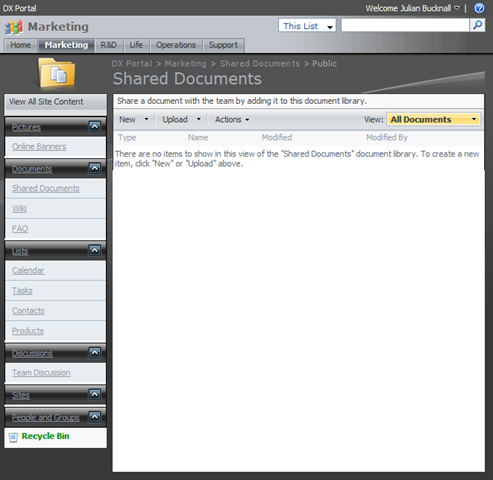
This screenshot shows one of our experiments, one that we're using in the Marketing area of our portal: replacing the standard left-hand navigation bar with ASPxNavBar. It uses our BlackGlass theme and you can see the collapsible headers and sections of the navigation bar quite clearly. And we put it in the Marketing area because they're not the developers, so we'll get some real feedback...
So how's it done? As it happens, replacing an existing navigation pane with an ASPxNavBar is pretty simple: just a matter of dropping an ASPxNavBar control onto the page and binding it to a data source that supplies the quick launch links.
First, we open our site in Microsoft Office SharePoint Designer and check out the default.master page:

We'll manually register the ASPxNavBar and its assembly at the top of the page:
1: <%@ Register assembly="DevExpress.Web.v8.2, Version=8.2.4.0, Culture=neutral,
2: PublicKeyToken=9b171c9fd64da1d1" namespace="DevExpress.Web.ASPxNavBar" tagprefix="dxnb" %>
As you can see, the v2008 vol 2 version of ASPxNavBar will work in MOSS quite nicely; no need to wait for v2008 vol 3.
Now find the default navigation pane <Sharepoint:SPNavigationManager/> named QuickLaunchNavigationManager, and replace it with our ASPxNavBar:
1: <dxnb:ASPxNavBar
2: EnableViewState="false"
3: runat="server"
4: width="100%" >
5: </dxnb:ASPxNavBar>
We'll bind it to the list of quick links via a SiteMapDataSource like so:
1: <asp:SiteMapDataSource
2: SiteMapProvider ="SPNavigationProvider"
3: ShowStartingNode="False"
4: id="MyQuickLaunchSiteMap"
5: StartingNodeUrl="sid:1025" runat="server"/>
6: <dxnb:ASPxNavBar
7: DataSourceID="MyQuickLaunchSiteMap" >
8: </dxnb:ASPxNavBar>
And we are done with the swapping part of the exercise. However, before the control can be used, it must be deployed on the target server and registered with SharePoint as a safe control.
Deploy the following assemblies to your server:
- DevExpress.Web.v8.x
- DevExpress.Data.v8.x
and GAC them. Then open your SharePoint website's web.config file and register them as "safe" by adding the following in the SafeControls section (note that your assembly version may be different).
1: <SafeControl Assembly="DevExpress.Web.v8.2, Version=8.2.4.0, Culture=neutral, PublicKeyToken=9b171c9fd64da1d1"
2: Namespace="DevExpress.Web.ASPxNavBar" TypeName="*" Safe="True" />
3: <SafeControl Assembly="DevExpress.Data.v8.2, Version=8.2.4.0, Culture=neutral, PublicKeyToken=9b171c9fd64da1d1"
4: Namespace="DevExpress.Data" TypeName="*" Safe="True" />
5: Now, onto the problem of applying themes. By far the easiest way to do this is to create a simple web site in Visual Studio, drop the control on the designer, theme it, and then copy/paste the generated theme files and aspx code into your SharePoint web site.
For example drop an ASPxNavBar control on a page and invoke AutoFormat from the smart tag:

Theme it using the BlackGlass theme:

At this point all the necessary theme files will have been generated in the \BlackGlass\Web folder. Copy that folder to your site's "_themes" folder and adjust the paths of the ASPxNavBar control accordingly:
1: <dxnb:ASPxNavBar
2: EnableViewState="false" runat="server"
3: width="100%"
4: DataSourceId="MyQuickLaunchSiteMap"
5: CssFilePath="/marketing/_themes/BlackGlass/Web/styles.css"
6: CssPostfix="BlackGlass"
7: GroupSpacing="3px" ImageFolder="/marketing/_themes/BlackGlass/Web/">
8: <CollapseImage
9: Height="17px"
10: Url="/marketing/_themes/BlackGlass/Web/nbCollapse.gif"
11: Width="18px" />
12: <ExpandImage
13: Height="17px"
14: Url="/marketing/_themes/BlackGlass/Web/nbExpand.gif"
15: Width="18px" />
16: </dxnb:ASPxNavBar>
And that's it. We get the view in the first image above.
We'll be bringing out more information about using our ASP.NET controls in MOSS over the coming days and weeks so that you too will be able to improve the usability of your SharePoint sites. Stay tuned.
Free DevExpress Products - Get Your Copy Today
 Julian Bucknall (DevExpress)