New CodeRush Plug-in: Jump to Implementer

I received a tech support question yesterday asking if there was an easy way to find all the implementers of a particular interface. While CodeRush has a nice Find All References window and a neat Tab to Next Reference feature, it doesn't filter out references to the interface that are used in variable declarations and expressions. So as a result both of those approaches produce more noise than the customer wanted. There is also a Jump to Implementers feature available when you right-click an interface declaration and choose Jump to..., however that feature requires that the caret be on the interface declaration, and is not available on interface references elsewhere in the code.
Fortunately the DXCore framework that CodeRush, Refactor! Pro, and a host of powerful third-party plug-ins are built upon makes adding this feature very easy.
And that's what we'll build right now. This plug-in is going to rely upon functionality that ships with CodeRush, specifically the Jump To menu which is available though a right-click in the editor.
The steps listed here assume you have CodeRush and Refactor! Pro installed.
Creating the Plug-in Project
Inside Visual Studio, from the DevExpress menu, select "New Plug-in...". If you don't have a DevExpress menu or you don't see a "New Plug-in..." menu item, contact support@devexpress.com.

Specify the name of the project and the solution. I'm calling both the project and the solution "CR_JumpToImplementer". Click OK.
The DXCore Plug-in Project Settings dialog appears.

Click OK to accept the default settings.
Next the plug-in project will open in Visual Studio.
Working with the NavigationProvider
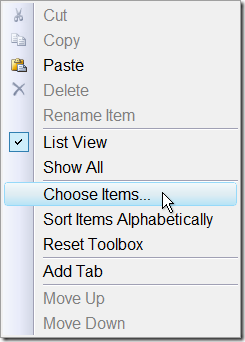
Since we're adding a navigation feature, and we want it to be part of the Jump to menu, we need to drop a NavigationProvider onto the form. The NavigationProvider is a relatively new control, and so it may not appear on the DXCore page of the Toolbox. If you don't see it, activate the DXCore control page, right-click the ToolBox and select "Choose Items..."
In the Filter TextBox enter "navigation" and then place a checkmark next to the NavigationProvider entry.
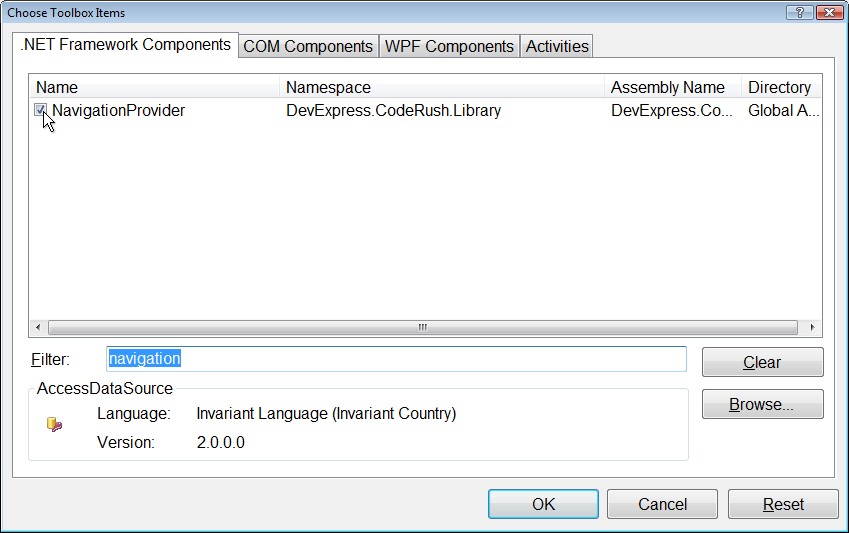
And click OK. Now you'll have the NavigationProvider control on your DXCore page of the ToolBox.
Click the NavigationProvider control...
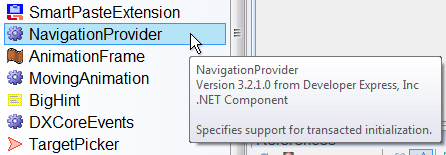
and then click the design surface to add one of these to your plug-in.

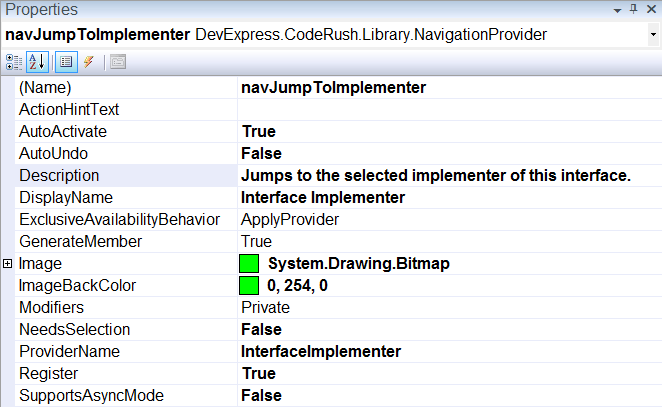
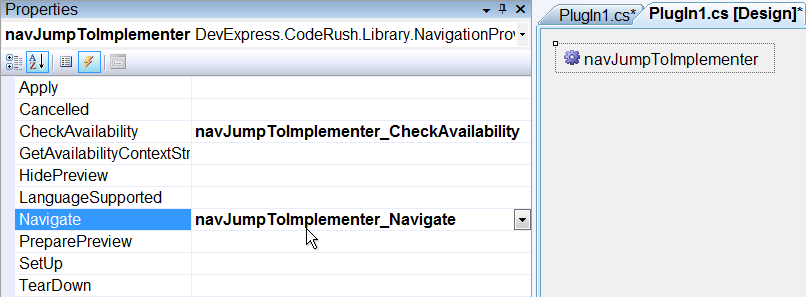
NavigationProvider Properties
| Property | Value |
| (Name) | navJumpToImplementer |
| Description | Jumps to the selected implementer of this interface. |
| DisplayName | Interface Implementer |
| ProviderName | InterfaceImplementer |
The ProviderName identifies our NavigationProvider to the DXCore, and the DisplayName tells the DXCore the text to display in the Jump to menu. The Description text is placed in a hint that explains what will happen when this menu item is selected.
NavigationProvider Events
Next, on the Properties grid click the Events button.
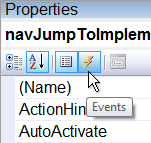
There are two important events we'll need to handle. The first is CheckAvailability, which gives us a chance to find out if our Jump to Implementer navigation feature should be shown in the menu. In our handler for this event, we can check to see if the token at the caret is a reference to an interface.
CheckAvailability
Double-click the CheckAvailability event to generate a handler for it.

Next, we'll write code to determine if the active element (the identifier or reference at the caret) is a reference to an interface. When I need to write code like this in a plug-in, I always create some sample code first that represents the code I want the plug-in to work on, then I move the caret through that sample code and see what it looks like in the Expressions Lab.
The Expressions Lab is a DXCore plug-in that reveals the structure of the code in the editor. It's a direct view into the language-independent parse tree that the DXCore generates with its background compilers. If you don't have the Expressions Lab installed yet, you can download a copy and learn more about it here.
Note: You don't need to install the Expressions Lab to finish writing the plug-in, but it is useful in exploring parse trees and especially comes in handy if you want to write plug-ins that work with source code.
After installing (you will need to restart Visual Studio), bring up the Expressions Lab from the DevExpress menu by selecting Tool Windows | Diagnostics | Expressions Lab.

Next, let's write some simple code to explore. I started with this (added to the end of my Plugin1.cs file):
public interface IMyInterface
{
}
public class MyClass : IMyInterface
{
}
Placing the caret on the second reference to IMyInterface (the one after MyClass) yields the following:
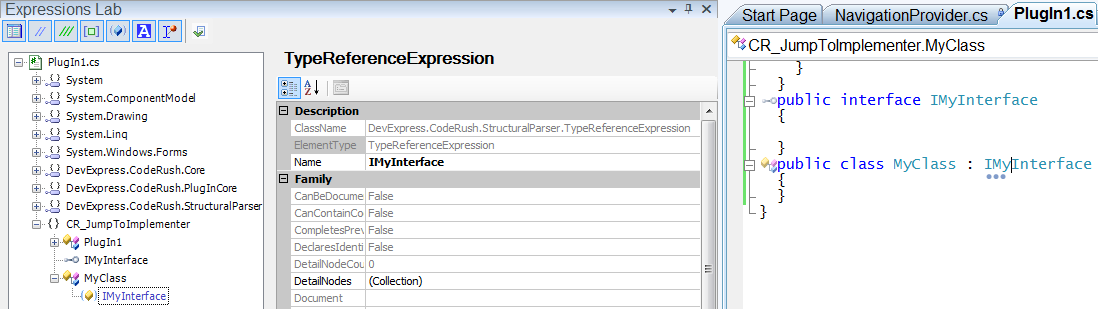
The Expressions Lab shows the value of this element's ElementType property is LanguageElementType.TypeReferenceExpression. We can use this information to start building the code that determines if the active element (the element at the caret) is a reference to an interface. Although ElementType is an enum property, the names of its elements correspond to actual class names inside the DevExpress.CodeRush.StructuralParser namespace. For example, the TypeReferenceExpression is a class that represents a reference to a type (e.g., a class, interface, struct, etc.). The ElementType property is provided on all LanguageElements for performance and other technical reasons.
A few other things we'll need to know before writing this code:
- All LanguageElements have a GetDeclaration method. This returns an IElement representing the declaration.
- The ElementType of an interface declaration is LanguageElementType.Interface. You can verify this in the Expressions Lab by moving the caret onto the IMyInterface declaration.
So armed with this knowledge, our CheckAvailability event handler looks like this:
private void navJumpToImplementer_CheckAvailability(object sender, CheckContentAvailabilityEventArgs ea)
{
if (ea.Element == null)
return;
ea.Available = GetInterfaceDeclaration(ea.Element) != null;
}
Here we're simply setting the Available property to true or false based on whether we've found an interface declaration for the active element (ea.Element). GetInterfaceDeclaration looks like this:
private static IElement GetInterfaceDeclaration(LanguageElement element)
{
IElement declaration;
if (element.ElementType == LanguageElementType.TypeReferenceExpression)
declaration = element.GetDeclaration();
else // We might be on an interface declaration....
declaration = element;
if (declaration != null && declaration.ElementType == LanguageElementType.Interface)
return declaration;
return null;
}
This code checks to see if the ElementType is a type reference, and if so finds the declaration for that interface. If the type of the active element is not a type reference, there is a chance that the type is an Interface, and so the active element is assigned to the declaration local variable. The code in the second if clause checks to see if the declaration variable is in fact a declaration for an Interface. And so if the element passed in is an interface or a reference to an interface, this method will return the declaration of that interface.
So far so good. If we were to run our plug-in right now and test it, we could right-click on interfaces and references to interfaces, select "Jump To...", and then see our "Interface Implementer" menu item. Before we test, however, let's write some code to respond to the menu item being selected....
As previously mentioned, there are two events that you must handle when creating a NavigationProvider. The first event is CheckAvailability, which tells the DXCore if our NavigationProvider's Display Text should appear as a menu item in the Jump to menu. The second event we need to handle is Navigate. This event is called when our menu item is selected.
Navigate
The Navigate event handler is where I want to find all the interface implementers and present those in a window, allowing the developer to select a desired implementer to jump to. So let's add the Navigate event handler.
Activate the Plugin1.cs [Design] surface. Select the navJumpToImplementer control. In the Properties grid (on the Events page) double-click the Navigate event to generate a handler.
There are two things we need to know before we write this code:
- When we call GetDeclaration on a reference to a type, (as opposed to a reference to a variable or member), the result will be an ITypeElement.
- ITypeElement has method called GetDescendants, which returns an array of ITypeElements that descend from or implement that type.
Knowing this, we can start with code like the following:
private void navJumpToImplementer_Navigate(object sender, DevExpress.CodeRush.Library.NavigationEventArgs ea)
{
IElement declaration = GetInterfaceDeclaration(ea.Element);
ITypeElement iTypeElement = declaration as ITypeElement;
if (iTypeElement != null)
{
ITypeElement[] directImplementers = iTypeElement.GetDescendants();
if (directImplementers != null && directImplementers.Length > 0)
{
// TODO: Create the form to show implementers of this interface.
}
else
MessageBox.Show("There are no implementers of the X interface in this solution.");
}
}
In the code above we call our GetInterfaceDeclaration method built earlier, and attempt to cast the result to an ITypeElement. If the cast is successful, we call the GetDescendants method to get a list of all the implementers of this interface.
Notice the string passed to MessageBox.Show is incomplete. that was done intentionally so you could try a cool refactoring we use whenever we need to create strings with substituted parts. The refactoring is called Introduce Format Item.
Select the "X" inside that string, and press the CodeRush/Refactor! key (Ctrl+`). You'll see something like this:
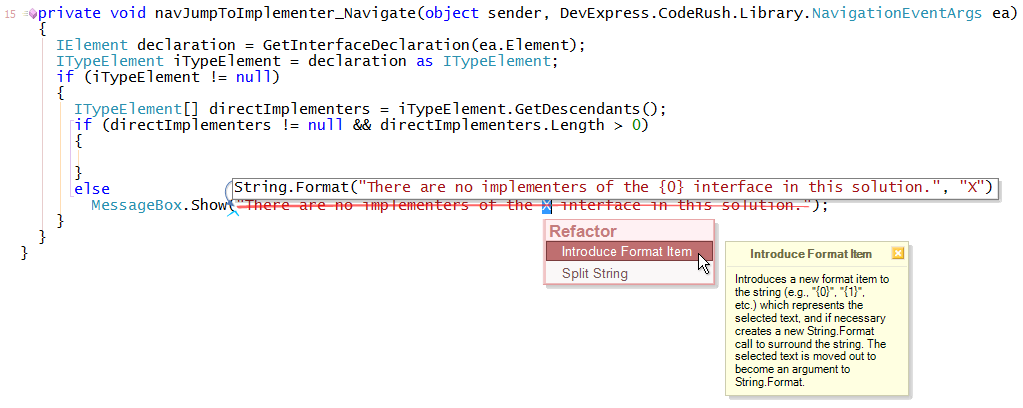
Press Enter to apply the refactoring, and you'll get a new String.Format call. All you need to do is replace the "X" string with declaration.Name, like this:
MessageBox.Show(String.Format("There are no implementers of the {0} interface in this solution.", declaration.Name));
Introduce Format Item is the most efficient way to create strings with substituted parts.
Next, let's create the UI for selecting the implementer to jump to.
Selecting an Implementer
In the Solution Explorer, right-click the project and select Add | "Windows Form...".
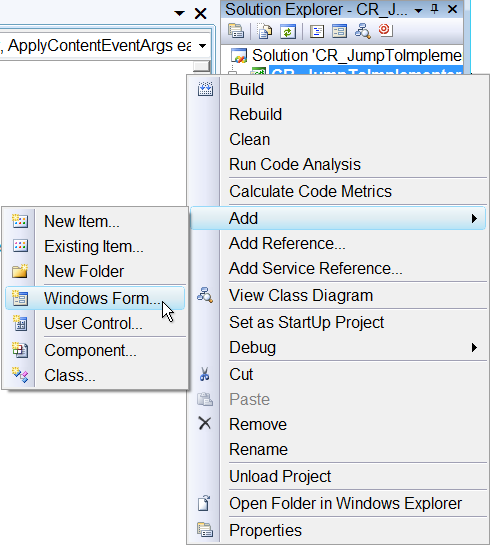
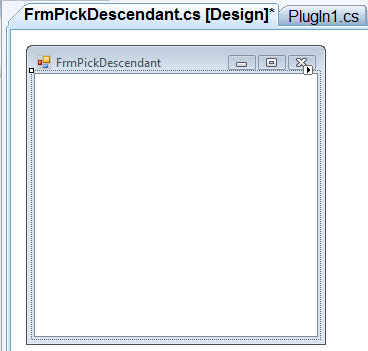
Give this form a meaningful name (like "FrmPickDescendant" -- I'm thinking we might list more than just interface implementers here):

Click "Add".
With the new form active in the designer, change the following values in the Properties grid:
| Property | Value |
| MinimizeBox | False |
| ShowInTaskbar | False |
| Text | Select an Implementer |
While we start with a flat list of all interface implementers, I'm thinking about eventuall showing a full hierarchy, one that shows descendents of the classes that implement the interface (the descendants inherit the implementation so they too are implementers). I want to use a TreeView instead of a ListBox to show the items. So drop a TreeView onto the new form.

Click the TreeView's smart tag and click the Dock in parent container task.

This will dock the TreeView entirely inside the form.
Change the following properties:
| Property | Value |
| (Name) | trvDescendants |
Back in Plugin1.cs, let's add the following code inside our Navigate event handler:
private void navJumpToImplementer_Navigate(object sender, DevExpress.CodeRush.Library.NavigationEventArgs ea)
{
IElement declaration = GetInterfaceDeclaration(ea.Element);
ITypeElement iTypeElement = declaration as ITypeElement;
if (iTypeElement != null)
{
ITypeElement[] directImplementers = iTypeElement.GetDescendants();
if (directImplementers != null && directImplementers.Length > 0)
{
FrmPickDescendant frmPickDescendant = new FrmPickDescendant(directImplementers);
if (frmPickDescendant.ShowDialog(CodeRush.IDE) == DialogResult.OK)
{
// TODO: Jump to the selected Interface implementer.
}
}
else
MessageBox.Show(String.Format("There are no implementers of the {0} interface in this solution.", declaration.Name));
}
}
This code creates a new instance of the FrmPickDescendant class, passing the array of ITypeElements to its constructor. FrmPickDescendant does not yet have a constructor matching this signature, so place the caret on this constructor call, press the CodeRush/Refactor! key (Ctrl+`), and select Declare Constructor, like this:
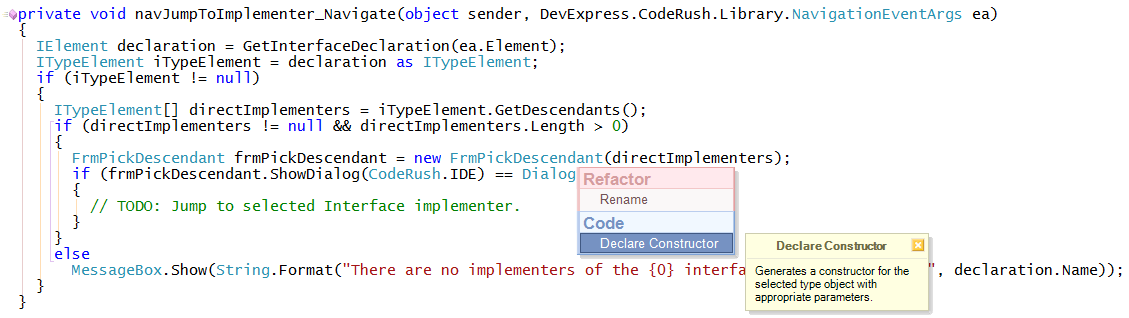
Using the target picker, select a location for the new constructor and press Enter.
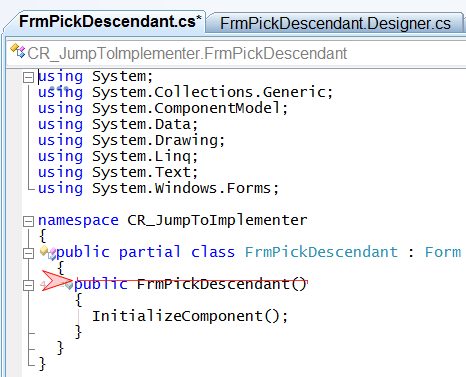
The construction code should look something like this:
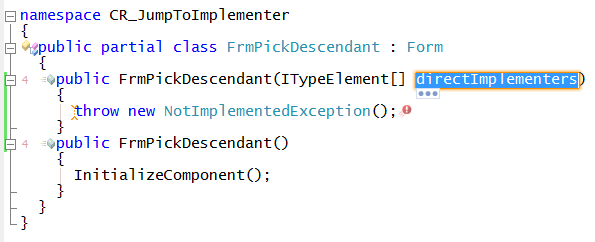
Press the copy key (Ctrl+C or Ctrl+Insert) to copy the directImplementers parameter to the clipboard. Press Enter to accept this suggested parameter name and move the caret onto the first line inside the constructor. Remove that throw statement if it exists (versions of CodeRush later than 3.2 will not by default add this throw statement to newly-built constructors).
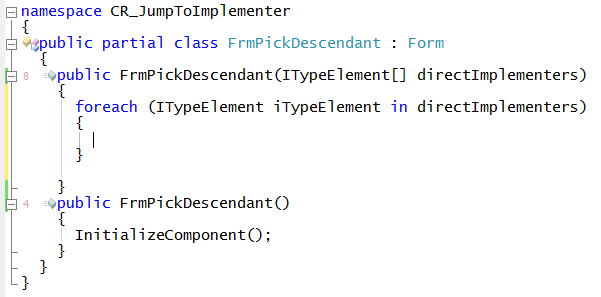
Next we want to iterate through all the passed-in implementers and add each one to the TreeView. So we need a foreach statement. CodeRush includes a template to make this easy, and this template works with identifiers on the clipboard (we have directImplementers on the clipboard right now). So on that same empty line enter "fe"....

Then press the space bar to expand that template. This will produce the following:
Notice that ITypeElement in the screen shots above is not formatted as a class. We need add a namespace reference to the file.
Place the caret on the ITypeElement reference, bring up the smart tag, and choose "using DevExpress.CodeRush.StructuralParser;".

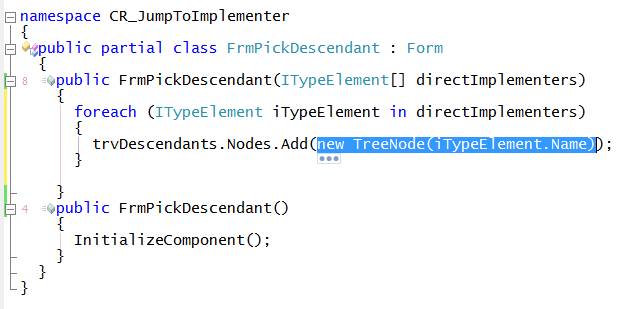
Now inside this foreach loop, add the following line of code:
trvDescendants.Nodes.Add(new TreeNode(iTypeElement.Name));
This will create a new node and set its Text property to the name of each type. Note however that in a complex solution, I may have two or more types with the same name, living in different namespaces. I like the simplicity of listing the types without their corresponding namespace, so we'll need some way to jump to the selected implementer. So for now let's use the Tag property of the TreeNode to store a reference to the implementing element.
With the caret somewhere on on the new TreeNode call, use CodeRush's Selection Increase feature (Num+ or Ctrl+Shift+W) to select the entire "new TreeNode(iTypeElement.Name)" expression....
Press the CodeRush/Refactor! key (Ctrl+`).
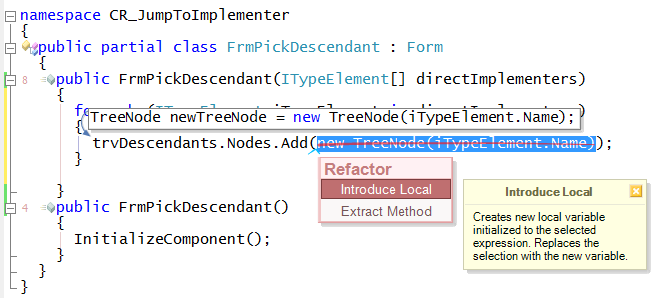
Select Introduce Local and press Enter.
Accept the default name of "newTreeNode" (you can press Enter to break the green links if you like), and add the following line to assign the iTypeElement reference to the TreeNode's Tag:
foreach (ITypeElement iTypeElement in directImplementers)
{
TreeNode newTreeNode = new TreeNode(iTypeElement.Name);
newTreeNode.Tag = iTypeElement;
trvDescendants.Nodes.Add(newTreeNode);
}
Since we added a custom constructor to this Form, we need to make sure we get a call to InitializeComponent in, otherwise the reference to trvDescendants will be null when this code executes. So lets add a call to ": this()" at the end of this new constructor, like this (note -- versions of CodeRush after 3.2 are likely to add this call automatically):
public FrmPickDescendant(ITypeElement[] directImplementers): this()
{
foreach (ITypeElement iTypeElement in directImplementers)
{
TreeNode newTreeNode = new TreeNode(iTypeElement.Name);
newTreeNode.Tag = iTypeElement;
trvDescendants.Nodes.Add(newTreeNode);
}
}
There's one more feature I want to add to this form, and that's the ability to respond to Enter and Escape to accept or cancel the destination. So let's add the following method (parts borrowed from the Clipboard History plug-in):
protected override bool ProcessCmdKey(ref Message msg, Keys keyData)
{
const int WM_KEYDOWN = 0x100;
if (msg.Msg == WM_KEYDOWN)
{
switch (keyData)
{
case Keys.Enter:
this.DialogResult = DialogResult.OK;
return true;
case Keys.Escape:
this.DialogResult = DialogResult.Cancel;
return true;
}
}
return base.ProcessCmdKey(ref msg, keyData);
}
Testing
Now let's run and test what we have so far. From the Debug menu, select Start Debugging. A second instance of Visual Studio will launch. To test this, either open a solution that contains classes that implement interfaces, or create your own. I'm using the following simple sample code to test:
namespace TestApp1
{
public interface IPerson
{
string Name { get; set; }
decimal Salary { get; set; }
void AdjustSalary(decimal amount);
}
public class Person : IPerson
{
public string Name { get; set; }
public decimal Salary { get; set; }
public void AdjustSalary(decimal amount)
{
Salary += amount;
}
}
}
Now, right-click one of the IPerson references in the code, and select "Jump to..."
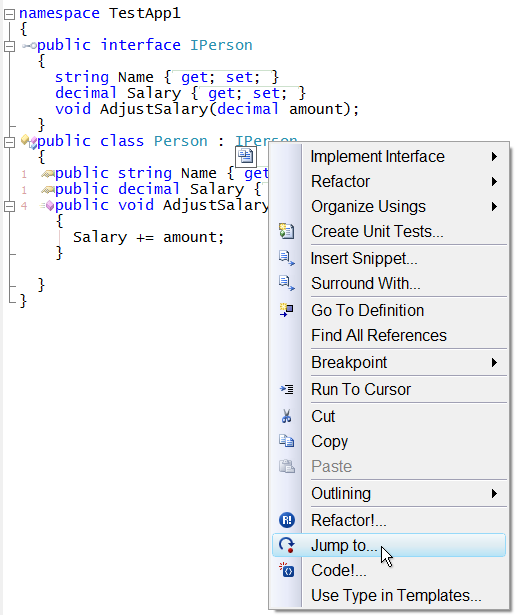
The Jump to menu will appear.
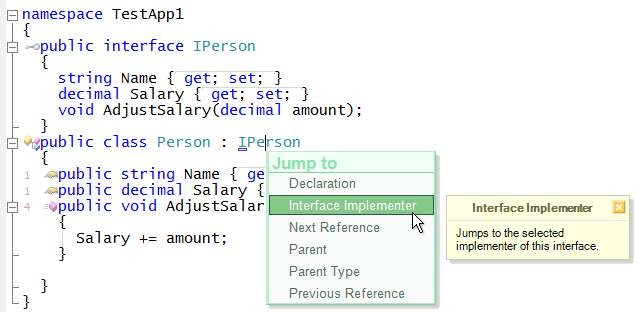
Select "Interface Implementer". Our "Select an Implementer" form will appear.
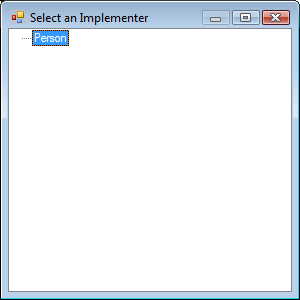
OK, so there's clearly some UI work to be done to improve the experience. However the desired behavior (at least what we've coded so far) appears to be working. Let's make the test code a bit more complex by changing it to the following:
namespace TestApp1
{
public interface IPerson
{
string Name { get; set; }
int Age { get; set; }
}
public class Person : IPerson
{
public string Name { get; set; }
public int Age { get; set; }
}
public class Child: IPerson
{
public string Name { get; set; }
public int Age { get; set; }
}
public class Adult : IPerson
{
public string Name { get; set; }
public int Age { get; set; }
}
public interface IEmployee
{
decimal Salary { get; set; }
void AdjustSalary(decimal amount);
}
public class Employee : Person, IEmployee
{
public decimal Salary { get; set; }
public void AdjustSalary(decimal amount)
{
Salary += amount;
}
}
public class Manager : Employee
{
}
}
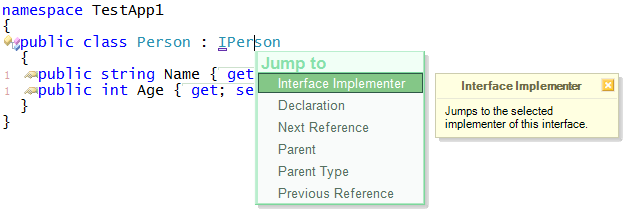
Now right-click one of the IPerson references, bring up the Jump to... menu and select Interface Implementer. You should see something like the following:

In general we appear to be in pretty good shape. We've actually written very little code, and yet already we have the ability to list all direct implementers of a particular interface. Also, because of the DXCore's language-independent parse trees, this functionality will work in all languages supported by the DXCore that also support interfaces, including C#, C++, and Visual Basic. This plug-in will also work in languages that we support in the future without a recompile. That's cool.
So we can list all implementers of an interface, but we're not listing descendants of the direct implementers (consider Employee in the example code above). And of course we still need to add the code to actually move the caret to the selected implementer when the Enter key is pressed. So let's take care of those two things.
Jumping to Selected Implementers
Shut down the instance of Visual Studio we're debugging, and return to the CR_JumpToImplementer project.
First, let's add a property to the FrmPickDescendant form to return the selected node. My first try looks like this:
public ITypeElement SelectedElement
{
get
{
TreeNode selectedNode = trvDescendants.SelectedNode;
if (selectedNode == null)
return null;
return selectedNode.Tag as ITypeElement;
}
}
Next, let's exploit that property inside our Navigate event handler back in PlugIn1.cs, with the following code:
private void navJumpToImplementer_Navigate(object sender, DevExpress.CodeRush.Library.NavigationEventArgs ea)
{
IElement declaration = GetInterfaceDeclaration(ea.Element);
ITypeElement iTypeElement = declaration as ITypeElement;
if (iTypeElement != null)
{
ITypeElement[] directImplementers = iTypeElement.GetDescendants();
if (directImplementers != null && directImplementers.Length > 0)
{
FrmPickDescendant frmPickDescendant = new FrmPickDescendant(directImplementers);
if (frmPickDescendant.ShowDialog(CodeRush.IDE) == DialogResult.OK)
{
ITypeElement selectedElement = frmPickDescendant.SelectedElement;
if (selectedElement != null && selectedElement.Files.Count > 0)
{
CodeRush.File.Activate(selectedElement.Files[0].Name);
CodeRush.Caret.MoveTo(selectedElement.Ranges[0].Start);
}
}
}
else
MessageBox.Show(String.Format("There are no implementers of the {0} interface in this solution.", declaration.Name));
}
}
ITypeElements have a Files property, accessed here, which contains a list of files where the type is declared. In the case of partial classes, this list might include more than one file. We're using the first file in that list. ITypeElements also have a Ranges property that stores where the type starts and ends inside the source code. That property is also indexed (and this index is synchronized with the index of the Files property). So, for example, the values in Ranges[0] correspond to the file in Files[0]. So the new code above gets the selected element, activates the corresponding file and then moves the caret to the start of that type's declaration.
Adding Descendants of Direct Implementers
Let's go back to the FrmPickDescendant form to add the code to list all the implementers of an interface, even those that descend from other classes.
After a bit of refactoring, I've replaced our form's constructor with the following (the signature is the same -- only the body has changed):
public FrmPickDescendant(ITypeElement[] directImplementers): this()
{
AddImplementers(trvDescendants.Nodes, directImplementers);
}
AddImplementers looks like this, and includes a recursive call:
private void AddImplementers(TreeNodeCollection nodes, ITypeElement[] implementers)
{
foreach (ITypeElement iTypeElement in implementers)
{
TreeNode newTreeNode = new TreeNode(iTypeElement.Name);
newTreeNode.Tag = iTypeElement;
nodes.Add(newTreeNode);
// Now add descendants...
ITypeElement[] descendants = iTypeElement.GetDescendants();
if (descendants != null && descendants.Length > 0)
AddImplementers(newTreeNode.Nodes, descendants);
}
}
Note that it's theoretically possible to hit an infinite loop here, if a given nodes structure were to arrive in a corrupted state (something that won't compile), for example the case where two classes descend from each other. While this case is unlikely to come up ever, it's a good idea to write some defensive code to stop this. I'll leave that as an exercise for the reader, offering the hint that I would track the full names of each type added, and in the event of duplicates I would exit before recursively calling AddImplementers.
Testing the Latest Changes
Great. Now let's run and test again....
In the test app (if you've been using the sample test code from before), I suggest applying the Move Type to File refactoring for each type, and applying Rename File to Match Type on the last type remaining in Class1.cs. Doing so produces the following files, as seen from Solution Explorer:

Now right-click an IPerson reference somewhere in the code and select "Jump to...". Select "Interface Implementer".
The Select an Implementer window appears:

The root nodes of the TreeView are the direct implementers of the interface (Child, Person and Adult all implement IPerson). Now we're also listing descendants of these implementers as child nodes.
Select an implementer and press Enter. The corresponding file should activate and the caret should move to the start of the class that implements this interface.
Excellent!
Now, if you're familiar with existing navigation conventions in CodeRush, you have probably realized by now that this experience is not quite as polished as the CodeRush navigation experience. The recommended guidelines for navigation are essentially as follows:
- Drop a Marker (so we can get back easily with Escape)
- Activate the file
- Move the caret (or the selection) to the desired location
- Display a locator beacon if there is no selection (so devs with large monitors can quickly see the new location of the caret)
So far we have implemented steps 2 and 3. Let's add code for steps 1 and 4.
Dropping a Marker
Dropping a Marker at the active caret location is easy. Just call CodeRush.Markers.Drop and pass in the type of the marker desired. In the Navigate event handler inside the PlugIn1.cs file, add the following line of code:
private void navJumpToImplementer_Navigate(object sender, DevExpress.CodeRush.Library.NavigationEventArgs ea)
{
IElement declaration = GetInterfaceDeclaration(ea.Element);
ITypeElement iTypeElement = declaration as ITypeElement;
if (iTypeElement != null)
{
ITypeElement[] directImplementers = iTypeElement.GetDescendants();
if (directImplementers != null && directImplementers.Length > 0)
{
FrmPickDescendant frmPickDescendant = new FrmPickDescendant(directImplementers);
if (frmPickDescendant.ShowDialog(CodeRush.IDE) == DialogResult.OK)
{
ITypeElement selectedElement = frmPickDescendant.SelectedElement;
if (selectedElement != null && selectedElement.Files.Count > 0)
{
CodeRush.Markers.Drop(MarkerStyle.System);
CodeRush.File.Activate(selectedElement.Files[0].Name);
CodeRush.Caret.MoveTo(selectedElement.Ranges[0].Start);
}
}
}
else
MessageBox.Show(String.Format("There are no implementers of the {0} interface in this solution.", declaration.Name));
}
}
Displaying a Locator Beacon
Displaying a Locator Beacon
It turns out displaying a locator beacon is pretty easy as well. There's a control, aptly named LocatorBeacon that we can drop on the plug-in....
Activate the PlugIn1.cs [Design] surface. From the DXCore page of the Toolbox, select the LocatorBeacon control and drop it on the plug-in.
![]()
Change the LocatorBeacon's Color property if you like. I'm changing it to MediumSeaGreen.
Next let's add some code to our Navigate event handler to start the beacon animation. The LocatorBeacon has a Start method that accepts a TextView and a line and column position to be the center of the animation. The Navigate method already references the Start property, which holds line and column information, so let's refactor that a bit, introducing a local variable to use for the Start. After these changes my version of the Navigate event handler look like this:
private void navJumpToImplementer_Navigate(object sender, DevExpress.CodeRush.Library.NavigationEventArgs ea)
{
IElement declaration = GetInterfaceDeclaration(ea.Element);
ITypeElement iTypeElement = declaration as ITypeElement;
if (iTypeElement != null)
{
ITypeElement[] directImplementers = iTypeElement.GetDescendants();
if (directImplementers != null && directImplementers.Length > 0)
{
FrmPickDescendant frmPickDescendant = new FrmPickDescendant(directImplementers);
if (frmPickDescendant.ShowDialog(CodeRush.IDE) == DialogResult.OK)
{
ITypeElement selectedElement = frmPickDescendant.SelectedElement;
if (selectedElement != null && selectedElement.Files.Count > 0)
{
CodeRush.Markers.Drop(MarkerStyle.System);
CodeRush.File.Activate(selectedElement.Files[0].Name);
TextPoint start = selectedElement.Ranges[0].Start;
CodeRush.Caret.MoveTo(start);
locatorBeacon1.Start(CodeRush.TextViews.Active, start.Line, start.Offset);
}
}
}
else
MessageBox.Show(String.Format("There are no implementers of the {0} interface in this solution.", declaration.Name));
}
}
And that wraps up our changes! There are still some minor UI changes I would like to make to the FrmPickDescendant class, including the following:
- Smart positioning of the form near the caret
- Support for double-clicking nodes to accept that node as a target
- Changing the font size to match the size of the font in the editor
- Adding more details, like the name of the interface and namespace hints associated with each node
- Adding a mechanism to filter nodes in the TreeView
However I'll save those changes for another day. For now I think you have an idea of how easy it is to create a NavigationProvider for CodeRush. Let me know if you have any questions, suggestions, or would like to see more step-by-step tutorials like this in the future.
Free DevExpress Products - Get Your Copy Today
Mark Miller (DevExpress)