An Even Easier Way to Create Cross Tab Reports...
***FLASH*** The LA Times reports that Pau Gasol is set to return to the Lakers tonight.
OK - with that, onto business...
Last week, I wrote the following blog post about creating cross tab reports with the XtraReports Suite. In a previous post, I discussed how much I hate creating reports and the importance of bringing one's UI to the printed page to radically reduce the number of reports one would otherwise have to create manually. If you have not read these posts, you might want to take a quick look now before proceeding...
As you know, XtraReports is an industrial strength reporting solution and creating cross tab reports with it is a piece of cake...In my last blog post, I gave you step by step instructions on creating a cross tab report with the XtraReports Suite. With this post, I want to show you how to use the XtraPivotGrid and the XtraPrinting System together to replicate what we did with XtraReports.
Why you ask - why bother describing the latter when I already showed you how to do the former? For me, the answer to this question is quite simple. If I can deliver an intuitive UI which gives users the ability to mine and dissect data - AND - allow them to render what they see on screen to paper, then I've made my application more usable, improved my end-user's experience, and reduced my workload.
Onto the demo...
Our first step is to create a form that contains the XtraPivotGrid within it...so...
-
Start Visual Studio
-
Create a new Windows Application
-
Open the Toolbox pane and then drag & drop the PivotGridControl from the DX: Win.v8.1 toolbox tab onto the Form1.
Binding Data
-
Invoke the Smart Tag for the PivotGridControl (select the control and then click the arrow icon in its top-right corner).
-
In the Smart Tag, select the Choose Data Source property and click the Add Project Data Source… link.
-
Choose the Database type, click Next.
-
Set the Data Connection to the nwind.mdb file, which is used in XtraReports demos. For this, click New Connection, set the Microsoft Access Database File (OLE DB) as the Data source, click Browse and locate the nwind.mdb file on your drive. Click Ok, then Next.
-
Click No to leave data source at its original location. Click Next.
-
Choose the SalesPerson view, and click Finish. Now the PivotGridControl is bound to the SalesPerson view (its Data Source is set to nwindDataSet1).
Adding Fields
-
In the PivotGridControl's Smart Tag, click the Run Designer… link.
-
Click the Retrieve Fields button.
-
Switch to the Layout section in the navigation bar on the left.
-
Drag & drop the CategoryName and ProductName fields to the Row Fields area.
-
Drag & drop the Country and SalesPerson fields to the Column Fields area.
-
Drag & drop the Quantity and ExtendedPrice fields to the Data Items area.
-
Click Apply. Close the editor.
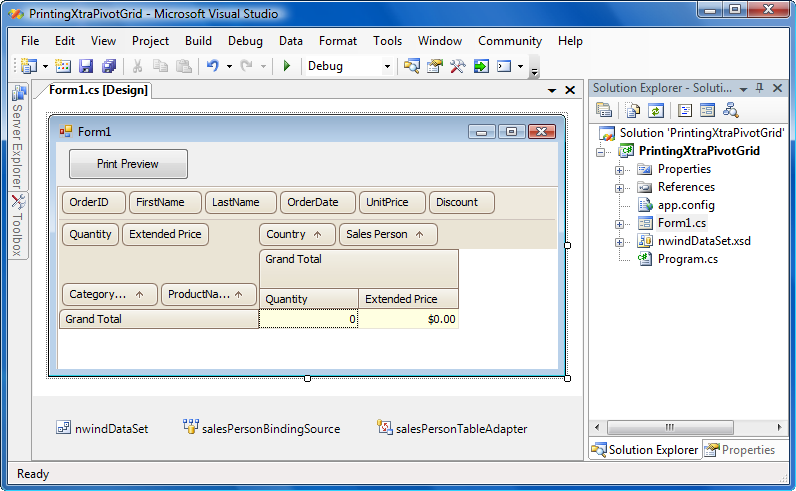
What you should now be able to see is the following
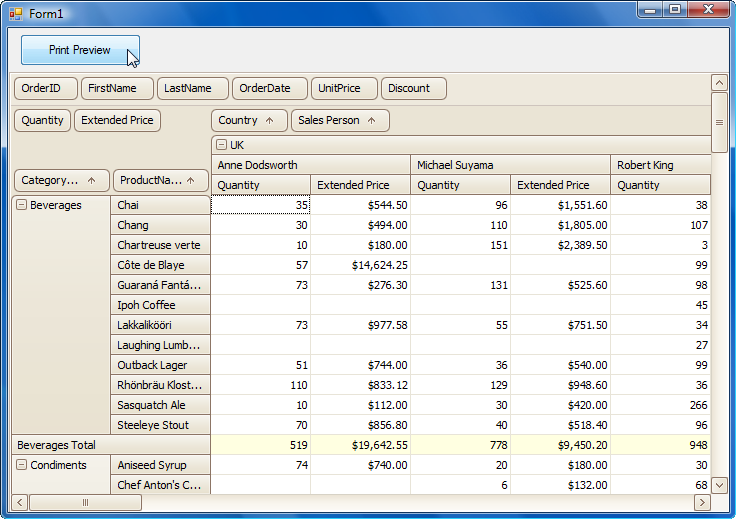
And here's what you should see at runtime...
Rendering to Paper
To invoke the Print Preview of a Pivot Grid, add this code to the Click event of a button on your form:
Run the application - press the button with the event handler above and you should see something this:
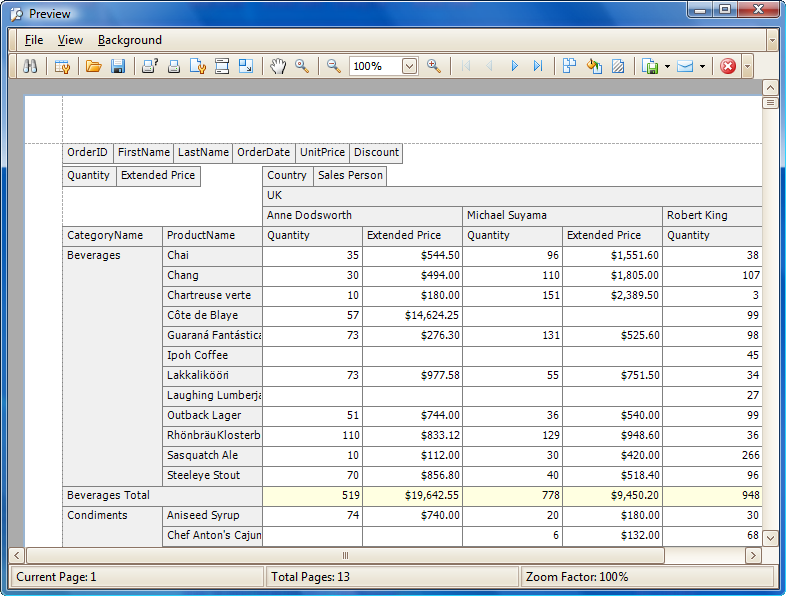
Of course, your user's will be able to drill-in and out as needed with your UI. They will be in control and once they've created the appropriate snapshot, the XtraPrinting System will take care of the rendering.
All of these products are included in our DXperience package - making it one heck of a value if I do say so myself. Pound for pound, Im convinced nothing comes close (of course Im biased, but you can always Download, Compare, then Decide for yourself).
GO LAKERS!
Free DevExpress Products - Get Your Copy Today
 Ray Navasarkian (DevExpress)