For a while now, DevExpress has delivered a Web API Service component out of the box. This service supports some of the existing XAF framework functionality, but it is meant to be used as a stand-alone element of an application system. There are many plans and requests for the service, and we expect things to keep moving quickly in the future.
I was curious to see for myself what the current state is, and I decided to create an app using JavaScript, but not DevExtreme, and to evaluate the state of the Web API service from this “outside” perspective. I was able to feed back my experiences to the team, and they asked me to document what I had done so others can benefit.
I decided to do this in some detail so you can follow along, but I also created “versions” of my sample project as I went along, so you can use those to check out the individual states without having to recreate everything for yourself. If you plan to walk through my description yourself, please be aware that my path may be less than straight on occasion!
The full source code for this stage of the demo process is available in the branch stage-1 of the repository. You can access it by clicking this link. The instructions below still apply even if you run directly from the repo — you will need to create a .env file as described, and run the sample using the Docker setup provided. Side note: we have recently published a sample along similar lines for .NET MAUI (please follow this link to read the blog post).
Table of Contents
Get started with a new project
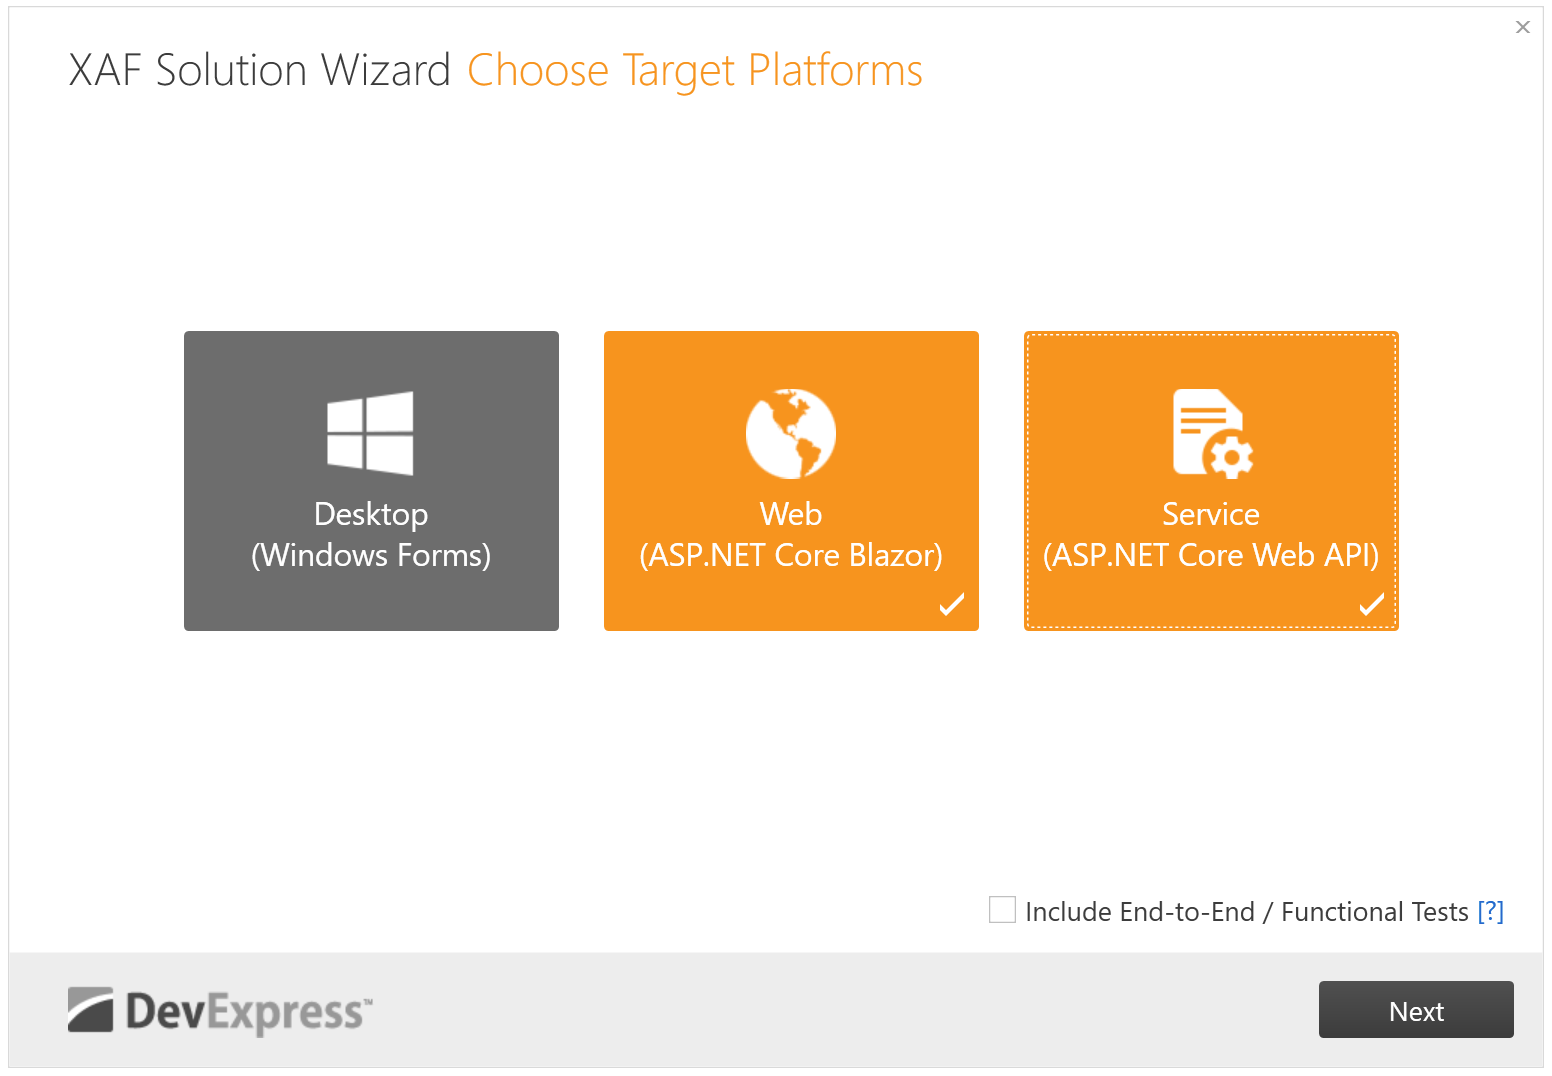
Begin this walkthrough in the simplest possible way, by creating a new project with the help of the Visual Studio wizard. Select the XAF Solution Wizard and choose both the Blazor frontend and the Web API service from the dialog Choose Target Platforms, and stick to Entity Framework Core as the ORM tool.
Note that the XAF Solution Wizard is the starting point for Web API projects at this time, but the Web API approach does not tie you to the XAF ecosystem.
On the page Choose Options, select the radio button titled Standalone (Separate Projects) so that the Web API will not be integrated in the Blazor app. For the purposes of this demo, we want the Web API separate. Being able to run the Blazor app as well is a bonus because it will enable you to use the standard auto-generated UI to work with the sample app as you go along, or to compare the standard implementation with your custom UI.
Leave the Authentication selection on None for the time being. I will later document how to add authentication support to the project, but it is easier to get started without the extra complexity.

Leave the default selection active on the Choose Additional Modules page and click Finish to create the project.
Before moving on, I suggest you change the three newly created projects to use .NET 7. Unless you have specific reasons to stick to .NET 6, which is currently chosen by default, going with the newer version is a good recommendation.

Please make sure to change this setting for all three projects! You can either use the Visual Studio Properties view for each project, or change the TargetFramework line in the project file manually.
Optional: use Docker as a development runtime
In the sample scenario, I set up the project so that I can develop and run it independently of the usual Windows Visual Studio environment. I described this process independently in the post Develop a DevExpress XAF and Web API Solution in Docker. If you are following along, you can find the required steps there to evolve your own sample to the same state as the demo repository.
Add a Svelte Kit frontend app
Creating a JavaScript app to access data from the Web API service was the whole point of the exercise, and we have finally reached that point! There is much more to come, but as a starting point please add a Svelte Kit app to the repository now. Here are the steps to do this.
You will need an installation of Node.js. Instructions and installers are available on the website, or you may have this already since it can even be installed automatically by Visual Studio. If you work with Node.js seriously, I recommend using nvm, the Node Version Manager. It is easy to install — a single command on any Mac, Linux machine, or Windows using WSL, and then you can choose any Node.js environment and manage versions side by side as required.
For commands related to Node.js package management, I will show the use of the pnpm package manager. You can substitute npm or yarn commands if you prefer. Starting from a basic Node.js or nvm installation, pnpm can be added with a simple npm i -g pnpm.
Set up the project
On the repo level, create a new project svelte-frontend and add packages for Tailwind CSS. I typically enjoy working with Tailwind as a utility CSS library, so I recommend it here — of course Svelte has powerful built-in style handling, so feel free to leave this out if you’d like to configure styles without Tailwind.
> pnpm create svelte@latest svelte-frontend

# ... choose "skeleton project", then "JavaScript with JSDoc",
# activate "ESLint" and "Prettier"

> cd svelte-frontend
> pnpm i -D tailwindcss postcss autoprefixer
> pnpm tailwind init -p --esm
Now make the required modifications to use Tailwind. Detailed instructions for this can be found on the Tailwind website.
Edit svelte.config.js and add the vitePreprocess config:
import adapter from '@sveltejs/adapter-auto';
import { vitePreprocess } from '@sveltejs/kit/vite';

/** @type {import('@sveltejs/kit').Config} */
const config = {
    kit: {
        // adapter-auto only supports some environments, see https://kit.svelte.dev/docs/adapter-auto for a list.
        // If your environment is not supported or you settled on a specific environment, switch out the adapter.
        // See https://kit.svelte.dev/docs/adapters for more information about adapters.
        adapter: adapter()
    },
    preprocess: vitePreprocess()
};

export default config;
Adjust the content value in tailwind.config.js like this:
/** @type {import('tailwindcss').Config} */
export default {
  content: ['./src/**/*.{html,js,svelte,ts}'],
  theme: {
    extend: {},
  },
  plugins: [],
}
Change the plugins setting in postcss.config.cjs so that Tailwind supports the use of nested elements in style tags.
export default {
    plugins: {
        'tailwindcss/nesting': {},
        tailwindcss: {},
        autoprefixer: {}
    }
};
Add src/app.css and load the Tailwind layers:
@tailwind base;
@tailwind components;
@tailwind utilities;
Finally, create src/routes/+layout.svelte and load the new app.css from there:
<script>
    import '../app.css';
</script>

<slot />
Edit src/routes/+page.svelte and add a few Tailwind classes to the h1 element to check that Tailwind is active.
<h1 class="font-bold text-2xl">Welcome to SvelteKit</h1>
<p>Visit <a href="https://kit.svelte.dev">kit.svelte.dev</a> to read the documentation</p>
Now you can run the project, just to see that everything works so far:
svelte-frontend > pnpm run dev
Navigate to http://localhost:5173 to bring up the dev preview.

Add the project to the Docker configuration
Create the file svelte-frontend/Dockerfile:
FROM node:lts

RUN apt-get update
RUN apt-get install -y wait-for-it
RUN npm i -g pnpm

WORKDIR /src
COPY . ./
RUN chmod +x /src/start.sh

CMD ["wait-for-it", "-t", "0", "webapi:5273", "--", "/bin/sh", "/src/start.sh"]
The structure is very similar to that used by the Blazor and Web API projects, but the base image is different due to the Node.js requirement.
Create the file svelte-frontend/start.sh:
#!/bin/sh

# Remove old files to avoid conflicts
rm -rf /src/.svelte-kit /src/node_modules /src/.pnpm-store /.pnpm-store
pnpm config set store-dir /.pnpm-store
pnpm config set node-linker hoisted
pnpm config set symlink false
pnpm i
pnpm run dev
Create the file svelte-frontend/.dockerignore. Similar to the Blazor and Web API projects, you can prevent copying large folder structures that will be recreated inside the container anyway.
.svelte-kit
node_modules
.pnpm-store
Edit vite.config.js and add the server setting, so that the process listens to all network interfaces inside the Docker container.
import { sveltekit } from '@sveltejs/kit/vite';
import { defineConfig } from 'vite';

export default defineConfig({
    plugins: [sveltekit()],
    server: {
        host: '0.0.0.0'
    }
});
Now edit docker-compose.yml and add a service block called svelte. It does not matter where it is added in relation to the other three blocks, but make sure to indent it correctly so that the block name svelte lines up with the blocks sql, webapi and blazor.
  svelte:
    build: ./svelte-frontend
    depends_on:
      - webapi
    ports:
      - '5173:5173'
    volumes:
      - ./svelte-frontend:/src
Make sure you don’t have the previous instance of the Svelte Kit project running anymore, so that port 5173 is available. Then repeat the command from earlier. Again, a full rebuild is not strictly required, but using the same command is convenient.
> docker compose up --build -d
Access http://localhost:5173 again, and now the Svelte Kit app should come up from the container.
Add the first data view to the Svelte Kit app
Finally you can now see data in the Svelte Kit based JavaScript app. This is what we will build upon in further posts, so the starting point is simple. Begin by adding the file svelte-frontend/src/routes/saleProducts/+page.server.js. It implements a simple load function that accesses the Web API service using its OData endpoint, and retrieves the data in JSON format.
export function load({ fetch }) {
    const odataUrl = `http://webapi:5273/api/odata/SaleProduct`;

    const dataSource = fetch(odataUrl)
        .then((res) => res.json())
        .then((res) => res.value);

    return { dataSource };
}
Now add +page.svelte in the same folder. Use this code to display the loaded data in a table. Of course this could be a bit shorter as a minimal implementation — some careful error handling is already in place here, as well as basic styling.
<script>
    export let data;
    $: ({ dataSource: saleProducts } = data);
</script>

<h2 class="font-bold text-xl">Data: Sale Products</h2>

<table class="border-separate w-full">
    <tr>
        <th class="text-left">Name</th>
        <th class="text-right">Price</th>
    </tr>
    {#await saleProducts}
        <tr class="placeholder"><td colspan="2">Waiting for data</td></tr>
    {:then dataSourceContent}
        {#if dataSourceContent && Array.isArray(dataSourceContent)}
            {#each dataSourceContent as item}
                <tr>
                    <td class="text-left">{item.Name}</td>
                    <td class="text-right">{item.Price}</td>
                </tr>
            {/each}
        {/if}
    {/await}
</table>

<style lang="postcss">
    td,
    th {
        @apply px-2 py-1;
    }
    th {
        @apply bg-blue-300 cursor-pointer select-none;
    }
    td {
        @apply border border-gray-200;
    }
    tr.placeholder {
        @apply bg-gray-200;
    }
</style>
In most cases, the running development server for the Svelte Kit app will pick up your changes without restart. Navigate to http://localhost:5173/saleProducts to see the data table! In case something doesn’t seem right, you can use Docker Desktop to quickly restart the container, which may occasionally help if packages have been added or larger configuration changes are not recognized correctly.

Refactor for reusability
In preparation for further posts, which will go deeper into topics around data retrieval, I’ll describe a few steps you can take now to refactor the code of the initial data view.
First, create a file src/lib/DataTable.svelte. The lib folder will probably not exist yet, if you started with a skeleton project. It is typically used in a Svelte Kit app for components that are not part of the routing structure.
Add this code to the file, which is a more flexible version of the table rendering code that was previously used above. It supports field definitions passed from the outside, and it can detect various error states and display information accordingly.
<script>
    export let dataSource;
    export let fields;
</script>

<table class="border-separate w-full">
    <tr>
        {#each Object.keys(fields) as f}
            <th class={fields[f].class}>{f}</th>
        {/each}
    </tr>
    {#await dataSource}
        <tr class="placeholder"><td colspan="2">Waiting for data</td></tr>
    {:then dataSourceContent}
        {#if dataSourceContent && Array.isArray(dataSourceContent)}
            {#each dataSourceContent as item}
                <tr>
                    {#each Object.keys(fields) as f}
                        <td class={fields[f].class}>{item[f]}</td>
                    {/each}
                </tr>
            {:else}
                <tr class="placeholder empty">
                    <td colspan={Object.keys(fields).length}>Empty list</td>
                </tr>
            {/each}
        {:else}
            <tr class="placeholder debugging">
                <td colspan={Object.keys(fields).length}>
                    Unknown dataSourceContent content (debugging): <code
                        >{JSON.stringify(dataSourceContent)}</code
                    >
                </td>
            </tr>
        {/if}
    {:catch e}
        <tr class="placeholder error">
            <td colspan={Object.keys(fields).length}>Error: {e}</td>
        </tr>
    {/await}
</table>

<style lang="postcss">
    td,
    th {
        @apply px-2 py-1;
    }
    th {
        @apply bg-blue-300 cursor-pointer select-none;
    }
    td {
        @apply border border-gray-200;
    }
    tr.placeholder {
        @apply bg-gray-200;
    }
    tr.empty {
        @apply bg-yellow-200;
        td {
            @apply text-center p-4;
        }
    }
    tr.error {
        @apply bg-red-200 font-bold;
    }
</style>
Now you can update the file src/routes/saleProducts/+page.svelte, which is a lot shorter than before since it uses the DataTable component.
<script>
    import DataTable from '$lib/DataTable.svelte';

    export let data;
    $: ({ dataSource } = data);

    const fields = {
        Name: { class: 'text-left' },
        Price: { class: 'text-right' }
    };
</script>

<h2 class="font-bold text-xl">Data: Sale Products</h2>

<DataTable {dataSource} {fields} />
Add navigation elements
As a final change for this post, the demo can be made more accessible by providing top-level navigation elements. For the time being, you’ll need just one.
Start by emptying the file src/routes/+page.svelte. It should remain in place so that the main page of the app can be accessed, but the placeholder text created by the Svelte Kit template is not needed. Of course, instead of emptying it, you can add your own welcome text!
Then adjust the code in src/routes/+layout.svelte like this:
<script>
    import '../app.css';
</script>

<h1 class="text-2xl mt-4 mb-8 text-center">DevExpress Web API Service from a Svelte App</h1>

<div class="w-9/12 max-w-prose m-auto">
    <nav class="mb-8 flex gap-2">
        <a href="/saleProducts">Sale Products</a>
    </nav>

    <slot />
</div>

<style lang="postcss">
    a {
        @apply bg-blue-200 px-4 py-1 rounded hover:bg-orange-200;
    }
</style>
With these changes in place, your app will display its content in an improved format. Additionally, if you access http://localhost:5137, i.e. the root URL of the app, you will see a navigation button that leads to the /saleProducts URL. This makes the demo more usable!

Conclusion
This completes the stage-1 step of the demo. Again, you can find the repository branch at this link.
Please feel free to send comments and ideas! Additional steps are already complete and I will write posts about them soon. The next item coming up will be the addition of sort and filter features to the data view. Thanks for reading!
Your Feedback Matters!
Please take a moment to reply to the following questions – your feedback will help us shape/define future development strategies.
Free DevExpress Products - Get Your Copy Today
The following free DevExpress product offers remain available. Should you have any questions about the free offers below, please submit a ticket via the
DevExpress Support Center at your convenience. We'll be happy to follow-up.