In
the first part of this post series, I described how to set up a Svelte Kit project to load data
from the
DevExpress Web API service. I started at the beginning, and the sample ended with a very
simple data overview — please check out
the branch “stage-1” in the GitHub repository
for the code from the first post.
For this second part, I decided to improve my simple data
visualization by making an important step: I want to integrate
information from the type and setting metadata behind the Web
API service for dynamic UI localization of the JavaScript
client. Here is
the branch “stage-2” in the GitHub repository, which includes the changes described in this post. Side note: we have recently published a sample along similar
lines for .NET MAUI.
Please follow this link to read the blog post.
Table of Contents
A built-in storage for application-wide type, behavior and UI settings
The
Application Model
is well known to XAF developers; it’s a data structure which is
auto-generated by extracting metadata from persistent types and
other sources, which can then be overridden selectively by
developers. The framework identifies business model classes and
several other supported types, analyzes them and builds
metadata. That metadata is the Application Model, and it can be
customized by applying Model Diffs. For example, the Module
project in the sample repository includes a file called
Model.DesignedDiffs.xafml. Below you’ll find an
example where this file is edited manually, but in Visual
Studio you can also bring up the visual Model Editor by
double-clicking this file. It is also possible to store XAFML
settings in a database, which is the default used for
XAF Blazor and WinForms UI apps
since it allows application admins to manage settings for
different user roles at runtime.
For this demo, the most obviously relevant information relates
to the data you see on screen. There are field names displayed
in table column headers, and the type name of the data (i.e.
SaleProduct) is also used in the UI. The
Application Model already includes metadata about known types
and their properties, and even in simple cases it is useful to
retrieve details like field captions from that store because
they are “prettified” by applying capitalization and adding
spaces. The Application Model allows translation of field and
type names, as well as any custom identifiers you may need (you
can define custom localization items under the
Localization node in the Model Editor).
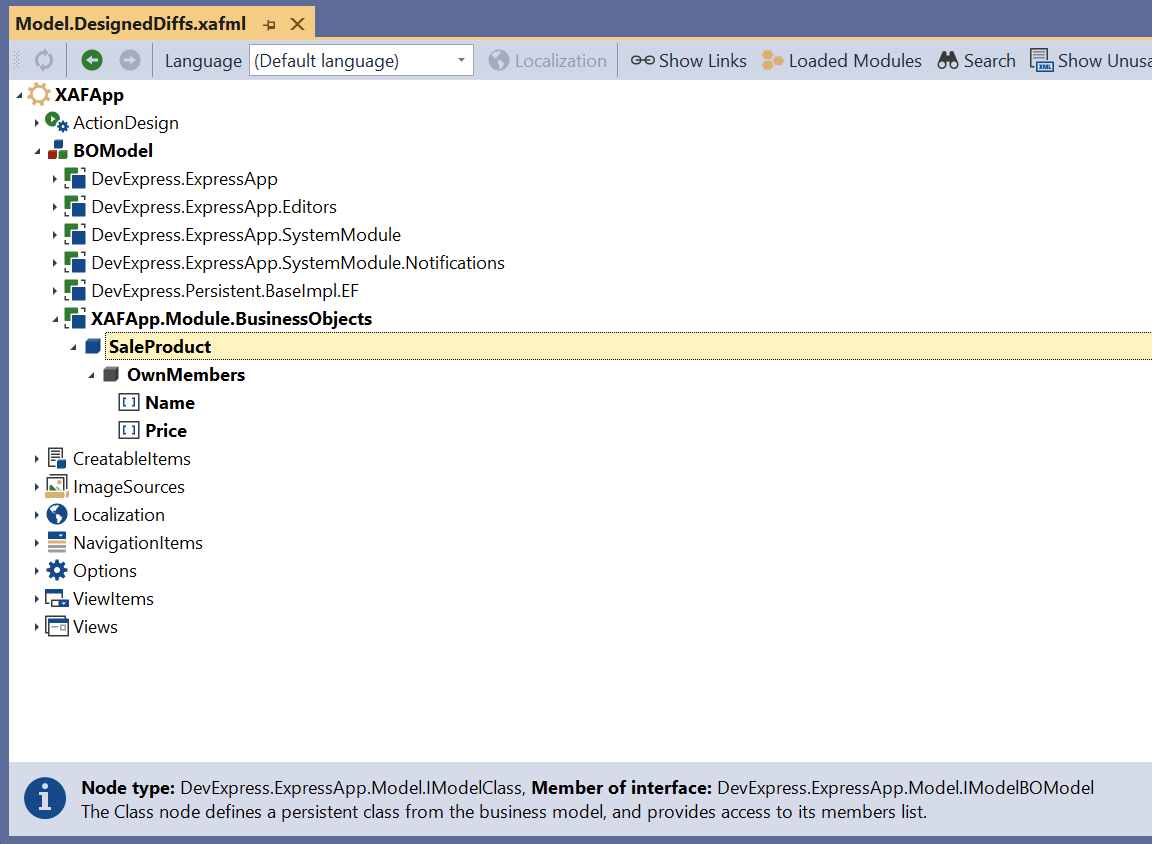
Since the sample data type SaleProduct only has
two properties called Name and Price,
I begin by introducing a “Model Diff” that customizes these
names for test purposes. If you’re working along, edit the file
Model.DesignedDiffs.xafml in the
Module project and change it to be similar to
this:
<?xml version="1.0"?>
<Application Title="XAFApp">
  <BOModel>
    <Class Name="XAFApp.Module.BusinessObjects.SaleProduct">
      <OwnMembers>
        <Member Name="Name" Caption="Product Name" />
        <Member Name="Price" Caption="Product Price" />
      </OwnMembers>
    </Class>
  </BOModel>
</Application>
Both fields are assigned custom captions in this small snippet.
To test that this change is recognized by the Web API service,
you can use the Swagger UI. With your service running, access
http://localhost:5273/swagger in the browser and
find the entry for /api/Localization/ClassCaption.
Click the button Try it out and enter the name of the
class in the field classFullName:
XAFApp.Module.BusinessObjects.SaleProduct. Click
Execute and you’ll see the result: “Sale Product”. The
space has been inserted by the service — it works!
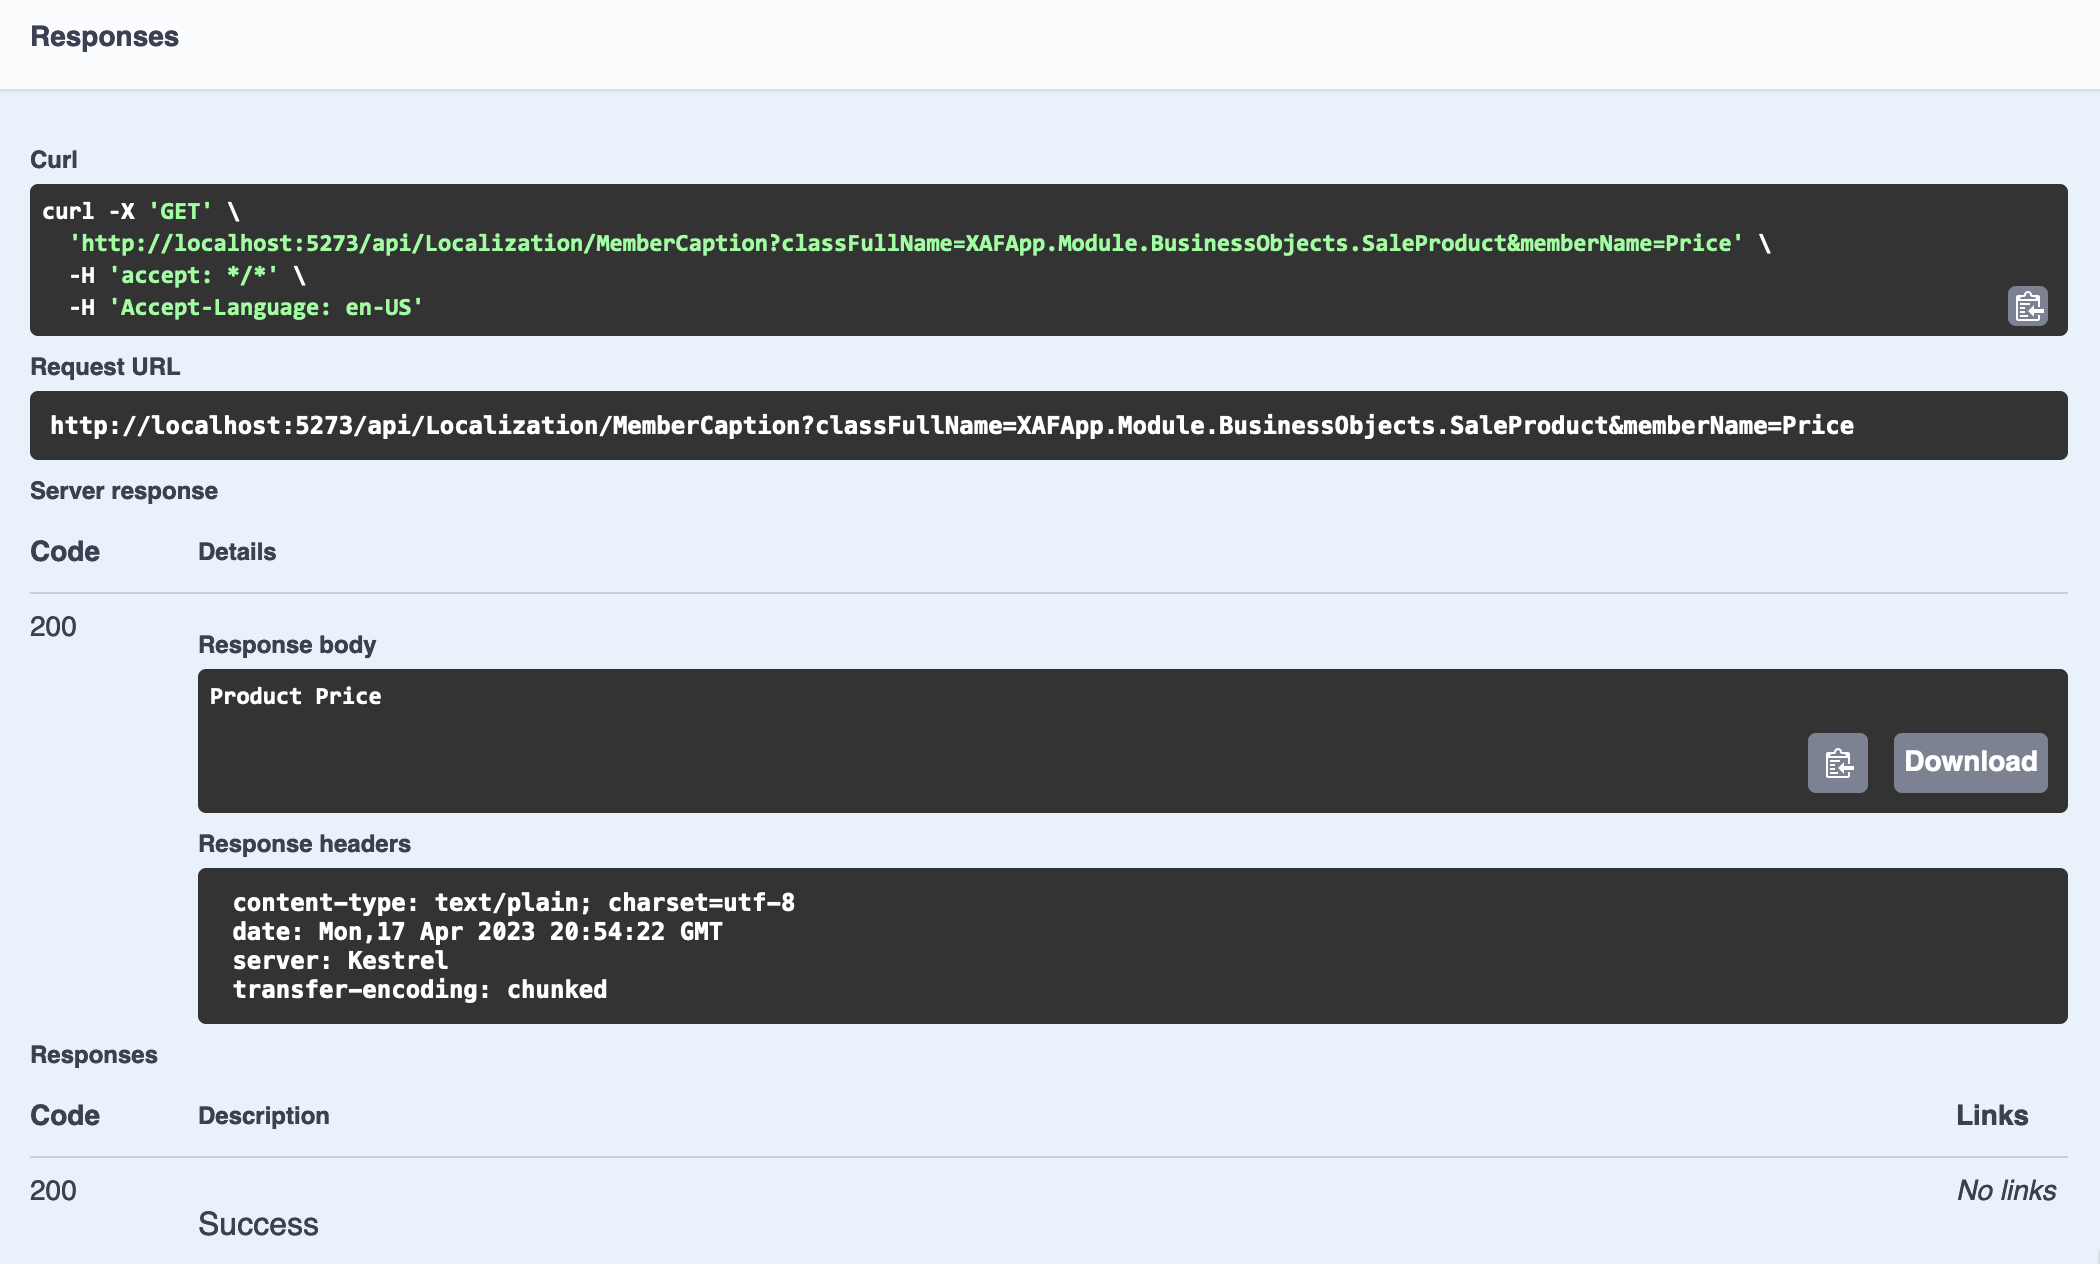
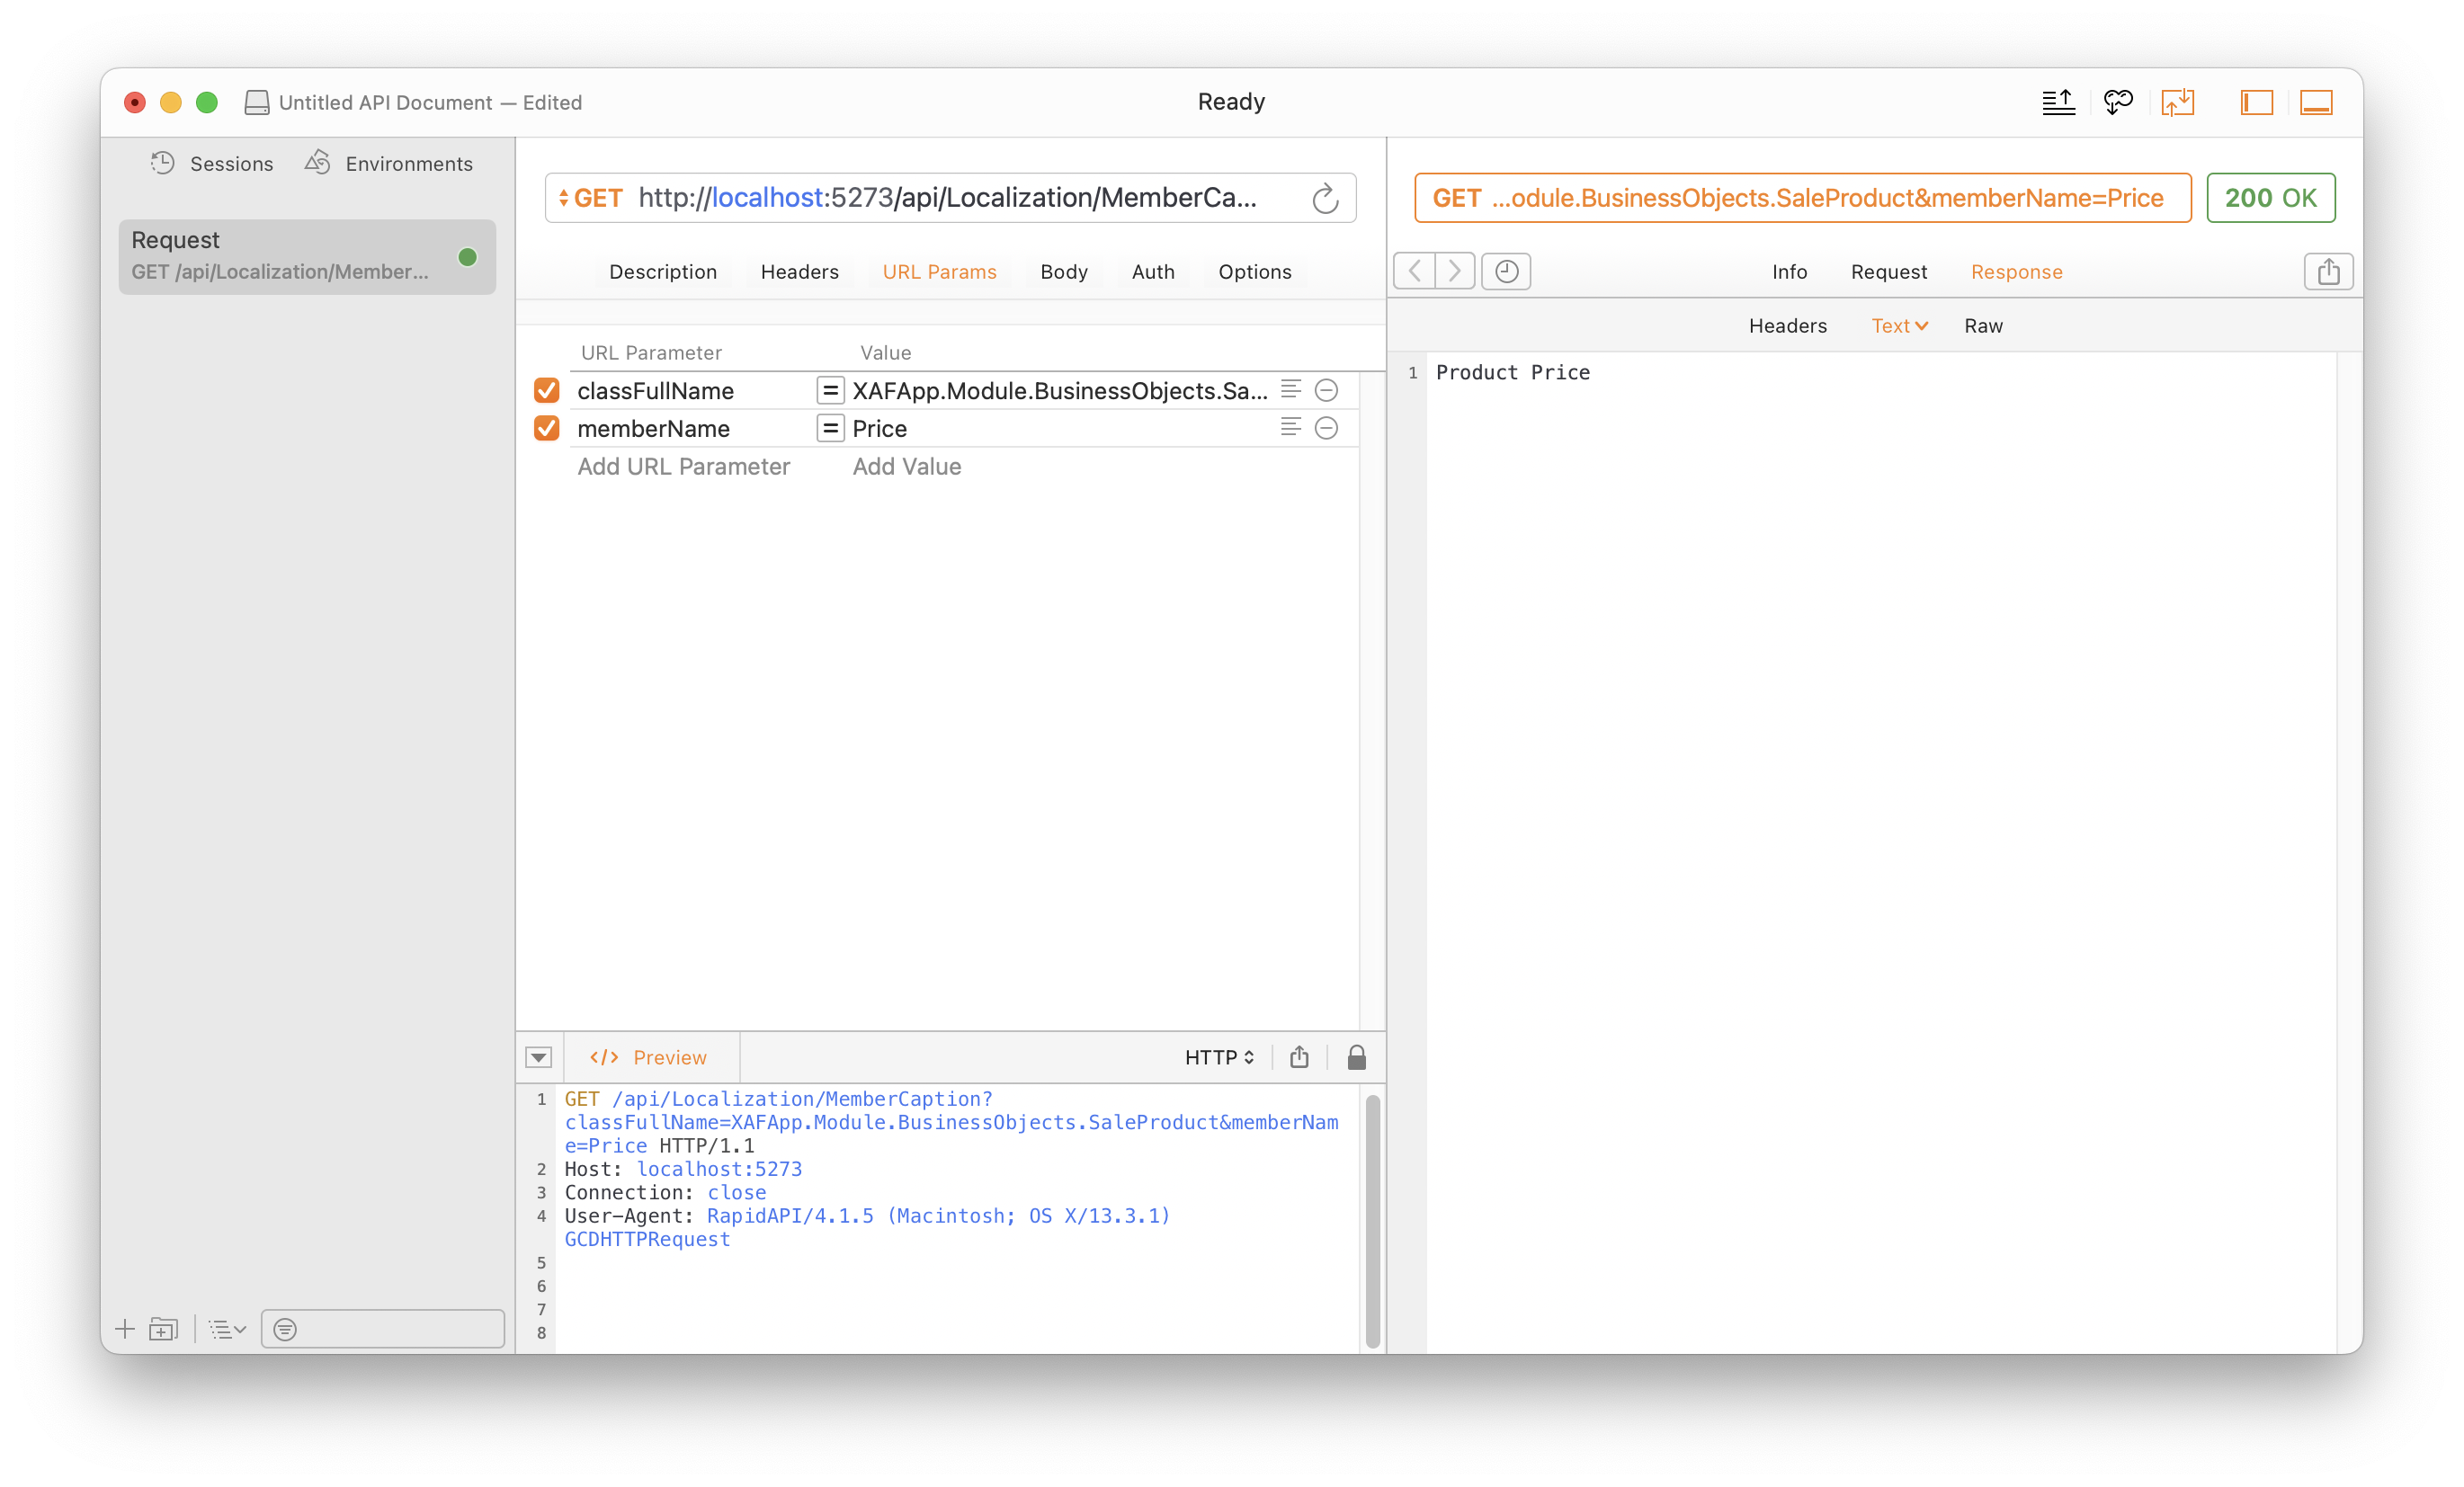
Now use the endpoint
/api/Localization/MemberCaption, repeat the class
name as before and try Name and
Price for the memberName. You will
receive the customized captions “Product Name” and “Product
Price”, which you configured in the Model Diffs.
Of course you can use a tool like curl to run
queries like these (the Swagger UI shows example commands for
curl). Other tools are popular to test APIs,
including Postman and
RapidAPI.
Note that the service endpoints seem to support the
Accept-Language header to pass the localization
language. In tests I found that this does not work correctly in
some environments, including the Docker/Linux based runtime I
used for the demo project. However, this issue will of course
be fixed, and then you will be able to take advantage of
Application Model-based localization features
and retrieve localized strings correctly through the Web API
service endpoints.
In order to display several fields in the UI of the Svelte app,
like the overview page does, it is necessary at this time to
make numerous requests to the Web API. This is a situation that
may see improvements in the future, but in the meantime we need
to make one request per field, plus one for the type itself,
and perhaps additional ones to retrieve other bits and pieces
of information. Additionally, we need to retrieve structural
metadata before we can call the various field- and
type-specific endpoints!
It may be necessary, as you’ll see going forward, to have some
field-specific configuration in the Svelte app anyway, but
generally it is a better approach not to reproduce type
information in the client application. The Web API service
already knows everything there is to know about the data
structures it works with, so it’s better to ask the service
instead of setting up a second static copy of these details.
In the Swagger UI you can see the service endpoint
/api/odata/$metadata. Try it, it does not require
any parameters. It returns a long blob of XML data, which
includes a Schema block about the
SaleProduct type and its members.
There are a couple of issues with this API endpoint. First, it
can’t be used to return data selectively, so it is potentially
inefficient to use. Second, while the Swagger UI is
pre-configured to ask for data of type
application/json, the service clearly returns XML
data instead. Again, these are problems which will be addressed
in the future, but for now a bit of work is required to use the
service endpoint as intended.
To work along, please add the package
fast-xml-parser to your project:
> pnpm i -D fast-xml-parser
Now create the file
src/routes/api/metadata/+server.js in the Svelte
Kit project folder. Here is the content:
import { json } from '@sveltejs/kit';
import { XMLParser } from 'fast-xml-parser';

// Could prerender to prevent extra roundtrips to the XML data
// export const prerender = true;

const parser = new XMLParser({
	ignoreAttributes: false,
	attributeNamePrefix: '',
	attributesGroupName: '@_attributes'
});

export async function GET({ fetch }) {
	const result = await fetch('http://webapi:5273/api/odata/$metadata')
		.then((res) => res.text())
		.then((xmlString) => parser.parse(xmlString));

	return json(result);
}
This service does one simple job: it retrieves the XML format
metadata from the Web API service and converts it to a JSON
representation. Since the conversion is automatic, this is not
the best possible JSON structure you can imagine, but it’s much
easier to work with in JavaScript than the original XML.
Note the comment: Svelte Kit has the capability to apply
server-side rendering to a service route like this. In a real
application this could be used so that the Web API wouldn’t
need to be called at runtime for this metadata. But of course
the format conversion is a temporary solution, and for test
purposes I keep everything dynamic by using this proxy service.
Create a second service source code file now with the following
path name:
src/routes/api/schema/[className]/[[lang]]/+server.js. For those unfamiliar with Svelte Kit: yes, include all the
brackets in the path, just like that! They indicate parameters,
which will be extracted from the route when a request comes in.
The full source code of the file is a bit too long and verbose
to include here. If you are following along, please access the
complete file
at this URL
and copy&paste the code from there. Additionally, please
use pnpm i -D lodash to make the package
lodash available to the project.
Here is the main function GET from this code file:
export async function GET({ fetch, params }) {
	const { className, lang = '' } = params;
	const namespace = className.slice(0, className.lastIndexOf('.'));
	const entityName = className.slice(className.lastIndexOf('.') + 1);

	const { propertyNames, idField } = await getPropertyInfo(fetch, namespace, entityName);

	const promises = [
		Promise.resolve({ $$idField: idField }),
		getClassCaptionPromise(fetch, className, lang),
		...propertyNames.map((pn) => getMemberCaptionPromise(fetch, className, pn, lang))
	];

	const result = await Promise.all(promises).then(mergeAll);

	return json(result);
}
The function receives the input parameters
className and (optionally) lang from
the routing system. Through the various helper functions, it
calls the Web API services and builds a schema structure for
the given type. With the new route active, a test renders
output like this:
> curl http://localhost:5173/api/schema/XAFApp.Module.BusinessObjects.SaleProduct | jq
{
	"$$idField": "ID",
	"$$classCaption": "Sale Product",
	"ID": "ID",
	"Name": "Product Name",
	"Price": "Product Price"
}
As you can see, I decided to include the two fields
$$idField and $$classCaption using a
name format that is very unlikely to be used by actual data
structure fields. Of course you could choose a different format
in case that the $$ prefix collides with your real
field names.
Fetch the schema from the page load function
Now it is time to call the new service and retrieve the schema
as part of the data loading process that runs when the page is
accessed. Edit
src/routes/saleProducts/+page.server.js and change
it to this:
export async function load({ fetch }) {
	const odataUrl = `http://webapi:5273/api/odata/SaleProduct`;

	const dataSource = fetch(odataUrl)
		.then((res) => {
			if (res.ok) return res;
			throw new Error(`HTTP error, status: ${res.status}`);
		})
		.then((res) => res.json())
		.then((res) => res.value);

	const schemaUrl = `/api/schema/XAFApp.Module.BusinessObjects.SaleProduct`;
	const schema = fetch(schemaUrl)
		.then((res) => {
			if (res.ok) return res;
			throw new Error(`HTTP error, status: ${res.status}`);
		})
		.then((res) => res.json());

	return await Promise.all([dataSource, schema])
		.then(([ds, sc]) => ({ dataSource: ds, schema: sc }))
		.catch((err) => {
			console.log(err);
			return { error: err.message };
		});
}
There are several changes compared to the previous version,
which used a simple piece of code to load the data alone.
-
Error handling has been inserted, which is a best practice
that makes it easier to track down issues, as the
implementation grows in complexity
-
In addition to the original
fetch call, a second
promise is constructed to retrieve the schema data from the
new service
-
Both promises are combined and awaited before the return, and
the function is declared
async. Technically,
Svelte Kit can return the promises without awaiting them
first, and it can even
stream results, but in a future version one part of the results generated
in this sample code will depend on user authorization and so
it doesn’t make sense to return one part of the result set
while a second part may not be returned — I set up the code
now to allow for this change in the future.
Use the schema to display the correct captions
Edit src/routes/saleProducts/+page.svelte first.
This is where the data is received after the load function
returns it, and you need to receive the schema and
error elements now that may be returned after the
recent changes.
export let data;
$: ({ dataSource, schema, error } = data);
Now you can use the new schema information to include the
correct type caption:
<script>
	...
	const classCaptionPlaceholder = 'Sale Products';
</script>

<h2 class="font-bold text-xl">
	Data: {schema ? schema['$$classCaption'] : classCaptionPlaceholder}
</h2>
In case the error field has been returned, it
should be displayed — at least that is the approach this demo
will use. In a real application you may decide differently,
since end users don’t necessarily like technical error
messages!
Make sure to include the schema parameter for the
DataTable while you’re at it.
{#if error}
	<div class="error">{error}</div>
{:else}
	<DataTable {dataSource} {fields} {schema} />
{/if}

<style lang="postcss">
	.error {
		@apply font-bold border bg-red-200 p-2 rounded;
	}
</style>
Finally, edit src/lib/DataTable.svelte and use the
incoming schema information to display the column headers:
<script>
	export let dataSource;
	export let fields;
	export let schema = {};
</script>

<table class="border-separate w-full">
	<tr>
		{#each Object.keys(fields) as f}
			<th class={fields[f].class}>{schema[f] || f}</th>
		{/each}
	</tr>
...
With all the changes in place, you will see the schema details
reflected by the column headers and in the table caption.

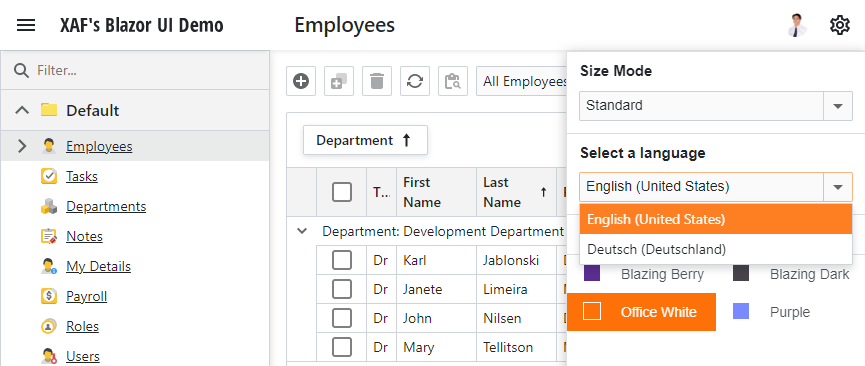
The beauty of this solution is that the JavaScript UI now
reacts to XAFML changes dynamically. This makes future
extensions easier, and it becomes possible to add localization
features and end-user capabilities like the
language chooser for XAF Blazor apps.
Conclusion
Here is the link to
the branch “stage-2” in the GitHub repository
again. This branch includes all the changes described in this
post.
Thank you for reading, or following along! In the next post of
the series I will describe how to dynamically retrieve data to
take advantage of sorting and filtering features provided by
the Web API service.
Your Feedback Matters!
Please take a moment to reply to the following questions – your
feedback will help us shape/define future development
strategies.
Free DevExpress Products - Get Your Copy Today
The following free DevExpress product offers remain available. Should you have any questions about the free offers below, please submit a ticket via the
DevExpress Support Center at your convenience. We'll be happy to follow-up.