Having established in previous posts that CodeRush Templates absolutely rock, we’re going to move on and start to show you how to create and modify your own templates.
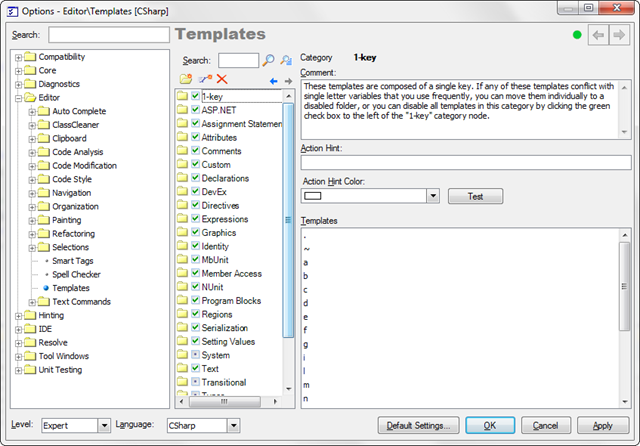
We’ll start slowly though, and just show you around for now. Template editing is done via the Templates options page:

This screen is reached through the DevExpress \ Options menu or by pressing Ctrl+Shift+Alt+O. once on this screen you should use the page tree to navigate to the Editor\Templates page.
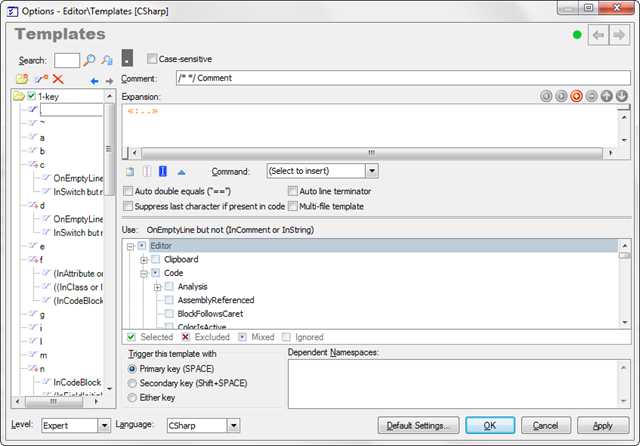
 When creating or editing a template, it’s useful to give yourself as much space as possible. To this end, I recommend collapsing the page tree and maximizing the options screen. The page tree is collapsed by clicking the border on it’s right. As you hover over this border, it lights up with a series of blue arrows, helping to indicate that this isn’t your typical splitter. These techniques will of course work on any of the option pages.
Great stuff. Ok now let’s show you around.

 The Template Tree
On the left of your screen is a tree of Templates. The templates in this tree are grouped in folders and subfolders, which help to make locating templates a little easier. Folders of templates may also be enabled or disabled by removing the tick mark beside the folder in question.
Even a short glance at the template tree, will tell you that it holds a lot of templates. These are organised in a large hierarchy of folders and subfolders. However even this is not the full list of templates. Your view is being filtered at all times by the value in the language dropdown.
CodeRush provides templates out of the box for C#, VB.Net, C++, JavaScript, HTML, XAML and XML. However if your favourite language isn’t listed there, don’t worry. CodeRush will happily support the creation of templates for any language service installed with studio. Out of the box these include VB.Net, C#, C++, F#, CSS, JavaScript, HTML, T-SQL, XML, XAML and Plain Text, but additional services are often added by third party vendors and CodeRush will happily work with any of these.
Don’t be concerned if you have less entries than this in you list of languages. CodeRush doesn’t add them until it sees that you are actually going to work with file of the type in question. This saves presenting more options than you will practically use.
In addition to the previously listed language entries, you will see an additional item labelled *neutral*. Templates contained within the *neutral* category will expand within any document rather than restricting themselves to a single document type. It is therefore important that care be taken when creating templates in this section, lest you unintentionally create a template which causes unintended side effects within document types you didn’t mean to.
The Template Tree Context Menu
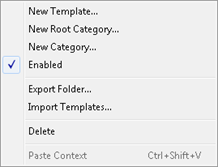
Right clicking an item (folder or template) in the template tree, will yield this context menu. From here you can see a number of functions including the creation of new folders and templates as well as the import and export of templates. Importing and Exporting will be covered in a future post. Suffice to say that this can be useful when either sharing templates or when upgrading to a fresh set of templates.
The Expansion Box
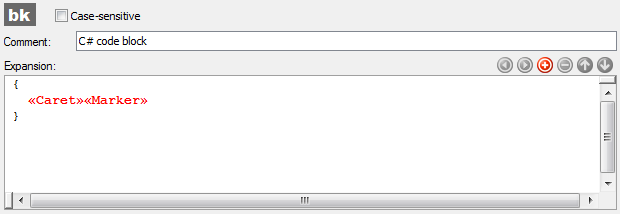
This sits near the top of the screen. The text in this box represents the instructions that will be followed when CodeRush expands your template. Most text entered is interpreted literally, however there are 3 special types of command you can enter into this box. Aliases, StringProviders and TextCommands.
- Aliases are used to inject another template into the current expansion and take the form «:TemplateName».
- StringProviders are used to inject calculated strings into the template and take the form «?StringProviderName(Params)» examples include «?Username», «?Paste» and «?Member»
- TextCommands are used to cause other secondary side effects within the TextDocument (The DXCore representation of text file) associated with the current operation, and take the form «TextCommandName(Parameters)». Good examples of Simple TextCommands are «Marker», «BlockAnchor» and «Caret»

You can enter your template expansions directly into this box using nothing more than your keyboard, but if you’d like a little help, you can use some of the tools provided in the panel underneath the expansion box.  This panel provides quick access to some of the more commonly used StringProviders and TextCommands. From left to right the icons represent…the «?Paste» StringProvider and the «Caret», «BlockAnchor» and «DropMarker» TextCommands. Other TextCommands are available through the drop down list. In addition, the full range of StringProviders, TextCommands and Aliases is available through the context (Right Click) menu of the expansion box, along with the usual clipboard related items.
The Context Panel
This panel provides a tree of contexts supported by CodeRush. A context is a condition which may either be true or false. For example Editor \ Code \ InClass or Editor \ Code \ InComment are 2 conditions relating to the location of the caret within the active document. The template expansion engine will evaluate these based on the configuration of each of their checkboxes. A tick indicates  that the condition is required to be true, while a cross indicates that the condition must be explicitly false. An empty (default) checkbox indicates that the template does not care about the state of this condition and it will not be evaluated at expansion time.
Many CodeRush features use contexts to allow them to be more specific about when they should operate. In the case of templates, the contexts dictate preconditions which must be held true in order for the template to expand. So for example if you want your template to only expand if the caret is not within a comment, then you should set a cross against the Editor \ Code \ InComment.

Template triggering.
This next panel allows you to specify how your template is triggered. By default all templates are triggered by the Primary expansion key (<Space>). However you can alter a template’s settings so that it is instead triggered by the secondary expansion key (<Shift>+<Space>). This 2-key shortcut is not typically used during coding, therefore it follows that a more deliberate act is required in order to trigger a template which requires this trigger.
These settings can be used to ensure that certain templates are not expanded without the user making a very conscious effort to do so. Some consider this an effective way to disable individual templates from expanding.
….and that concludes our introduction to the Templates options page.
Next time we’re going to create a brand new template from scratch.
Free DevExpress Products - Get Your Copy Today
The following free DevExpress product offers remain available. Should you have any questions about the free offers below, please submit a ticket via the
DevExpress Support Center at your convenience. We'll be happy to follow-up.