New Excel Export Library - XLSX, XLS, CSV (Coming soon in v15.1)
Last year, I blogged about the updated Excel export capabilities of our WinForms, WPF and ASP.NET Grid Controls. As we saw by all your great feedback, this was an important enhancement and something many of you were looking forward to...
Based on your input, v15.1 will introduce an entirely new product to the DevExpress Document Generation toolset - our new XL Export Library.
This new data export engine can be used to generate Excel spreadsheet files (XLSX, XLS, CSV) quickly, with minimal memory usage. The engine allows you to generate document structures in code and immediately write them to a stream. To maintain the highest possible performance standards, the engine is not designed to load and modify existing documents (it does not create an internal document model to work directly with data).
The bottom-line is simple: When you need an extremely fast and low-memory footprint engine to export data from within your application into Excel file formats, the DevExpress XL Export Library is your best option.
How the DevExpress XL Export Library Works
With the XL Export API you can create all major spreadsheet elements (worksheets, columns, rows and cells), specify formatting options, create conditional formatting rules, add formulas and hyperlinks to cells, create merged cells, freeze columns and rows, insert pictures, use filters, introduce data grouping and data validation, etc.
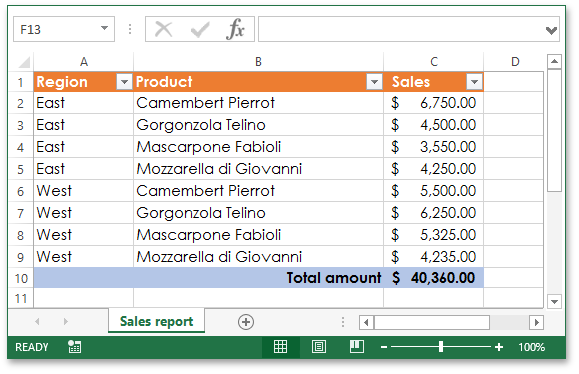
In the following example, we'll walk you through creating a simple sales report.
1. First, we must add references to the appropriate libraries:
DevExpress.Data.v15.1.dll
DevExpress.Printing.v15.1.Core.dll
2. Next, a couple of namespaces.
using DevExpress.Export.Xl;
using System.IO;
3. To perform the export operation, we need to create an object exposing the IXlExporter interface.
IXlExporter exporter = XlExport.CreateExporter(XlDocumentFormat.Xlsx);
4. Next, we create an instance of the FileStream class and call the IXlExporter.CreateDocument method to create the new document and begin to write it to the specified file stream.
FileStream stream = new FileStream("Document.xlsx", FileMode.Create);
IXlDocument document = exporter.CreateDocument(stream);
5. Here, we'll add a new worksheet to a document and set its name to "Sales Report".
IXlSheet sheet = document.CreateSheet();
sheet.Name = "Sales Report";
6. The structure of the document includes three columns. We'll create them in code using the IXlSheet.CreateColumn method, specify column width, and set the number format for the last column.
using (IXlColumn column = sheet.CreateColumn())
column.WidthInPixels = 100;
using (IXlColumn column = sheet.CreateColumn())
column.WidthInPixels = 250;
using (IXlColumn column = sheet.CreateColumn()) {
column.WidthInPixels = 100;
column.ApplyFormatting((XlNumberFormat)@"_([$$-409]* #,##0.00_);_([$$-409]* \(#,##0.00\);_([$$-409]* ""-""??_);_(@_)");
}
7. Specify cell formatting for the data range, header and total rows.
XlCellFormatting cellFormatting = new XlCellFormatting();
cellFormatting.Font = new XlFont();
cellFormatting.Font.Name = "Century Gothic";
cellFormatting.Font.SchemeStyle = XlFontSchemeStyles.None;
XlCellFormatting headerRowFormatting = new XlCellFormatting();
headerRowFormatting.CopyFrom(cellFormatting);
headerRowFormatting.Font.Bold = true;
headerRowFormatting.Font.Color = XlColor.FromTheme(XlThemeColor.Light1, 0.0);
headerRowFormatting.Fill = XlFill.SolidFill(XlColor.FromTheme(XlThemeColor.Accent2, 0.0));
XlCellFormatting totalRowFormatting = new XlCellFormatting();
totalRowFormatting.CopyFrom(cellFormatting);
totalRowFormatting.Font.Bold = true;
totalRowFormatting.Fill = XlFill.SolidFill(XlColor.FromTheme(XlThemeColor.Accent5, 0.6));
8. We'll create the header row by calling the IXlSheet.CreateRow method. We'll add three cells inside the header row and apply format settings specified in the previous step.
using (IXlRow row = sheet.CreateRow()) {
using (IXlCell cell = row.CreateCell()) {
cell.Value = "Region";
cell.ApplyFormatting(headerRowFormatting);
}
using (IXlCell cell = row.CreateCell()) {
cell.Value = "Product";
cell.ApplyFormatting(headerRowFormatting);
}
using (IXlCell cell = row.CreateCell()) {
cell.Value = "Sales";
cell.ApplyFormatting(headerRowFormatting);
}
}
9. It's now time to generate the data for this sales report...
string[] products = new string[] { "Camembert Pierrot", "Gorgonzola Telino", "Mascarpone Fabioli", "Mozzarella di Giovanni" };
int[] amount = new int[] { 6750, 4500, 3550, 4250, 5500, 6250, 5325, 4235 };
for (int i = 0; i < 8; i++) {
using (IXlRow row = sheet.CreateRow()) {
using (IXlCell cell = row.CreateCell()) {
cell.Value = (i < 4) ? "East" : "West";
cell.ApplyFormatting(cellFormatting);
}
using (IXlCell cell = row.CreateCell()) {
cell.Value = products[i % 4];
cell.ApplyFormatting(cellFormatting);
}
using (IXlCell cell = row.CreateCell()) {
cell.Value = amount[i];
cell.ApplyFormatting(cellFormatting);
}
}
}
10. We'll now activate AutoFilter functionality for our data range.
sheet.AutoFilterRange = sheet.DataRange;
11. It's time to create the total row. To calculate the total sales amount, we'll pass the appropriate formula to the IXlCell.SetFormula method. Note that you can assign your formula as a string by using the XlFunc object for the most popular spreadsheet functions (Average, Max, Min, Sum, Subtotal, etc.), or construct a formula expression (cell references, operators, functions, etc) as needed.
The code below uses the XlFunc.Subtotal method to calculate subtotals for the cell range.
using (IXlRow row = sheet.CreateRow()) {
using (IXlCell cell = row.CreateCell())
cell.ApplyFormatting(totalRowFormatting);
using (IXlCell cell = row.CreateCell()) {
cell.Value = "Total amount";
cell.ApplyFormatting(totalRowFormatting);
cell.ApplyFormatting(XlCellAlignment.FromHV(XlHorizontalAlignment.Right, XlVerticalAlignment.Bottom));
}
using (IXlCell cell = row.CreateCell()) {
// Add values in the cell range С2 through С9 using the SUBTOTAL function.
cell.SetFormula(XlFunc.Subtotal(
XlCellRange.FromLTRB(2, 1, 2, 8),
XlSummary.Sum, true));
cell.ApplyFormatting(totalRowFormatting);
}
}
12. In this final step, we'll complete the document generation process and close the output stream.
sheet.Dispose();
document.Dispose();
stream.Dispose();
With this brief introduction, I hope you can see the value of our new XL Export API and how you can quickly generate spreadsheet files in code. Once we ship v15.1, we'll post a link to this code in our Code Examples database.
As always, we welcome your comments and feedback. Let us know what you think.
