OTHER RELATED ARTICLES:
- Getting Started with DevExpress MVVM Framework. Commands and View Models.
- DevExpress MVVM Framework. Introduction to Services, DXMessageBoxService and DialogService.
- THIS POST: DevExpress MVVM Framework. Interaction of ViewModels. IDocumentManagerService.
- DevExpress MVVM Framework. Introduction to POCO ViewModels.
- DevExpress MVVM Framework. Interaction of ViewModels. Messenger.
- DevExpress MVVM Framework. Using Scaffolding Wizards for building Views.
- DevExpress MVVM Framework. Data validation. Implementing IDataErrorInfo.
- DevExpress MVVM Framework. Using DataAnnotation attributes and DevExpress Fluent API.
- DevExpress MVVM Framework. Behaviors.
- DevExpress MVVM Framework. TaskbarButtonService, ApplicationJumpListService and NotificationService.
- DevExpress MVVM Framework. Asynchronous Commands.
- DevExpress MVVM Framework. Converters.
Previously, we examined a common Service mechanism and two Service implementations: DXMessageBoxService and DialogService. In this post, we’ll explore View creation and ViewModel interaction mechanisms.
View creation mechanisms
There are two main approaches to create Views with Services:
- ViewTemplate and ViewTemplateSelector.
- ViewLocator.
ViewTemplate and ViewTemplateSelector
In our previous blog post, we created a Registration View and displayed it in a separate dialog window via a DialogService. Our View was defined at the DialogService ViewTemplate.
1: <dx:DialogService ...>
2: <dx:DialogService.ViewTemplate>
3: <DataTemplate>
4: <View:RegistrationView/>
5: </DataTemplate>
6: </dx:DialogService.ViewTemplate>
7: ...
8: </dx:DialogService>
The Registration ViewModel was created from the main ViewModel and passed as a parameter to the DialogService.
1: RegistrationViewModel registrationViewModel = new RegistrationViewModel();
2: DialogService.ShowDialog(..., viewModel: registrationViewModel);
Alternatively, a View can be dynamically generated from the passed ViewModel. The ViewTemplateSelector supports this approach.
1: public class DialogViewTemplateSelector : DataTemplateSelector {
2: public DataTemplate RegistrationViewTemplate { get; set; }
3: public DataTemplate DefaultViewTemplate { get; set; }
4: public override DataTemplate SelectTemplate(object item, DependencyObject container) {
5: if(item is RegistrationViewModel)
6: return RegistrationViewTemplate;
7: return DefaultViewTemplate;
8: }
9: }
1: <Helper:DialogViewTemplateSelector x:Key="dialogViewTemplateSelector">
2: <Helper:DialogViewTemplateSelector.RegistrationViewTemplate>
3: <DataTemplate>
4: <View:RegistrationView/>
5: </DataTemplate>
6: </Helper:DialogViewTemplateSelector.RegistrationViewTemplate>
7: <Helper:DialogViewTemplateSelector.DefaultViewTemplate>
8: <DataTemplate>
9: <TextBlock Text="Default Template"/>
10: </DataTemplate>
11: </Helper:DialogViewTemplateSelector.DefaultViewTemplate>
12: </Helper:DialogViewTemplateSelector>
13: <dx:DialogService ViewTemplateSelector="{StaticResource dialogViewTemplateSelector}" ...>
14: ...
15: </dx:DialogService>
ViewLocator
Alternatively, the ViewLocator provides a simple composition mechanism and also supports creating a View by name.
1: <dxmvvm:Interaction.Behaviors>
2: <dx:DialogService/>
3: </dxmvvm:Interaction.Behaviors>
1: UICommand result = DialogService.ShowDialog(
2: dialogCommands: new List<UICommand>() { registerCommand, cancelCommand },
3: title: "Registration Dialog",
4: documentType: "RegistrationView",
5: viewModel: registrationViewModel
6: );
The preceding code implicitly calls the default ViewLocator to create a View for the document type at the parameter.
The default ViewLocator is limited to creating Views contained in the main application. To create Views from other libraries, register these additional libraries by creating a custom ViewLocator on application startup.
1: ViewLocator viewLocator =
2: new ViewLocator(typeof(MainView).Assembly, typeof(RegistrationView).Assembly);
3: ViewLocator.Default = viewLocator;
If the default ViewLocator implementation does not meet your requirements, you can implement a custom ViewLocator. For instance, the following ViewLocator on-demand library loading:
1: ViewLocator.Default = new MainViewLocator();
2:
3: public class MainViewLocator : IViewLocator {
4: public object ResolveView(string name) {
5: if(name == "RegistrationView") {
6: Assembly assembly = Assembly.LoadFrom(@"DialogServiceTestLib.dll");
7: Type t = assembly.GetType("DialogServiceTest.View.RegistrationView");
8: return Activator.CreateInstance(t);
9: }
10: return null;
11: }
12: }
You may also set a particular ViewLocator at the Service level. Any custom Service can support View creation by inheriting from the ViewServiceBase class and exposing its ViewLocator property.
Interaction of ViewModels
We’ve explored the mechanisms of View creation. Since Views are generally unaware of each other, interaction is mediated at the ViewModel level. ViewModel interactions are implemented by either of the following approaches:
- Closely-coupled ViewModels.
- Loosely-coupled ViewModels.
Closely-coupling implies ViewModel creation by other ViewModels. Loose-coupling implies ViewModels bind to Views while ViewModel interaction is handled with parameter passing. Both strategies can be used simultaneously.
We’ll examine these interaction patterns in detail.
Closely-coupled ViewModels
The previous DialogService example is built entirely on this interaction type. The Registration ViewModel is created in the main ViewModel code which has access to the properties on the child ViewModel.
1: RegistrationViewModel registrationViewModel = new RegistrationViewModel();
2: DialogService.ShowDialog(..., viewModel : registrationViewModel);
Loosely-coupled ViewModels
The ViewModelBase is a basic ViewModel class supporting two interfaces:
1: public interface ISupportParameter {
2: object Parameter { get; set; }
3: }
4: public interface ISupportParentViewModel {
5: object ParentViewModel { get; set; }
6: }
ISupportParameter passes parameters from the main ViewModel to the child ViewModel. There’s no restriction to what can serve as a parameter. For instance, a ViewModel editing a table row can be passed a row or key as a parameter.
ISupportParentViewModel makes it possible to access Services of the main ViewModel from the child ViewModel. I.e., all services defined by the main View are available in the child ViewModel.
With a ViewModel defined in XAML…
1: <dx:DialogService ...>
2: <dx:DialogService.ViewTemplate>
3: <DataTemplate>
4: <View:RegistrationView>
5: <View:RegistrationView.DataContext>
6: <ViewModel:RegistrationViewModel/>
7: </View:RegistrationView.DataContext>
8: </View:RegistrationView>
9: </DataTemplate>
10: </dx:DialogService.ViewTemplate>
11: ...
12: </dx:DialogService>
…call a Service method to pass the parameter and parent ViewModel:
1: DialogService.ShowDialog(
2: ...
3: parameter: "Parameter",
4: parentViewModel: this,
5: );
In this case, the DialogService picks up the ViewModel from the DataContext of the generated View and sets the Parameter and ParentViewModel properties on this ViewModel.
Messenger
Messenger also implements ViewModel interaction. This class exchanges messages between loosely-coupled parts of the application. We’ll discuss this pattern in detail in a future article.
IDocumentManagerService
IDocumentManagerService is an abstraction of the document manager. With version 13.1, we introduced two implementations of this service: WindowedDocumentUIService and TabbedDocumentUIService.
WindowedDocumentUIService
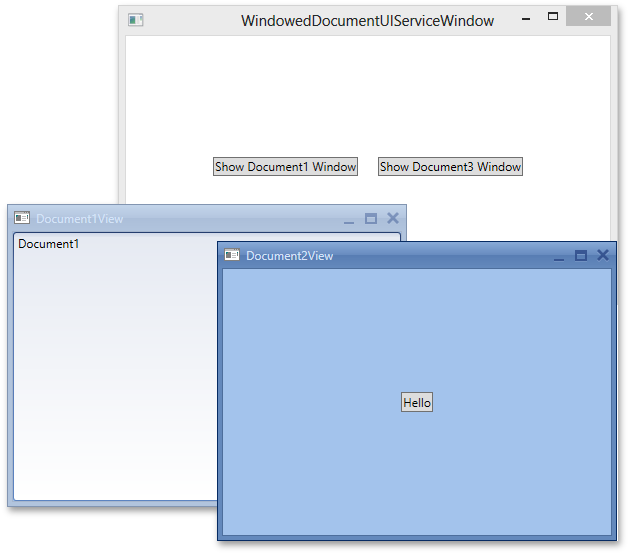
WindowedDocumentUIService supports the display and control of Views in separate windows. Consider the simple sample. We have two Views -- Document1View and Document2View -- corresponding to ViewModels that are assigned in XAML (via DataContext).
The main View presents two buttons to open each document (View).
1: <UserControl x:Class="DocumentServiceTest.View.MainView"
2: xmlns:ViewModel="clr-namespace:DocumentServiceTest.ViewModel"
3: ...>
4: <UserControl.DataContext>
5: <ViewModel:MainViewModel/>
6: </UserControl.DataContext>
7: <StackPanel Orientation="Horizontal">
8: <Button Content="Show Document1 Window"
9: Command="{Binding ShowDocumentCommand}" CommandParameter="Document1View" />
10: <Button Content="Show Document3 Window"
11: Command="{Binding ShowDocumentCommand}" CommandParameter="Document2View" />
12: </StackPanel>
13: </UserControl>
1: public class MainViewModel : ViewModelBase {
2: public ICommand ShowDocumentCommand { get; private set; }
3: public MainViewModel() {
4: ShowDocumentCommand = new DelegateCommand<string>(OnShowDocumentCommandExecute);
5: }
6: void OnShowDocumentCommandExecute(string document) {
7: }
8: }
The main application window contains the main view.
1: <Window x:Class="DocumentServiceTest.WindowedDocumentUIServiceWindow"
2: xmlns:View="clr-namespace:DocumentServiceTest.View"
3: ...>
4: <Grid>
5: <View:MainView ...>
6: </View:MainView>
7: </Grid>
8: </Window>
To display the Document1View and Document2View from the main ViewModel, we will use the WindowedDocumentUIService. Add this service to the main view at the main window level.
1: <Window x:Class="DocumentServiceTest.WindowedDocumentUIServiceWindow"
2: xmlns:View="clr-namespace:DocumentServiceTest.View"
3: xmlns:dx="http://schemas.devexpress.com/winfx/2008/xaml/core"
4: xmlns:dxmvvm="http://schemas.devexpress.com/winfx/2008/xaml/mvvm"
5: ...>
6: <Grid>
7: <View:MainView>
8: <dxmvvm:Interaction.Behaviors>
9: <dx:WindowedDocumentUIService>
10: <dx:WindowedDocumentUIService.WindowStyle>
11: <Style TargetType="Window">
12: <Setter Property="Height" Value="300"/>
13: <Setter Property="Width" Value="400"/>
14: </Style>
15: </dx:WindowedDocumentUIService.WindowStyle>
16: </dx:WindowedDocumentUIService>
17: </dxmvvm:Interaction.Behaviors>
18: </View:MainView>
19: </Grid>
20: </Window>
The service is now available from the main ViewModel. We’ll use it to display the child views.
1: public class MainViewModel : ViewModelBase {
2: public ICommand ShowDocumentCommand { get; private set; }
3: IDocumentManagerService DocumentManager {
4: get { return GetService<IDocumentManagerService>(); }
5: }
6: public MainViewModel() {
7: ShowDocumentCommand = new DelegateCommand<string>(OnShowDocumentCommandExecute);
8: }
9: void OnShowDocumentCommandExecute(string document) {
10: IDocument doc = DocumentManager.CreateDocument(document, null, this);
11: doc.DestroyOnClose = true;
12: doc.Title = document;
13: doc.Show();
14: }
15: }
In the preceding code, we created a document via the service and call the document’s Show method. Our document supports the IDocument interface and provides access to a container with the appropriate View. While using the WindowedDocumentUIService, this container is a Window. IDocument is defined in the DevExpress.Xpf.Mvvm library as follows:
1: public interface IDocument {
2: void Show();
3: void Close(bool force = true);
4: bool DestroyOnClose { get; set; }
5: object Title { get; set; }
6: object Content { get; }
7: }
We have the following result after running the program.

TabbedDocumentUIService
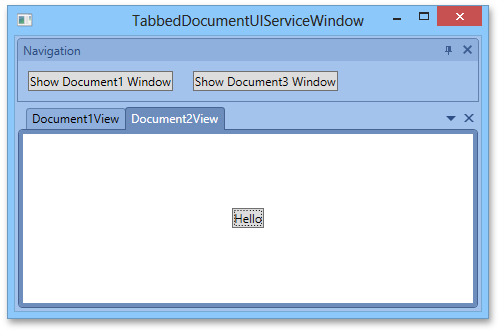
It’s a cool thing that the IDocumentManagerService allows switching UI styles while leaving the View and ViewModel code unchanged.
Let’s modify our application to use the Tabbed MDI UI. All our changes are at the main window code.
1: <Window x:Class="DocumentServiceTest.TabbedDocumentUIServiceWindow"
2: xmlns:View="clr-namespace:DocumentServiceTest.View"
3: xmlns:dx="http://schemas.devexpress.com/winfx/2008/xaml/core"
4: xmlns:dxmvvm="http://schemas.devexpress.com/winfx/2008/xaml/mvvm"
5: xmlns:dxdo="http://schemas.devexpress.com/winfx/2008/xaml/docking"
6: ...>
7: <Grid>
8: <dxdo:DockLayoutManager>
9: <dxdo:LayoutGroup Orientation="Vertical">
10: <dxdo:LayoutPanel Caption="Navigation" ItemHeight="Auto">
11: <View:MainView>
12: <dxmvvm:Interaction.Behaviors>
13: <dxdo:TabbedDocumentUIService
14: DocumentGroup="{Binding ElementName=documnetGroup}"/>
15: </dxmvvm:Interaction.Behaviors>
16: </View:MainView>
17: </dxdo:LayoutPanel>
18: <dxdo:DocumentGroup x:Name="documnetGroup"
19: Caption="Documents" ItemHeight="*"/>
20: </dxdo:LayoutGroup>
21: </dxdo:DockLayoutManager>
22: </Grid>
23: </Window>

CODE EXAMPLE: You can download an example demonstrating these document services from the How to: Use Services Implementing the IDocumentManagerService Interface link.
In our upcoming 13.2, we’ll introduce the new IDocumentManagerService implementation for building a modern Windows 8 UI.
Thank you for your time. Feel free to sound off with your thoughts in the comments below.
Free DevExpress Products - Get Your Copy Today
The following free DevExpress product offers remain available. Should you have any questions about the free offers below, please submit a ticket via the
DevExpress Support Center at your convenience. We'll be happy to follow-up.