UPDATED
We are fully committed to XAF and are continuing to evolve its capabilities. For those targeting Web browsers & Mobile devices, we have chosen to focus our efforts on a new UI powered by Microsoft Blazor.
==================================================
In this blog post, we’ll use the new DXTREME HTML JS framework to create a phone web app that works on iOS and Android devices. You can DOWNLOAD a working version of this app here (DXperience Universal 12.2.4 is required). Please do not miss a gentle disclaimer in the end.
1. Mobile Client Considerations
Let’s start with an XAF application already connected to the built-in middle-tier security service via WCF or .NET Remoting. It may look like this:
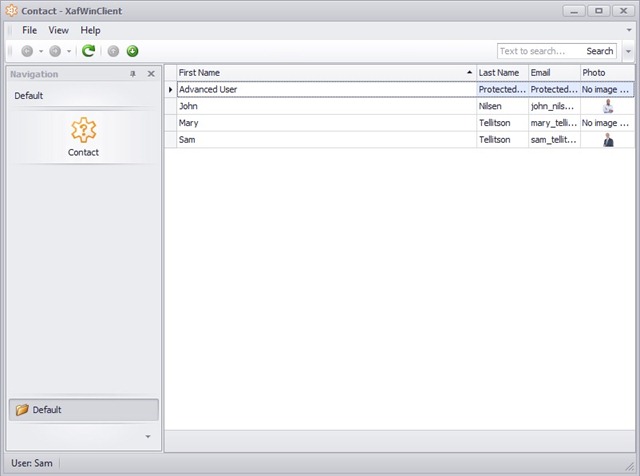
If you have an existing XAF app and want to connect it to the security service, you can change the application connection string to a service URL, e.g.:
http://samplexafsecurity.cloudapp.net/CustomWcfSecuredDataServer.svc
Once the XAF application is connected to the security service, the built-in Security module will handle user authentication, data filtering and UI modifications as needed, according to specified security permissions. However, we need to extend the capabilities delivered by the built-in module to handle more specific security scenarios, such as:
Is user X permitted to use this app?
Is user X permitted to perform operation Y on data record Z?
Is user X allowed to read member Y for data record Z?
We can handle all of these scenarios with a custom authentication service.
Before we start, we should think about the way we want to transfer data to our clients. Because of the wide variety of client platforms, we need protocol that allows interoperability across all the platforms and devices we want to support. OData is a great candidate. Another great choice would be DXTREME, which supports iOS, Android, Win8 and other operating systems, without forcing us to dig into the framework of each individual platform.
Finally, we will deploy our authentication service to Windows Azure. Let’s get started!
2. Database in the Cloud
Note: These instructions apply to Windows Azure, but other cloud providers have similar capabilities. A quick Google search shows this is true for Amazon (btw, I recommend this blog if you are thinking about moving your XAF Web app to Amazon).
Let’s start by launching the Azure portal. Click the SQL Databases tab and then click Create an SQL Database. Specify the necessary parameters:
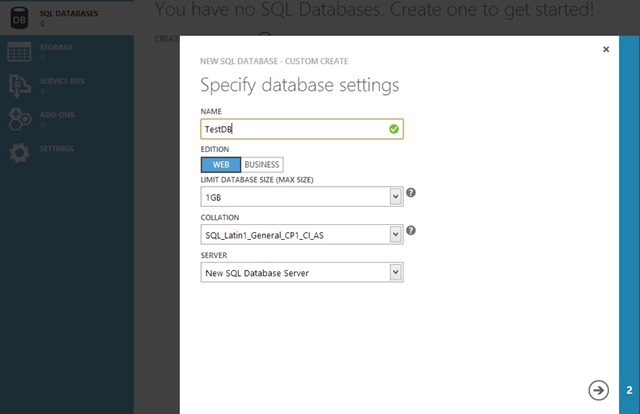
Note we did not specify an existing database server - we will create a New SQL Database Server.
Next we need to fill in the SQL Server administrator credentials and specify its physical location. We will also need to create tables and provide some initial data. To make that easier, we have prepared the Azure_XAF_AuthenticationDemoDB.sql file, which is a part of the DBCreator project in this example. To use this file, we will need to locate the TestDB database created above and click the MANAGE button at the bottom:
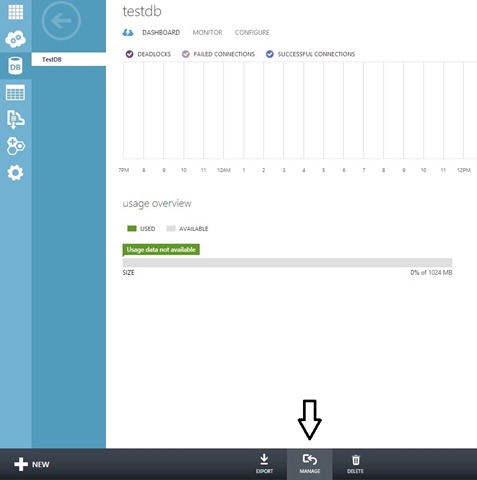
Click Open and provide a path to the SQL file (.\Utils\DBCreator\Azure_XAF_AuthenticationDemoDB.sql):
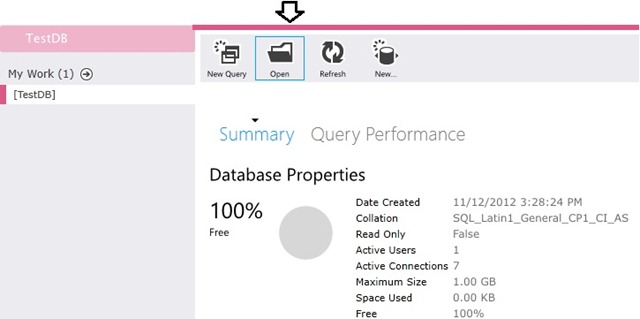
Opening this file will create the required database and tables. Next we need to populate these tables with some test data using the DBCreator project mentioned earlier. It just needs an updated connection string from our Azure portal. Place the connection string in the .Utils\DBCreator\app.config file. It should look something like this:
"User ID=test;Password=***;Pooling=false;Data Source=***.database.windows.net;Initial Catalog=TestDB"
With the connection string specified, we can run the DBCreator console app:

Running DBCreator does the following:
Creates three users in the SecuritySystemUser table: one with unlimited rights (Admin) and two regular users (Sam and John). All users have empty passwords for the demo.
Adds a few contacts corresponding to these users to the Contact table
Creates security permissions so sample users can view all contacts, but only be able to edit their personal contacts.
Creates a custom permissions set for the “Advanced User” contact. By default Sam and John can view only Photo and First Name fields; remaining fields are hidden.
Code for creating permissions is not included in this article, however it is easily discoverable in the attached example.
3. A WCF Middle-Tier Security Service
Once our work with the database is complete, we can begin work on the most interesting part of this article – the creating and deploying of a service in the cloud! Let’s begin with using the Empty Web Application project template to create our service application called ClientServer_Wcf_CustomAuth.Service.
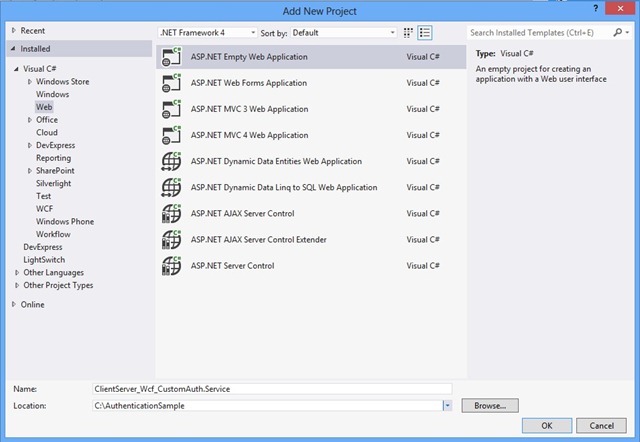
The next step is to add a new WCF service called CustomWcfSecuredDataServer using the built-in command under the context menu invoked for the created project in the Solution Explorer. This will result in Visual Studio generating CustomWcfSecuredDataServer.svc and ICustomWcfSecuredDataServer.cs files. We will remove the latter file as it is not needed. The next step is to replace the base class for the CustomWcfSecuredDataServer class with the WcfSecuredDataServer.
namespace ClientServer_Wcf_StandartAuth.Server {
[AspNetCompatibilityRequirements(RequirementsMode = AspNetCompatibilityRequirementsMode.Allowed)]
[ServiceBehavior(InstanceContextMode = InstanceContextMode.Single, MaxItemsInObjectGraph = System.Int32.MaxValue, ConcurrencyMode = ConcurrencyMode.Multiple)]
public class CustomWcfSecuredDataServer : WcfSecuredDataServer {
private static SecuredDataServer securedDataServer;
public static void SetSecuredDataServer(SecuredDataServer dataServer) {
securedDataServer = dataServer;
public CustomWcfSecuredDataServer() : base(securedDataServer) { }
Next, we will add a Global.asax file using the built-in item template and modify its code as follows:
namespace ClientServer_Wcf_StandartAuth.Server {
public class Global : System.Web.HttpApplication {
public static string ConnectionString;
protected void Application_Start(object sender, EventArgs e) {
ConnectionString = ConfigurationManager.ConnectionStrings["AzureApplicationServices"].ConnectionString;
CustomAuthenticationServiceHelper customAuthenticationServiceHelper = new CustomAuthenticationServiceHelper();
ValueManager.ValueManagerType = typeof(ASPRequestValueManager<>).GetGenericTypeDefinition();
QueryRequestSecurityStrategyHandler securityProviderHandler = delegate() {
return new SecurityStrategyComplex(typeof(SecuritySystemUser), typeof(SecuritySystemRole), new AuthenticationStandard());
SecuredDataServer dataServer = new SecuredDataServer(
ConnectionString, customAuthenticationServiceHelper.XPDictionary, securityProviderHandler);
CustomWcfSecuredDataServer.SetSecuredDataServer(dataServer);
A final tweak will alter the web.config file to warn WCF about us transferring relatively large amounts of data to it (e.g., photos):
<binding maxReceivedMessageSize="2147483646">
<readerQuotas maxDepth="32" maxStringContentLength="5242880" maxArrayLength="2147483646" maxBytesPerRead="4096" maxNameTableCharCount="5242880"/>
This concludes this step. You can always find more details in the source code of the ClientServer_Wcf_CustomAuth.Service project that hosts this service. It is not rocket science, and I believe that experienced XAFers noticed that the service code mimics what you can already find in the Application Server project template provided by XAF – here we just did things manually and used an ASP.NET application instead of the Windows Service or Console Application projects by default. Due to a heavy demand from our customers, we chose the ASP.NET application format as an example.
4. Deploying the middle-tier security service in Azure
By using the built-in Add Windows Azure Cloud Service Project command to create a new project titled the ClientServer_Wcf_CustomAuth.Service.Azure, we can easily deploy our newly-created security system in Azure.
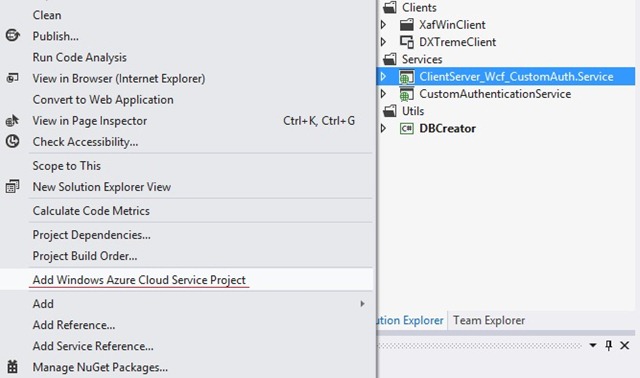
Please utilize the screenshots below to review the steps that follow.

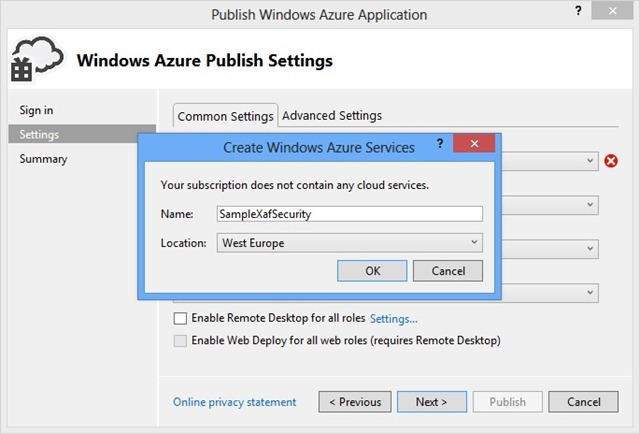
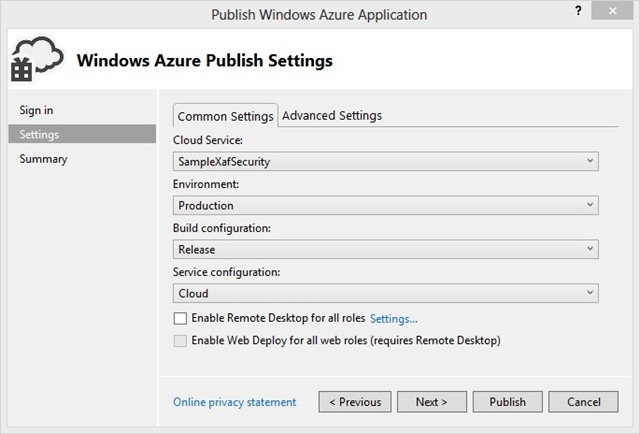
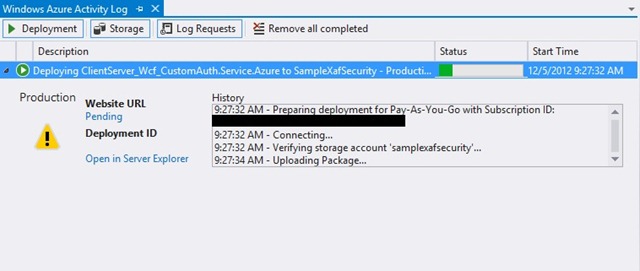
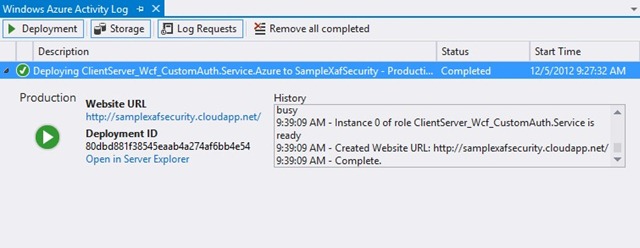
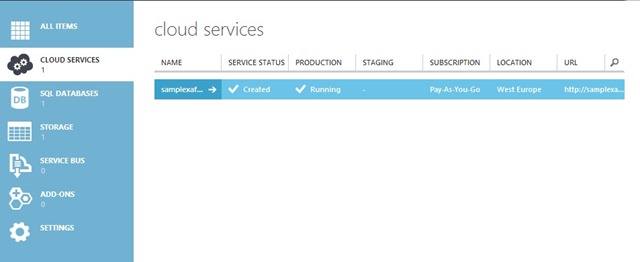
Once all the above-mentioned steps have been completed, we can simply press the Publish button and wait for the service to begin so that we can ensure that things run smoothly via our Azure portal.
Since everything operates correctly, we can now access our service at samplexafsecurity.cloudapp.net.
5. An OData Service Consumed by Mobile and Other Non-XAF Clients
Let’s begin by creating an empty Web project called CustomAuthenticationService. Next, we will add a class, which is derived from the base XpoDataServiceV3 class. (You may recall that it was added in XPO 12.2 to support the latest OData version.) Now we will add several service operation methods (IsGranted, IsUserAllowed, CanReadMembers) marked with the WebGet attribute to indicate that they are only used to retrieve information from the service, which will be REST by nature. Methods are required to implement a security on the client.
namespace CustomAuthenticationService {
[JSONPSupportBehaviorAttribute]
[AspNetCompatibilityRequirements(RequirementsMode = AspNetCompatibilityRequirementsMode.Required)]
[ServiceBehavior(InstanceContextMode = InstanceContextMode.PerCall, MaxItemsInObjectGraph = System.Int32.MaxValue, ConcurrencyMode = ConcurrencyMode.Multiple)]
public class CustomAuthenticationDataService : XpoDataServiceV3, System.Data.Services.IRequestHandler {
private DataServiceHelper _dataServiceHelper;
public CustomAuthenticationDataService()
: this(new HttpContextWrapper(HttpContext.Current)) {
public CustomAuthenticationDataService(HttpContextBase httpContext)
: this(httpContext, new CustomAuthenticationServiceHelper(), "CustomAuthenticationService") {
public CustomAuthenticationDataService(HttpContextBase httpContext, DataServiceHelper dataServiceHelper, string containerName) :
base(new MyContext(containerName, dataServiceHelper.NamespaceName, dataServiceHelper.CreateDataLayer())) {
if((httpContext == null) && (HttpContext.Current == null)) {
throw new ArgumentNullException("context", "The context cannot be null if not running on a Web context.");
_dataServiceHelper = dataServiceHelper;
public static void InitializeService(DataServiceConfiguration config) {
//config.SetEntitySetAccessRule("*", EntitySetRights.All);
config.SetEntitySetAccessRule("Contact", EntitySetRights.All);
config.SetServiceOperationAccessRule("IsGranted", ServiceOperationRights.AllRead);
config.SetServiceOperationAccessRule("IsUserAllowed", ServiceOperationRights.AllRead);
config.SetServiceOperationAccessRule("CanReadMembers", ServiceOperationRights.AllRead);
config.DataServiceBehavior.MaxProtocolVersion = DataServiceProtocolVersion.V3;
config.DataServiceBehavior.AcceptProjectionRequests = true;
protected override void HandleException(HandleExceptionArgs args) {
if(args.Exception.GetType() == typeof(ObjectLayerSecurityException)) {
args.Exception = new DataServiceException(403, args.Exception.Message);
base.HandleException(args);
public bool IsGranted(string objectType, string memberName, string objectHandle, string operation) {
Type type = XafTypesInfo.Instance.FindTypeInfo(objectType).Type;
return ((IRequestSecurity)SecuritySystem.Instance).IsGranted(new ClientPermissionRequest(type, memberName, objectHandle, operation));
public IEnumerable<string> CanReadMembers(string objectType, string membersName, string targetObjectsHandle) {
List<string> _membersName = new List<string>(membersName.Split(';'));
List<string> _targetObjectsHandle = new List<string>(targetObjectsHandle.Split(';'));
Type type = XafTypesInfo.Instance.FindTypeInfo(objectType).Type;
Dictionary<string, bool> canReadMembers = ((IRequestSecurity)SecuritySystem.Instance).CanReadMembers(type.AssemblyQualifiedName, _membersName, _targetObjectsHandle);
List<string> result = new List<string>();
foreach(KeyValuePair<string, bool> item in canReadMembers) {
result.Add(item.Key + ";" + item.Value);
public bool IsUserAllowed() {
This would be a good time to take a deeper look at this service. As you can see, we limited access to the Contact business object when configuring the service:
config.SetEntitySetAccessRule("Contact", EntitySetRights.All);
This is a flexible solution for controlling what is accessible and what is hidden from service users. Error handling is provided by the HandleException method, which wraps ObjectLayerSecurityException into DataServiceException – a step required for providing a client application with meaningful error code. There are three primary exceptions: the DataServiceClientException for client operations (updates/inserts), the DataServiceQueryException for querying via LINQ and the DataServiceRequestException for requesting data via a URI. All other exceptions will be passed to the client as an “«Internal Server Error»” with the 501 code, which does not provide a lot of useful information in many cases.
There are also a number of auxiliary classes that are required for the service to work.
· The DataServiceHelper class is a helper that provides methods for accessing XAF IObjectSpaceProvider and XPO IObjectLayer entities.
· The JSONPSupportInspector is required to provide jsonp support; you can learn more about it here.
· The ASPRequestValueManager<ValueType> is required to store security system objects within the context of a current request.
· MyContext is a descendant of the XpoContext base class. We overrode the ShowLargePropertyAsNamedStream and HideProperty methods in this class to tell XPO to:
-pass streams as a part of the query instead of the URL,
-and to hide the Oid property of the Contact class.
Once we are done with the XPO OData service, we will add the Global class using the respective item template. In this class, we will handle all the queries to our service using the means provided by the XAF security system. Let’s review the Application_AuthenticateRequest method, where we will check user credentials and request further processing.
namespace CustomAuthenticationService {
public class Global : System.Web.HttpApplication {
public static string ConnectionString;
protected void Application_Start(object sender, EventArgs e) {
ValueManager.ValueManagerType = typeof(ASPRequestValueManager<>).GetGenericTypeDefinition();
ConnectionString = ConfigurationManager.ConnectionStrings["AzureApplicationServices"].ConnectionString;
protected void Session_Start(object sender, EventArgs e) { }
protected void Application_AuthenticateRequest(object sender, EventArgs e) {
SecurityStrategyComplex securityStrategy = new SecurityStrategyComplex(typeof(SecuritySystemUser), typeof(SecuritySystemRole), new AuthenticationStandard());
SecuritySystem.SetInstance(securityStrategy);
// Remember claims based security should be only be used over HTTPS
//if(context.Request.IsSecureConnection){
string userName = GetUserName(HttpContext.Current.Request);
if(string.IsNullOrEmpty(userName)) {
HttpContext.Current.Response.Status = "401 Unauthorized";
HttpContext.Current.Response.StatusCode = 401;
HttpContext.Current.Response.End();
((AuthenticationStandardLogonParameters)SecuritySystem.LogonParameters).UserName = userName;
((AuthenticationStandardLogonParameters)SecuritySystem.LogonParameters).Password = GetPassword(HttpContext.Current.Request);
CustomAuthenticationServiceHelper helper = new CustomAuthenticationServiceHelper();
//Calling Cross Domain WCF Service using Jquery
// http://www.devexpress.com/Support/Center/Issues/ViewIssue.aspx?issueid=KA18633
string origin = HttpContext.Current.Request.Headers["Origin"];
if(!string.IsNullOrEmpty(origin)) {
HttpContext.Current.Response.AddHeader("Access-Control-Allow-Origin", origin);
string method = HttpContext.Current.Request.Headers["Access-Control-Request-Method"];
if(!string.IsNullOrEmpty(method))
HttpContext.Current.Response.AddHeader("Access-Control-Allow-Methods", method);
string headers = HttpContext.Current.Request.Headers["Access-Control-Request-Headers"];
if(!string.IsNullOrEmpty(headers))
HttpContext.Current.Response.AddHeader("Access-Control-Allow-Headers", headers);
HttpContext.Current.Response.AddHeader("Access-Control-Allow-Credentials", "true");
if(HttpContext.Current.Request.HttpMethod == "OPTIONS") {
HttpContext.Current.Response.StatusCode = 204;
HttpContext.Current.Response.End();
SecuritySystem.Instance.Logon(helper.ObjectSpaceProvider.CreateObjectSpace());
catch(AuthenticationException) {
HttpContext.Current.Response.Status = "401 Unauthorized";
HttpContext.Current.Response.StatusCode = 401;
HttpContext.Current.Response.End();
As you can see, the main work is performed by the well-known SecurityStrategyComplex and AuthenticatinStandard components, which are used in the client XAF apps. The same built-in SecuritySystemUser and SecuritySystemRole business classes are used as well. The user credentials are retrieved from the request headers and parameters, which are originally specified by the client application initiating the request to the server. Of course, for better safety, this approach must work over HTTPS only. If the specified credentials are wrong, the AuthenticationException error with code "401 Unauthorized" is thrown. If everything is fine, the client’s request is passed further where the CustomAuthenticationDataService instance is created.
Note that it is necessary for cross-domain operations to modify the server’s response in a speific way. Further details can be found in this KB Article.
Finally, we will deploy the created service in Azure using the instructions we described in the previous chapter.
TAKE SPECIAL NOTE IF YOU UPGRADE THIS PROJECT CODE TO THE LATEST XAF VERSION:
1. The CanReadMembers method called in the CustomAuthenticationDataService class no longer exists. Refer to the http://www.devexpress.com/issue=Q477749 ticket for a replacement.
2. The DevExpress.ExpressApp.Security.ClientPermissionRequest class used in the CustomAuthenticationDataService class is now obsolete. Use 'PermissionRequest' instead. Refer to the https://www.devexpress.com/issue=T322857 ticket for a replacement.
3. The CreateSelectDataSecurity method called in the CustomAuthenticationServiceHelper class is no longer public. Instead, modify the line as follows: ((ISelectDataSecurityProvider)SecuritySystem.Instance).CreateSelectDataSecurity()
6. The DXTREME Mobile Client
This client application will use the CustomAuthenticationDataService we just created to get data and to get information about how to build a UI based on user rights.
To quickly get started with a DXTREME client, let’s use the recently introduced wizard, which will build CRUD views based on the specified data service. Since our service requires a user name and password, we will have to temporarily disable this feature, so as to not confuse the wizard. This can be done by returning “Sam”, along with an empty string from the GetUserName and GetPassword methods of our Global class respectively.
· Once the wizard completes its work, several views will be created. Let’s rename them as follows:
· - contact-ListView
- contact-DetailView
- contact-EditView
In addition, we will create a logon form, from which the IsUserAllowed service call will be initiated. A user is allowed to enter the application only if the service returns True. In case of a server error (e.g., 401(Unauthorized)) a user is rejected.
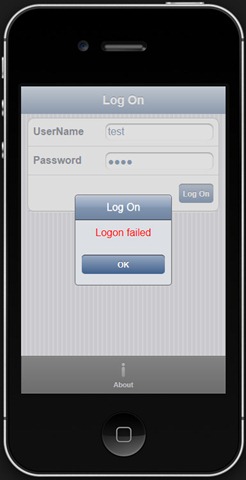
Once a user is authorized, the contact “ListView” is opened by default. This view has a command to create new contacts, which are available to Admin user only, by default.
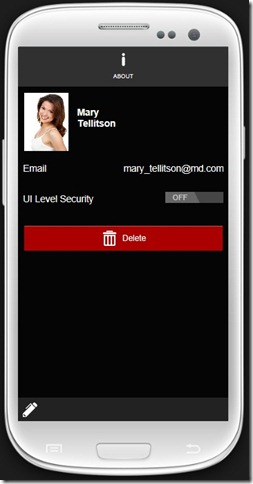
From a list form, a user can go to the contact ”DetailView”, which calls the IsGranted and CanReadMembers service methods. These calls are required for determining the visibility of the Edit and Delete buttons. If a user has no right to edit an object, a special UI Level Security button is displayed (just for the demo). The purpose of this button is to control whether or not the UI should be affected according to the results of our OData authentication service. For instance, if you set the option to Off, the IsGranted call will be ignored and the Edit/Delete buttons will always be displayed.
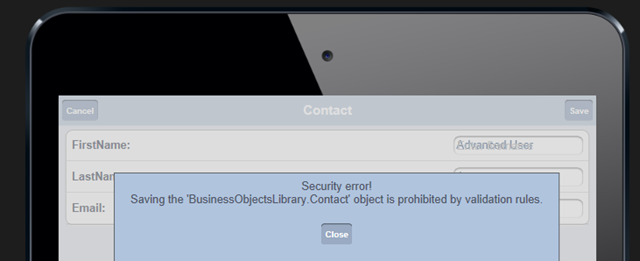
Pressing the Edit button will take you to the contact “EditView”. Once there, you can modify data and press the Save button when you are done. The save operation will complete only if the user has the right to do so. Otherwise, an error will appear.
Finally, you can DOWNLOAD a working version of this project here (DXperience Universal 12.2.4 is required).
A Quick Summary!
1. We created a custom WCF middle-tier security service, in which we leveraged ready-to-use XAF security system means, such as SecuredDataServer, etc. We didn’t invent anything new, except for hosting the service in a regular ASP.NET application deployed in Azure, because our users inquired about how to do this in the past. Please note that our service is connected to the SQL Azure database, which is powered by our XPO datalayer.
2. We created an XAF desktop app that is connected to the security service by simply changing the connection string to a service URL. No additional configuration was required, because it is already provided by the XAF security module out-of-the-box. With the XAF client, you can easily perform all the administrative work, such as creating users and roles, configuring security permissions, etc.
3. We built a custom authentication OData service to provide a bridge from the built-in XAF security system to non-XAF apps. This OData service not only takes data from a middle-tier security service according to the rights of the user talking to it, but also indicates what this user is allowed to do with a certain business object, its fields, etc., allowing for the performance of UI transformations accordingly.
4. We demonstrated the use of the OData authentication services with a DXTREME mobile client, mainly because more and more XAF customers are interested in creating mobile solutions for their clients. Take special note that could create a Console, WPF or any other application type that “understands” OData. This opens even more opportunities and flexibility for you.
Disclaimer
Please take special note that this is just a demonstration post that shows how to use XAF SecurityStrategyComplex class to filter out sensitive data when developing a DevExtreme mobile application. This is not a complete guideline or recommendation on how to develop your apps by any means, but rather an illustration of our vision at the publication date on how this task can be solved. So, please treat it appropriately, because the described solution may contain bugs or there may be better approaches over time. As of the publication date, we do not ship ready and recommended solutions for developing mobile apps with XAF and the Middle Tier Security feature is at the Beta stage. We are working to finish it and will surely provide additional information regarding this scenario when we get results (we cannot provide any ETA on this for now). That said, we will not be able to update the described solution and samples according to the XAF and DevExtreme updates and also provide immediate solutions or support if something stops working in the future. If you are interested in using the new XAF security system with non-XAF applications, you will probably be interested in adding this ticket to your Support Center Favorites list or subscribe to our team blog, as we may provide additional details there.
Our questions to you…
Q1. Would you be interested in having a prebuilt project template for the OData authentication service we created?
Q2. Would you use DXTREME to build a mobile client in addition to your existing XAF desktop app (this is a continuation of an earlier discussion; nevertheless, I wanted to get specific input on this from other users)? Or you would be all right with an XAF ASP.NET application optimized for mobile/tablet use via specialized templates with large buttons, an adaptive menu and other elements providing a superior experience on touch devices (see here for more details)?
Please post your answers to these questions and your thoughts about this in-depth how-to-series in your comments. Happy XAFing!
Free DevExpress Products - Get Your Copy Today
The following free DevExpress product offers remain available. Should you have any questions about the free offers below, please submit a ticket via the
DevExpress Support Center at your convenience. We'll be happy to follow-up.