Introduction
Last week I saw a request from an XAF customer about an updated version of a workaround for the suggestion we have in our Support Center: ViewVariants - provide the capability to save the current view as a new view variant at runtime. I remembered that I already created an updated version in the past when working on a customer’s inquiry (check out the Steps To Reproduce section). Unfortunately, at that time I did not have enough time to polish and publish this code in a Code Central example and then link it to the suggestion, and only added a corresponding item in my TODO list. Therefore, I would like to return to this item, finish a planned example and also describe my experience for other XAFers, because I believe it will be interesting. As always, I will split my discussion into several sections for better understanding and greater convenience. So, let’s start!
Creating a reusable platform-agnostic module
First, I will create a brand new XAF Application solution for version 11.1, which I will use to test the main functionality of my future module. Then, I will add a new module via the respective project template. My module will be platform-agnostic - same as its prototype, View Variants module.
That means that I will write only platform-agnostic code that will provide the same functionality for Windows Forms and ASP.NET applications. That also means that I will be abstracted from specifics of certain platforms (e.g. controls) and instead will operate with platform-independent entities and the API XAF specially provides for us. As you know, this is one of the main XAF advantages I and our customers love in our framework.
I am creating a separate module and not putting my code in one of the projects of my demo solution because I want my module to be easily reused by other users. Let me elaborate more on why this is helpful to you. Suppose I published my work in a Code Central example and you downloaded this example and started investigating it. Well, it worked fine and you wanted to integrate its functionality into your own project. What would be the next steps to do this? Logically, the first and last steps would be looking for controllers in code files and copying them into your project. It is understandable because the first thing you learned when starting with XAF was the fact that XAF controllers are usually used to provide various customizations and functionality. That’s OK, but you may easily forget other slightly less important parts of an XAF solution used for this purpose. For instance, it is very easy to forget to look into the Module.cs and Model.DesignedDiffs.xafml files and miss very important parts of the provided example solution.
Hence, should not it be better to be able to avoid looking into each and every project file and instead be able to just drag and drop a required module from the Toolbox, as with standard XAF modules?
No question that it is better and furthermore, this is a recommended development approach for XAF:
It is best practice to always put finished, independent and tested pieces of functionality into reusable modules. If possible, always try to create platform-agnostic modules, because they will work for several platforms, and so can be helpful to a wider audience.
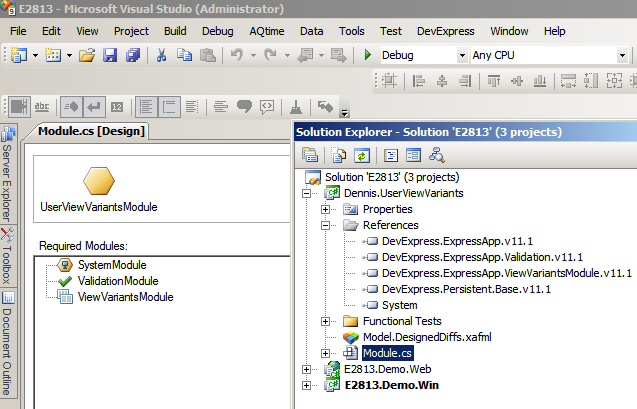
Next, I will invoke the Module Designer and add two standard XAF modules as required, for my module. That means that my module cannot be used without these two standard modules. The next step is optional and you can avoid it if you are not paranoid about optimizations as I am. I am talking about removing unnecessary assembly references and leaving only the required stuff. I have attached a small screenshot for your reference:
Well, enough theory and visual designers for now, and let’s start some real coding!
Implementing basic functionality
Well, my starter solution was represented by a single ViewController with a SimpleAction that created a new view variant by copying the current View settings into the application model. Although it looks a bit Spartan and simple, we actually already have 80% of our solution implemented. Let’s refactor this code by adding more bells and whistles that will make it more user friendly. Before doing this, let’s think what would be nice to have for the user-defined view variants we are implementing:
-
Ability to add new view variants;
-
Ability to delete existing view variants;
-
Ability to edit settings (e.g. caption) of existing view variants;
Now, we are ready for real coding! First, I will add a SingleChoiceAction with three items for adding, deleting and editing view variants:
  1: private readonly SingleChoiceAction userViewVariantsCore;
  2: public UserViewVariantsController() {
  3:     userViewVariantsCore = new SingleChoiceAction(this, STR_UserViewVariants_Id, PredefinedCategory.View) {
  4:         ImageName = STR_UserViewVariants_Image,
  5:         PaintStyle = ActionItemPaintStyle.CaptionAndImage,
  6:         Caption = CaptionHelper.ConvertCompoundName(STR_UserViewVariants_Id),
  7:         ItemType = SingleChoiceActionItemType.ItemIsOperation,
  8:         ShowItemsOnClick = true
  9:     };
 10:     ChoiceActionItem addViewVariantItem = new ChoiceActionItem(STR_NewViewVariant_Id, CaptionHelper.ConvertCompoundName(STR_NewViewVariant_Id), STR_NewViewVariant_Id) {
 11:         ImageName = STR_NewViewVariant_Image
 12:     };
 13:     ChoiceActionItem removeViewVariantItem = new ChoiceActionItem(STR_DeleteViewVariant_Id, CaptionHelper.ConvertCompoundName(STR_DeleteViewVariant_Id), STR_DeleteViewVariant_Id) {
 14:         ImageName = STR_DeleteViewVariant_Image
 15:     };
 16:     ChoiceActionItem editViewVariantItem = new ChoiceActionItem(STR_EditViewVariant_Id, CaptionHelper.ConvertCompoundName(STR_EditViewVariant_Id), STR_EditViewVariant_Id) {
 17:         ImageName = STR_EditViewVariant_Image
 18:     };
 19:     userViewVariantsCore.Items.Add(addViewVariantItem);
 20:     userViewVariantsCore.Items.Add(editViewVariantItem);
 21:     userViewVariantsCore.Items.Add(removeViewVariantItem);
 22:     userViewVariantsCore.Execute += UserViewVariants_Execute;
 23: }
Although XAF provides great support for visual designers (it is another great XAF feature), I (as well as many experienced XAF users I am aware of) personally very rarely use visual designers, even for adding Controllers and Actions. I prefer to always have full control over what I am doing, and hence I prefer to code something rather than design it. Of course, it is possible only after you have reached a significant level of understanding of our framework. If you are not there, then do not be concerne,d and just ignore this. Use the designers if you are OK with them, because while it is not best practice, it is a matter of taste.
Refer to the Add an Action with Option Selection help article to see how the same can be done via the visual designer.
The code above is very simple and there are only a few interesting points I want to draw your attention to. First, look at the use of the CaptionHelper.ConvertCompoundName method. I am using it to save time and not have to specify captions for my Actions. All that I need is to provide a good identifier for my Action items. For instance, my STR_EditViewVariant_Id string constant equals “EditViewVariant” and the method above transforms it to “Edit View Variant”. This is actually not rocket science, but it is a quite useful functionality. BTW, you might have already noticed that in the visual designer for Actions – if you specify an identifier for the action in the property grid, the Caption property will be set automatically.
Secondly, take special note that I assigned some data to the Data property (it is very similar to the Tag property provided by many components) for my SingleChoiceAction items.
Use the Data or Id properties of the ChoiceActionItem class to distinguish items in the SingleChoiceAction Execute event handler and other methods, or to hold additional data for other purposes.
To give you more inspiration, I would like to provide a few examples from standard XAF controllers. For instance, items of the Navigation Action provided by ShowNavigationItemController hold objects of the ViewShortcut type as data. Items of the New Action provided by NewObjectViewController hold objects of the System.Type type, corresponding to types of created business entities. There are of course many more examples in our framework.
Hence, let’s see what the Execute event handler of our SingleChoiceAction will look like:
  1: private void UserViewVariants_Execute(object sender, SingleChoiceActionExecuteEventArgs e) {
  2:     UserViewVariants(e);
  3: }
  4: protected virtual void UserViewVariants(SingleChoiceActionExecuteEventArgs e) {
  5:     string data = Convert.ToString(e.SelectedChoiceActionItem.Data);
  6:     if (data == STR_NewViewVariant_Id || data == STR_EditViewVariant_Id)
  7:         ShowViewVariantParameterDialog(e, data);
  8:     else if (data == STR_DeleteViewVariant_Id)
  9:         DeleteViewVariant();
 10: }
If you look closely at this code, you will be able to identify that here, I followed one more best practice, which is widely used in standard XAF Controllers and Actions, but which is not only specific to XAF:
Allow users (other developers) of your Controller to override the behavior of your Action by providing a virtual method that contains the main code executed by this Action.
In my example, I have a UserViewVariants action and a virtual method of the same name that accepts parameters of the SingleChoiceActionExecuteEventArgs type.
And here is another small best practice when writing Controllers with Actions:
Allow users (other developers) of your Controller to easily access its Actions by providing respective public properties for them.
In my example I have the following property:
  1: public SingleChoiceAction UserViewVarintsAction {
  2:     get { return userViewVariantsCore; }
  3: }
The same practice is widely used in standard XAF controllers. However, this is optional, because Actions can be still accessed by their Ids via the Actions collection of the Controller class:
1: ActionBase myAction = theController.Actions[“MyActionId”];
Now, let’s briefly describe the helper methods called directly and indirectly from the main UserViewVariants method:
-
protected virtual void ShowViewVariantParameterDialog(SingleChoiceActionExecuteEventArgs e, string mode) – this method is used to display a dialog Detail View where end-users can specify a caption for a new view variant or edit an existing view variant. This Detail View is displayed based on a non-persistent ViewVariantParameterObject class. Depending on the usage mode (creating a new or editing an existing view variant), different captions are specified for the Detail View and different initializations are performed for the parameter object. The ShowViewParameters property of the passed SingleChoiceActionExecuteEventArgs parameter is used to setup the Detail View display parameters.
-
protected virtual void NewViewVariant(ViewVariantParameterObject parameter) – this method is called after the OK button is pressed in the dialog Detail View of a new view variant parameter object, and once all the validations are successfully passed. It leads to creating a new view variant based on the current View settings and setting it as a default in the ChangeViewVariant action of ChangeVariantController.
-
protected virtual void EditViewVariant(ViewVariantParameterObject parameter) – this method is called after the OK button is pressed in the dialog Detail View of a view variant parameter object, created based on the selected view variant. It leads to changing its caption to the one, specified by an end-user in the dialog.
-
protected virtual void DeleteViewVariant() – this method is intended to remove unnecessary view variants and can be called for all view variants except for the root variant.
I intentionally will not spend a lot of time looking into the specific code of these methods here, because I already invested some time in commenting them for curious readers (you see the full source code in the Code Central example I published here) and finally, it goes a little bit outside the main scope of my blog post. Instead, I would like to focus only on interesting points and best practices I followed when implementing the whole solution.
Let’s continue our best-practices tour by talking about the ViewVariantParameterObject class I briefly introduced above. Generally, it is declared as a regular .NET class, but it has a few specifics:
  1: [DomainComponent]
  2: [DefaultProperty("Caption")]
  3: public class ViewVariantParameterObject {
  4:     private readonly IModelVariants variants;
  5:     public ViewVariantParameterObject(IModelVariants variants) {
  6:         this.variants = variants;
  7:     }
  8:     [RuleFromBoolProperty(
  9:         "RuleFromBoolProperty_ViewVariantParameterObject.IsUniqueCaption",
 10:         "AddViewVariantContext",
 11:         UsedProperties = "Caption",
 12:         CustomMessageTemplate = "You must specify a different value, because there is already a view variant with the same caption."
 13:      )]
 14:     [Browsable(false)]
 15:     public bool IsUniqueCaption {
 16:         get {
 17:             bool ok = true;
 18:             foreach (IModelVariant variant in variants) {
 19:                 if (variant.Caption == Caption) {
 20:                     ok = false;
 21:                     break;
 22:                 }
 23:             }
 24:             return ok;
 25:         }
 26:     }
 27:     [RuleRequiredField("RuleRequiredField_ViewVariantParameterObject.Caption", "AddViewVariantContext")]
 28:     public string Caption { get; set; }
 29: }
 30:
First, this class is marked with the DomainComponent attribute. It is required to tell XAF to register it within the underlying types info system and also to generate the application model for it. The same could be achieved using the XPO’s NonPersistent attribute, but I used the DomainComponent attribute to avoid any dependencies on XPO.
I presume that some of you may ask: why on the Earth should I care about these attributes and why wouldn’t XAF recognize and add them into the application model automatically, as with other persistent classes?
Come on, guys, the answer is very simple and already lies in your question: XAF automatically recognizes only persistent classes, but our ViewVariantParameterObject is NOT a persistent class, but a regular .NET class.
If you want XAF to recognize your classes, add them to its underlying types info system and generate a respective application model for them, descend your classes from the base XPO or XAF classes or mark them with the DomainComponent, Persistent or NonPersistent attributes, or even register them via a specialized API.
Our parameter class contains the following properties:
-
Caption – is a user-visible string property that is used to specify a caption for a view variant;
-
IsUniqueCaption – is a hidden and read only service boolean property that is used for validation purposes to avoid having view variants with duplicate captions. In order to do this, this property is marked with the RuleFromBooleanProperty validation attribute and implements a simple validation algorithm in its getter.
The following screenshot demonstrates how the ViewVariantParameterObject can be shown in the UI:
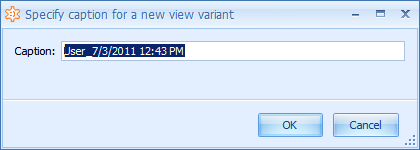
Let’s return to the class code above. Very careful readers might have already noticed that I am using a non-standard validation context for the validation rule: “AddViewVariantContext”. Why is this necessary?
Custom validation contexts can be used to validate objects in contexts other than the standard Save and Delete objects. For instance, to trigger validation of your rule when an Action is executed, assign its ValidationContexts property to a validation context set for your validation rule.
I am using this best practice to validate my non-persistent object when the OK button is pressed in the Detail View dialog, because XAF does not validate non-persistent objects automatically. Hence, I customized the application model of my module as follows:
  1: <ActionDesign>
  2:     <Actions>
  3:         <Action Id="DialogOK" ValidationContexts="AddViewVariantContext" />
  4:     </Actions>
  5:     <ActionToContainerMapping>
  6:         <ActionContainer Id="View">
  7:             <ActionLink ActionId="UserViewVariants" Index="1" />
  8:             <ActionLink ActionId="ChangeVariant" Index="2" />
  9:         </ActionContainer>
 10:     </ActionToContainerMapping>
 11: </ActionDesign>
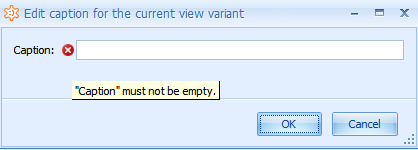
As a result, if the validation fails, it will display the standard validation error in the UI. For instance, in a Windows Forms application it may look as follows:
You can learn more about validating non-persistent objects as well as about implementing validation in custom contexts from the XAF documentation.
BTW, if you are interested in an alternative method (although it seems to be more user friendly, and doesn’t even require the Validation module at all, it will work fine only in a Windows Forms application) to validate non-persistent objects in this scenario, please let me know in comments to this blog.)
While we are discussing the code example above, I would like to talk about other XAF best practices with regard to the design of custom Actions in your module:
Use the Index property to set the relative position of your custom Action against other Actions within the chosen Action Container. You can use large or extreme numbers for the Index to avoid affecting Actions from other modules or ensure the right/left most position within the Action Container.
The last interesting thing in this section I would like to discuss is a very common best practice, which is very widely used in XAF and coming from the general programming world:
It is recommended to always unsubscribe from events and release other resources used in your Controller once they are not needed any longer. Depending on the concrete case, you can either do this immediately or delay it until the program execution comes to the overridden OnDeactivated or Dispose methods.
In my controller, I will do this as follows:
  1: protected override void Dispose(bool disposing) {
  2:     if (disposing)
  3:         UnsubscribeFromEvents();
  4:     base.Dispose(disposing);
  5: }
  6: private void UnsubscribeFromEvents() {
  7:     userViewVariantsCore.Execute -= UserViewVariants_Execute;
  8:     if (changeVariantController != null && changeVariantController.ChangeVariantAction != null)
  9:         changeVariantController.ChangeVariantAction.Execute -= ChangeVariantAction_Executed;
 10: }
Managing availability of Controllers and Actions
Here, I would like to talk about managing the activity (the Active property) and accessibility (the Enabled property) of custom Controllers and their Actions in general, because it is very important, and is very often used by XAF developers (in almost every controller, I need to perform certain operations only under certain circumstances, e.g. work only for certain View types, objects, restrict some users for users, etc.). Therefore, I decided to put it in a separate section.
The bottom line is to set the Active and Enabled properties of Controllers or Actions in response to some system event. There are a lot of events and ways to do this, and here I will list only most widely used ones. Basically, they vary by the place (method or event) where the availability is managed:
-
In the Controller’s constructor either by setting the Active/Enabled properties directly:
  1: public MyDetailsController() {
  2: ...
  3:     myDetailsAction.Active[MyDetailsActionActiveKeyShortcutIsAssigned] = false;
  4: ...
or by setting the TargetXXX properties:
  1: public AnalysisViewControllerBase() {
  2:     this.TargetViewNesting = DevExpress.ExpressApp.Nesting.Any;
  3:     this.TargetObjectType = typeof(IAnalysisInfo);
  4:     this.TargetViewType = ViewType.DetailView;
  5: }
As you see, this is a static approach and it is good when you know about the availability of your Controller or Action at design time. Many of you use this approach when specifying these properties via the Controller and Actions designers in Visual Studio.
-
In the overridden OnActivated method – I hope that all of you know about this option or at least its analog – handling the Controller.Activated event:
  1: protected override void OnActivated() {
  2:     base.OnActivated();
  3:     openObjectAction.Active[ActiveKeyHasReadPermissionToTargetType] = true;
  4: ...
You can also remove the set key in the OnDeactivated method. This approach is good when the availability depends on entities (Window, View, View.ObjectTypeInfo, etc.) available after a Controller is activated.
-
In the overridden OnViewChanging method or in the Frame.ViewChanging event handler – this option is also very common and is used in many standard controllers, but for some reason, it is less documented and well known among our users, perhaps because its name is not descriptive.. Here is a small example:
  1: protected override void OnViewChanging(View view) {
  2:     base.OnViewChanging(view);
  3:     Active.SetItemValue(ActiveKeyHasFileAttachmentAttribute, GetFileAttachmentAttribute(view) != null);
  4: }
  5:
Basically, it is very similar to the previous option. The only difference is that you can manage availability before a View is set for a Frame.
-
In a custom context method/context – this is a very common option and it basically means that you can manage the availability of your Controllers and Actions from almost any place and at any time you require. For instance, in my example controller, I change the accessibility of some of my SingleChoiceAction items under certain circumstances:
  1: private void UpdateUserViewVariantsAction() {
  2:     bool hasViewVariants = changeVariantController.ChangeVariantAction.Items.Count > 0;
  3:     UserViewVarintsAction.Items.FindItemByID(STR_DeleteViewVariant_Id).Enabled[STR_HasViewVariants_EnabledKey] = UserViewVarintsAction.Items.FindItemByID(STR_EditViewVariant_Id).Enabled[STR_HasViewVariants_EnabledKey] = hasViewVariants;
  4:     if (changeVariantController.ChangeVariantAction.SelectedItem != null) {
  5:         VariantInfo variantInfo = (VariantInfo)changeVariantController.ChangeVariantAction.SelectedItem.Data;
  6:         UserViewVarintsAction.Items.FindItemByID(STR_DeleteViewVariant_Id).Enabled[STR_IsRootViewVariant_EnabledKey] = variantInfo.ViewID != GetRootViewId();
  7:     }
  8: }
I call the method above from several places including the OnActivated method, ChangeVariantAction_Executed, NewViewVariant and DeleteViewVariant methods. This approach is good to go if the algorithm that determines the availability is not heavy enough. In addition to custom execution contexts in your own code, you can subscribe to many system events provided by various entities of our framework. For instance, I already mentioned above the Execute event provided by Actions, the CurrentObjectChanged, ControlsCreated, SelectionChanged and other events provided by the View class and so on. The general pattern here is to determine the list of required events and then handle them to call the method that will update the availability of your Controllers and Actions.
Regardless of the way the availability is managed, the same best practice is used here:
When setting the Active, Enabled or any other properties (e.g. AllowEdit) of the BoolList type, always provide descriptive reasons as keys and define them as string constants in your class. Descriptive keys will help you identify problems faster when using the Diagnostic Action.
In addition, I suggest you check out the following help topics:
Providing localization support
The next thing I would like to talk about is providing localization support in my ViewController. There are actually only a couple of strings that need to be localized, but I have to attend to this because my reusable module will be probably be used by people over the world.
Do not leave captions and other strings that can be modified for end-users hardcoded in your code. Instead, move them either into the application model or resource files, embedded into your module. Use the existing infrastructure and API provided by XAF and .NET framework for localization purposes.
Hence, I moved them into the Model.DesignedDiffs.xaml file, under the Localization model element, which is used in XAF as a centralized place for many localized strings:
  1: <Localization IsNewNode="True">
  2:     <LocalizationGroup Name="Texts" IsNewNode="True">
  3:         <LocalizationItem Name="DefaultViewVariantCaption" Value="Default" IsNewNode="True" />
  4:         <LocalizationItem Name="NewViewVariantParameterCaption" Value="Specify caption for a new view variant" IsNewNode="True" />
  5:         <LocalizationItem Name="EditViewVariantParameterCaption" Value="Edit caption for the current view variant" IsNewNode="True" />
  6:     </LocalizationGroup>
  7: </Localization>
Then, I will use the CaptionHelper.GetLocalizedText method to get a required localized string:
1: viewCaption = CaptionHelper.GetLocalizedText("Texts", "NewViewVariantParameterCaption");
Of course, this is not the only option that can be used in XAF to provide localization support into your applications. Another very popular approach, which is also a traditional for all .NET applications, is storing localized captions in resource files (*.resx). You can learn more about this in the docs.
Automatized testing is essential when creating reusable modules
Well, suppose we are done with the implementation of our module and we are ready to test whether it fully meets our needs. First, we will invoke the Application designer of our test application and will drag and drop our custom module from the Toolbox, just as you are accustomed to doing with standard XAF modules:
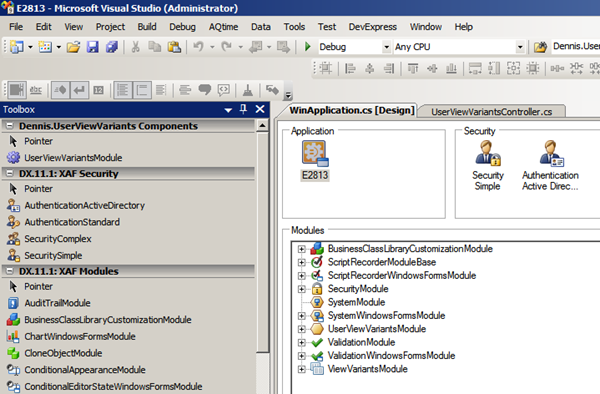
Now, we will run our Windows Forms and ASP.NET test applications and ensure that everything works exactly as we planned initially. The video below demonstrates the main functionality:
Well, everything functions as expected and we are almost finished with our work on the module. I said “almost” because we are still missing some important details…
But what if next time I decide to modify my code a little bit?
Damn it! At the current stage, I will have to manually repeat full testing two times (one for Windows Forms and one for ASP.NET applications). And, I will have to do this every time I decide to change something in my module to ensure that everything still functions as expected!!! Just imagine the cost!!!
And what if I have to support several such modules? And what if I have to migrate this module to the next framework version???
Well, everyone already knows the answers - it is a real PITA and no one would want to be in my shoes at then, because I have not yet taken care of automating the testing process…
How can I decrease my costs and pain? Fortunately, after this rhetorical question I just remembered Gary and his very good presentation: Technical Debt.
If I only used the pure agile approach and followed the “first test, then code” approach when writing my controller, I would be in a much better position. So, unit testing is certainly one possible solution.
Unfortunately, many of XAF users (including myself) hate to write unit tests prior the actual coding or even write them at all, because it is sometimes difficult to do (there are of course many other excuses for not doing this). Apparently, it increases our “technical debt” and I would love to look for alternative approaches that can help me be “done before lunch” © faster and with less cost.
Does such a magic solution exist on Planet Earth? In my opinion it does, and it is called Easy Test – a framework for functional testing of XAF (and not only XAF) applications. I suggest you check out this blog for more inspiration.
What is the best way of leveraging Easy Test to create a test script for my module? The answer is Script Recorder, a utility module, together with the Easy Test framework It records user activity and creates a test script for it.
The Script Recorder module can be added into my test application the same way as other standard XAF modules – just drag and drop it from the Toolbox (see the screenshot above). Once it is added, I will run my test Windows Forms application and start the testing procedure. At the end, I will execute the Show Script command from the Tools | Script Recorder menu and it will display the recorded Easy Test script:
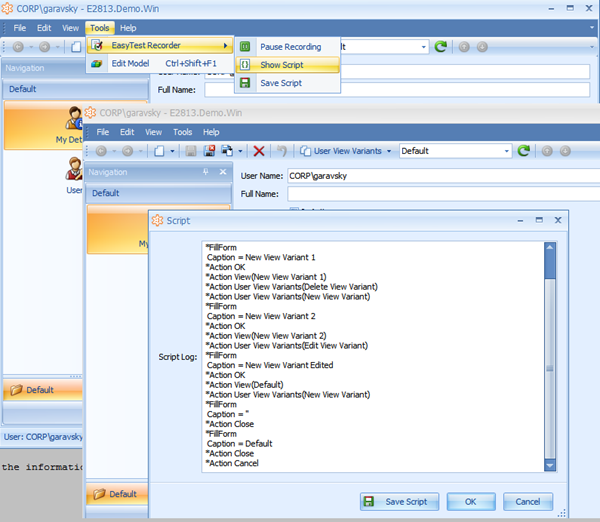
Then, I will save the generated script into the Functional Tests folder of my module.
Although, about 95% of testing work is already done by Script Recorder, it will still require modifying the generated script to insert actual checks – that it is understandable because it cannot read my mind and determine what I would like to check, just by capturing my eyes on the screen .
.
After the modification my script will look as follows:
  1: ;#DropDB E2813
  2: #Application E2813.Demo.Win
  3: #Application E2813.Demo.Web
  4:
  5: !ActionAvailable User View Variants(Edit View Variant)
  6: !ActionAvailable User View Variants(Delete View Variant)
  7:
  8: *Action User View Variants(New View Variant)
  9: *FillForm
 10:  Caption = New View Variant 1
 11: *Action OK
 12:
 13: *CheckActionValue View(New View Variant 1)
 14: *ActionAvailable User View Variants(Edit View Variant)
 15: *ActionAvailable User View Variants(Delete View Variant)
 16:
 17: *Action User View Variants(Delete View Variant)
 18: !ActionAvailable User View Variants(Edit View Variant)
 19: !ActionAvailable User View Variants(Delete View Variant)
 20:
 21: *Action User View Variants(New View Variant)
 22: *FillForm
 23:  Caption = New View Variant 2
 24: *Action OK
 25:
 26: *CheckActionValue View(New View Variant 2)
 27: *Action User View Variants(Edit View Variant)
 28: *FillForm
 29:  Caption = New View Variant 2 Edited
 30: *Action OK
 31: *CheckActionValue View(New View Variant 2 Edited)
 32:
 33: *Action View(Default)
 34: *ActionAvailable User View Variants(Edit View Variant)
 35: !ActionAvailable User View Variants(Delete View Variant)
 36:
 37: *Action User View Variants(New View Variant)
 38: *FillForm
 39:  Caption = ''
 40: *Action OK
 41:
 42: *CheckValidationResult
 43:  Message = Problems were detected during data validation. Please read the information below to understand what the issues are and how you can correct them.
 44:  Info = "Caption" must not be empty.
 45: *OptionalAction Close
 46:
 47: *FillForm
 48:  Caption = 'Default'
 49: *Action OK
 50:
 51: *CheckValidationResult
 52:  Message = Problems were detected during data validation. Please read the information below to understand what the issues are and how you can correct them.
 53:  Info = 'You must specify a different value, because there is already a view variant with the same caption.'
 54: *OptionalAction Close
Take special note that it can be used for testing both Windows Forms and ASP.NET applications! To see how it will work in action, ensure the correct path to the project is set in the Config.xml file and then select the E2813.ets file with our script in the Solution Explorer (or just open it in the code editor) and then choose Run from the context menu:
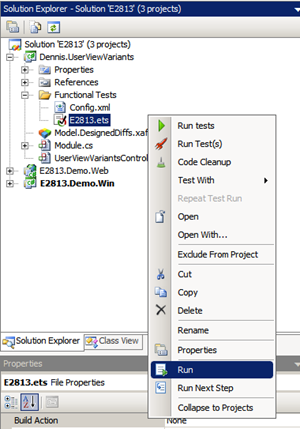
As a result, the testing procedure will be started, and you will see how first, the Windows Forms and ASP.NET application will be executed according to the script we created.
It is simply amazing how much time and work Easy Test can save you! So, the following best practice or assertion comes from it:
If you are developing with XAF and do not usually use Easy Test or at least write unit tests, then you are not following the best procedure, regardless of whether you are a one-man shop or an enterprise.
As always, you can learn more about Easy Test, and functional testing in general, in the XAF documentation.
Looking forward to hearing from you
My main goal when creating this blog was to demonstrate some of the best practices for creating reusable modules for our framework, and also show you the great opportunities it offers to developers. For example, if I was not working for DevExpress, I would just need to create the documentation for my module, integrate it into the build process, and I am ready to sell it for say, $9.99 per to other XAF developers. This opportunity is real, and it already exists for you. So, let’s pack your custom business classes, controllers, editors and other stuff into reusable modules and introduce them to the market. I believe that there is already a strong demand for it, for instance from people who do not have enough time or XAF experience to do certain tasks themselves.
BTW, today Tolis told me that his open source eXpand Framework already has a similar module in the arsenal: http://www.expandframework.com/#viewvariants. It is not surprising because eXpand has a lot of reusable modules that help you create functional business applications even easier (it is very similar to your construction set from childhood).
I hope you will find this blog post helpful and will learn more about XAF. The full source code of the extension for the View Variants module, including functional tests, can be found in the Code Central at http://www.devexpress.com/example=E2813
Please let me know what you think about this. Thank you in advance!
Happy XAFing!
Free DevExpress Products - Get Your Copy Today
The following free DevExpress product offers remain available. Should you have any questions about the free offers below, please submit a ticket via the
DevExpress Support Center at your convenience. We'll be happy to follow-up.