ASP.NET Core File Manager - How to Display Files Hosted on Azure

If your web application stores files within a cloud service, you'll find that visualizing a file system can be both cumbersome and time-consuming. In this blog post, we’ll briefly explain Azure storage, what the main problems are, and show you how you can use our ASP.NET Core File Manager to display hierarchical file information in your next web app.
Azure Data Storage
The following diagram illustrates the main concepts of Azure's storage structure:
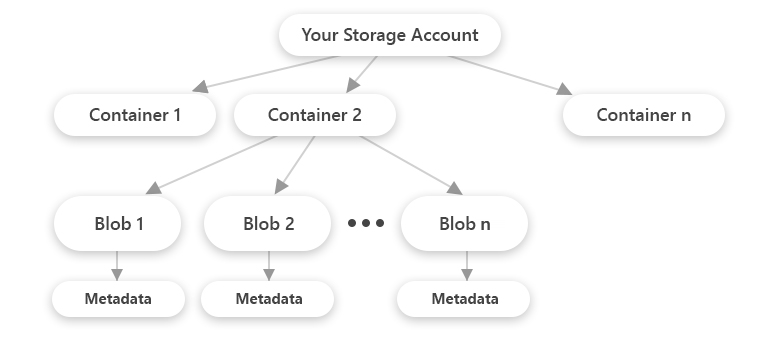
Unlike a local file system, Azure stores files in blobs, stored in blob containers. A blob container can contain several blobs. By default, Azure provides the files in your containers as a plain list. If you want to display files and folders hierarchically, you should create a custom file storage based on Azure blob storage data. See Creating an Azure Blob Hierarchy.
Creating a Custom File System
To help get you started, we created a solution with a custom file system provider that organizes files into a hierarchical file system. Follow the steps below to include this solution in your application.
- Download the source code for our ASP.NET Core sample project.
- Add the project to your Visual Studio solution.
- Execute the following command in the Visual Studio NuGet Package Manager Console to install the Microsoft.Azure.Storage.Blob Nuget package:
dotnet add package Microsoft.Azure.Storage.Blob --version 11.0.0 - To connect the DevExpress File Manager to Azure storage, create a custom file system provider that implements the IFileProvider interface (this is the AzureBlobFileProvider class in our sample).
- Use the Azure SDK to implement the necessary code to manage (rename, remove, copy, etc.) storage data.
- Specify an account name, container name and corresponding access key to access the appropriate container in your storage.
- Assign your custom file system provider to the
FileSystemConfiguration.FileSystemProviderproperty and apply security permissions to files and folders:
public IActionResult FileSystem(FileSystemCommand command, string arguments)
{
	var config = new FileSystemConfiguration
    {
		Request = Request,
		FileSystemProvider = new AzureBlobFileProvider(),
		AllowCopy = true,
		AllowCreate = true,
		AllowMove = true,
		AllowRemove = true,
		AllowRename = true,
		AllowUpload = true,
		UploadTempPath = _hostingEnvironment.ContentRootPath + "/wwwroot/UploadTemp"
	};
    var processor = new FileSystemCommandProcessor(config);
   	var result = processor.Execute(command, arguments);
   	return Ok(result.GetClientCommandResult());
}Survey
If you’re currently using the DevExpress ASP.NET File Manager control and expect to use Azure in an upcoming project, we’d love to hear from you. Please share your experiences with us below.
Free DevExpress Products - Get Your Copy Today
 The DevExpress Team