Building the Ultimate Developer’s Walking Desk

Sitting for long periods of time can be deadly, whereas walking is healthy. If you’re obsessed with efficiency like I am, it makes sense to exercise while you work. I built my first walking desk three years ago, and recently after a move I had the opportunity to take on the challenge again. This time I decided to document my process, and I share it here in the hopes that some may find it helpful.
Constraints for Success
- Transition from walking to sitting effortlessly - in less than five seconds.
- Support multiple monitors.
- Everything onboard the desk securely in place.
- Support my dev laptop (with the ability to disconnect or reconnect my laptop in less than a minute).
- Absolute minimum of cords connecting the desk to the outside world.
- Easy to modify later.
- Have expansion room leftover for custom peripherals (more monitors, streaming equipment, etc.)
- Everything clean and neat, both above and under the desk.
- Costs no more than $2000 to create and build.
- Needs to follow guidelines from the Science of Great UI design course.
Parts
Here’s what you need:
- Treadmill.

I’m using the LifeSpan TR1200-DT3 Under Desk Treadmill, retailing at $1149.99. This is the same treadmill I’ve had since 2015.
My mini review: It’s okay. When I’m walking, it totally meets all expectations, however I was never able to successfully get its Bluetooth connection working, and after being turned on for a long time, the control panel that sits on the desk will sometimes lock up and needs a reboot. But it’s three years old and still performs the essence of what it’s designed to do well and it’s low to the ground (more on why this is important later) so I’m still using it. When I’m in market for a new treadmill, I will likely consider alternatives as well as newer models and read product reviews.
- Treadmill Desk.

I’m using the TrekDesk Treadmill Desk, currently available for $649.99 on Amazon. When I originally bought this two years ago it was only $499, so the price appears to have definitely gone up without any apparent changes to the model.
My mini review: It’s really good. Aside from the unexplained price increase since 2015, this treadmill desk is perfect for what we want to build. I’m tall (6’4” or 1.93m), and this desk has no problems reaching the height I need when standing on the treadmill to make typing comfortable. The desk is lightweight, sturdy, and is easy to work with. It also gives me that wrap around desk I prefer, perfect for a multiple monitor setup. The desk also has a number of holes around the edges which are perfect for feeding cords through (more on this later).
- Drafting Chair.

I’m using the Modway Veer Drafting Stool-Chair, currently available for $118.75 on Amazon. A drafting chair is critical for the under-five-second transition between walking and sitting, because the chair must be high enough so your elbows rest at the exact same height as they would be when walking on the treadmill. A drafting chair is part of that equation (more on this below).
My mini review: This chair is functional at a low price. After a year’s worth of use the fabric on the arms has become rough. Aside from that it continues to work well.
- Furniture Sliders.

I’m using the Shepherd Hardware 9220 1-1/8-Inch Chair Tip Slide Glide Furniture Sliders, 4-Pack, currently available for $5.60 on Amazon. These are a super important part of the equation. Because your walking desk will likely be supporting a lot of weight (e.g., multiple monitors), reducing friction where the desk meets the floor is critical.
My mini review: These sliders work really well, making it easy to slide the desk across the floor. I have tried these on both hardwood (last location) and tiled floors (new location), and they work really well on both surfaces. They last a long time (I replaced my originals after over two years of use), and they perfectly fit the legs of the TrekDesk Treadmill Desk. Great value for the money here.
- Adhesive-backed Hook and Loop Tape.

I’m using Command Picture Hanging Strips shown above, because they hold well and remove cleanly. So I can keep devices in place on the desk where they belong and later if I want to remove or change devices, I don’t have gunky adhesive all over the desk and/or parts I’m removing.
My mini review: These hanging strips are great for keeping items on your desk in place when sliding back and forth. And I love that the adhesive detaches without leaving any residue on any of our onboard equipment. - Picture Hanging Wire

- Cable Ties.

For my build I used a package of 50 150mmx3.5mm black cable ties, and ended up using all 50 of those ties.

Other parts that may vary with your implementation: Extension cord, power strips, screws, wood glue, monitor stands, etc.
Equipment
- Drill
- Saw (ideally one that easily cuts straight lines at right angles)
- Screw driver
- Needle nose plyers
- Cutters (to cut the wire and the cable ties)
- Sandpaper
The Platform
The key to a fast walking/sitting transition is to bring your forearms (when sitting) to the same height as they are when walking on the treadmill. This is why treadmill height off the ground is important. The LifeSpan treadmill I’m using is 6” or 15.25cm off the ground. Pretty low, so that’s good. Satisfying this constraint is also why we’re using a drafting chair instead of a normal office chair. The Modway Veer drafting chair brings the seat up to 29” or 76.33cm off the ground. But a flat treadmill and a tall drafting chair are not enough to solve this problem alone. We will also need to build a platform to make up the difference.
The platform height plus the drafting chair’s armrest height (when the chair is at its highest position off the ground) should equal your forearm height when walking. In other words, we’re going to create something like this:

Click image above for a larger version. The desk slides backwards so you can sit, or forwards so you can walk.
By getting these forearm heights equal, you can quickly and almost effortlessly change from walking to sitting and back.
In my original build of the platform (from three years ago), I cobbled-together a mess using a picture frame, duct tape, Styrofoam, and cardboard (these last two supplies were borrowed from the original desk’s shipping box). The picture frame’s borders effectively prevented the chair wheels from rolling off the platform. And while arguably shoddy, this platform worked well and held together for almost three years until we moved.
However, for my latest build I decided an upgrade was in order, so I built the platform out of wood. The wooden platform feels more solid than my old Styrofoam/duct tape and cardboard solution (I suppose no surprise there).
Here’s what my platform looks like:

I used wood that was about 1 5/8” or 4cm on two sides (cut to various lengths) for the structure and border rails, a sturdy plywood for the floor, and about 32 long wood screws. Note the use of diagonals on each of the four sides. Building this was a great lesson in mechanical engineering for my kids. Before the diagonals the cube was wobbly, and after the diagonals it was so solid I felt I could start tossing it around the room (we didn’t). When I built this with the kids the hardware stores were all closed, and we were running low on wood screws, so instead of using two at each connection point (as I really felt we should) we only used one. But once we got the diagonals cut properly and in place, it became clear that each screw was more than capable of holding its respective connection in place.
Here’s the step-by-step on how I built it:
First, I set my chair down onto the plywood, turned the wheels inward, and measured the minimum space I needed, adding a border all around. The width of the border matched the width of my wood (1 5/8” or 4cm).
I cut four pieces of wood to serve as that border (to keep the chair from sliding off the top of the platform). Those pieces are screwed together like this:

The plywood is the floor to the platform, and is cut to line up with the outside edge of this border, and attached to the border with eight screws (two on each border edge):

The image above is the floor and border flipped upside down. The properly-oriented assembled platform floor with borders looks like this:

Next, we need to build the platform. This consists of a matching top and bottom pieces, supporting columns, and diagonals. We’ll start with the top piece.
The top rectangle should be at least as big as the opening in the floor, because it needs to support the weight of the chair that sits right above it. We can use two of the same-length pieces we’ve already used before (shown in purple, both above and below), with new pieces (in green) to make it long enough to just fit inside the bordered floor.

As a test, your completed top unit should fit snugly (or be a bit too big to fit) inside the bordered floor:

Careful: The image above is only to show comparative sizes of the floor and the top rectangle of the platform. This top rectangle will not be positioned as shown above.
Next, let’s build a bottom rectangle, which looks exactly like the top:

Next, add the side columns to the top rectangle:

Tip: This is a good time to get some help. When I built this part, I had two kids helping keep the columns upright as I screwed down each one.
After attaching the columns, you’ll need to flip this assembly over, and you’ll want to do this carefully because at this point the structure is fragile.
Add the remaining rectangle:

Next, we’ll need to add diagonals on each of the four sides shown above.
Carefully turn the crate on its side and rest it on a piece of wood long enough to become a diagonal, like this:

Arrange the diagonal so the center of the wood touches the inside corner on each side. Mark the two inside corners with a pencil…

then remove the platform and cut:

Make sure the diagonal is a snug fit. Cut/trim again if necessary to get this right. Install the snugly-fitting diagonal with (at least) two screws as shown below:

Repeat for the other three sides, and you get a structure that looks like this.

Notice in my implementation above each neighboring diagonal starts on the opposite top/bottom side. I’m not a mechanical engineer, but this felt like it would result in a more stable structure than one where two diagonals both meet at the same corner:

The last step is to add the floor on top of our platform, and you can do that with four (or more) screws like this (make sure it’s centered over the platform before you drive the screws):

The lengths for all the pieces I used are shown below (in imperial units):

Lengths for the diagonal pieces are not shown as those are custom-cut to fit snugly in each of the four sides.
Remember, your lengths will likely be different based on your forearm height when walking on the treadmill and the minimum base size needed for your drafting chair.
And of course, feel free to splurge and buy an extra pack of wood screws so you can increase the screw count if needed.
Here’s another view of the platform:

Suggestion: When building this platform, I actually made it about an inch (2.54cm) taller than I needed, in case the drafting chair’s lift mechanism were to fail in the future, where it becomes unable to reach its full height. Having it be a little taller than needed may buy time to continue working while I replace the dying chair.
Afterthought: After building this and using it a few times, I’m now thinking I should create a standing area on the side, and I might rebuild this as a future project. My older platform was wide enough and had plenty of room for my feet as I mounted/dismounted the chair. But because my new platform tightly holds the wheels of the chair (see pic below), I have less space to place my foot as I’m getting seated:

In this design I have little room to stand as I’m getting into or out of the chair.
A standing space on the side of this new platform would make getting up and down easier. I could extend the platform so I have more room to stand next to the chair, but still keep the tight lock on my chair wheels. I imagine something like this:

Power
The most important feature when building the ultimate programmer’s walking desk is onboard power. When I built my first desk I had only one power strip, and later felt the pain of that limitation when I wanted to add more devices.
My new desk has three power strips, with outlets to support up to 16 onboard devices:

I’m not worried about driving three different power strips from a single outlet because the total wattage of everything on my desk remains relatively low, with my laptop and monitors taking up most of the load.
The power cord leading to the desk should ideally never touch the floor. In my original setup the power cord leading to the desk did drag across the floor, and while I almost never had a problem of cord colliding with sliding desk legs, it was frequently a concern and I’d often find myself carefully watching the cord as the legs slid by or pushed it out of the way. In the new improved desk the cord is attached to the wall at a midway point, and as a result never touches the floor as I slide the desk between its extreme positions.

Monitors
Because we’ll be sliding our desk back/forth as we transition between walking and sitting, it is very important that all monitors be securely fastened to the desk. This is especially true of monitor stands that may be supporting vertically stacked monitors.
I used picture hanging wire because it is strong and easy to bend. Here’s how I secured a VIVO two-monitor stand in the center of my desk:

Notice I twisted two lengths of wire together for redundancy. I want this to be secure for a long time and be resilient to sudden forces applied to the desk in different directions.
Here’s that same stand from the back:

Notice also I’m drilling holes in the desk and feeding the wire through those holes. Here’s a second monitor stand:

Beneath the desk I twist the wires…

cut the excess wire…

and bend the sharp pointy edge up toward the desk…


And the final result looks something like this:

Tip: when placing monitors, try to distribute the weight between all four legs of the desk. In my initial placement, my heaviest onboard items were almost directly over the two furthest legs and as a result those two furniture sliders where working much harder than sliders closer to me, and there was some audible noise when sliding quickly. Get the balance right before you tie the monitors down, especially if you're placing heavy monitors near the back of the desk. Suggestion: have a friend hold the monitors in place while you push the desk back and forth over the surface to test weight distribution and balance.
Keyboard & Mouse
I use a Microsoft Natural Keyboard 4000. The keys are angled out so my arms are in a more comfortable position. The TrekDesk Treadmill Desk is a wrap-around desk, which I love for monitor placement but on this desk my keyboard needs to be positioned a bit further away from me than I would like. So I built a small extension for it out of thin plywood and sanded down the leading edges. Here’s the extension placed on the desk and secured with picture-hanging wire:

The dashed line shows the actual edge of the TrekDesk below the extension.
Here’s the mouse and keyboard in position:

Onboard Equipment
Every onboard item that has a dedicated position is kept in place using the removable hook & loop tape:

Cabling
So one of my goals is to have the smallest amount of visible cable above the desk. That means the bulk of the wiring needs to happen under the desk, and that we bring cables up to the surface only when needed (and bring those cables up through holes that are closest to where they are needed).
I mentioned before that the TrekDesk had holes around the perimeter of the desk that made it easy to bring wires from the underside to the top of the desk. These pics should give you an idea of just how big they are:

The capacitor in the line is easily pushed through.

Even the female end of a power cord easily slides right through.

Even my wireless phone charger slips through!
The TrekDesk has ten of these perfectly-shaped holes distributed around the perimeter of the desk. You can also optionally use any of these as a mounting point for one or more of their cupholders:

The only challenge I had fitting cables through these holes was when I tried to get an XLR audio cable through. XLR connectors seem just a bit too big for the hole and at first it seems like you can’t get them through. However, after a few tries I discovered they can in fact be pushed through safely (no damage to the desk or the cables) if you slowly apply consistent and sufficient force.
Below the desk, wiring needs to be cleanly routed and cable-tied. This is what it looks like under my desk now:

It’s pretty good. Maybe not perfect, but cables are definitely out of the way yet still easy to change.
Here’s the cord that brings power to the desk:

Final Layout
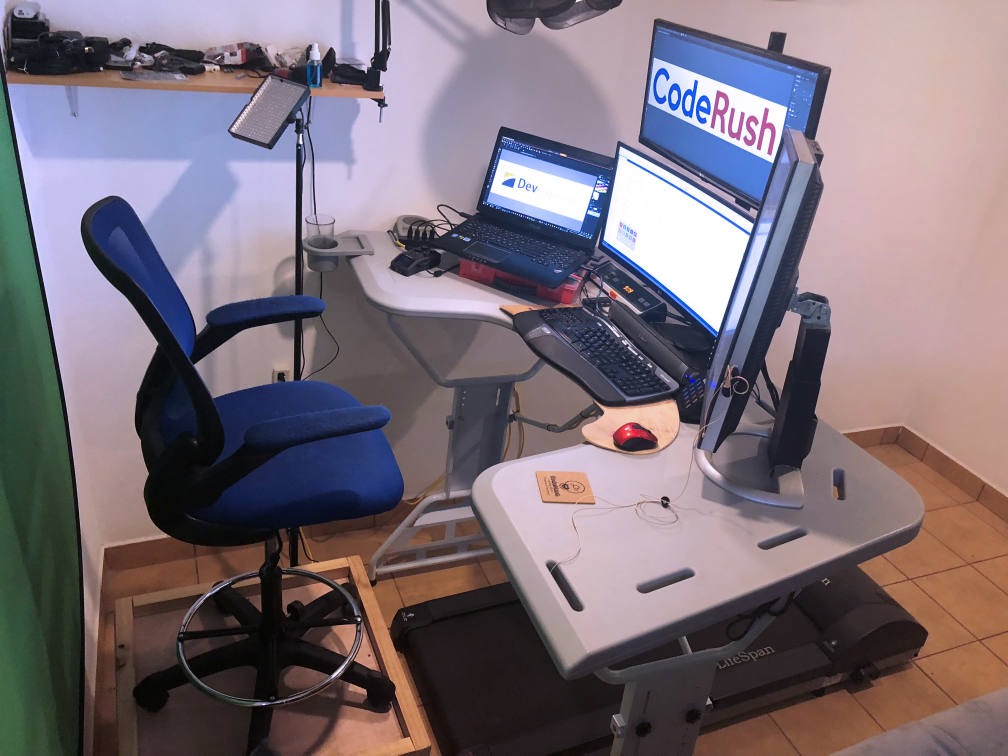
Here are a few pics of the in-progress layout of the developer's walking desk, version 2.0:

Pictured above: my laptop, three external monitors, Stream Deck, Zoom H6, headset mic, wireless phone charger, USB ports, treadmill control panel, speakers, keyboard, mouse and a CodeMash drink coaster all resting on my treadmill desk.
The desk nearly all the way back (sitting position). I pull it back until the keyboard meets my fingertips in a comfortable position.

The desk in walking position. To get it here I just start the treadmill, hop off the chair and push the desk forward slowly until it’s where I want it.

Side view of seated position.

View from the front, seated position, reveals my live streaming setup (greenscreen plus lighting).
Conclusions
Let’s see how we did in meeting our criteria for success:
- The desk supports up to four external monitors. Check.
- Everything onboard the desk is secure and where it belongs. Check.
- I can connect/disconnect my developer laptop in about 45 seconds. Check.
- Above-surface cords and wiring is clean; below-deck cords are cable-tied and out of the way. Check.
- There’s still room for one more monitor and more equipment. And modifications and later expansion are both reasonably easy (cut some cable ties, drill a few holes, route cables, wire equipment down, plug into power, tie cables).
- Total cost of treadmill + desk + chair + wood + screws + cable ties + velcro: $1,984.33, so we came at our budget.
The desk is easy to use and easy to transition between walking and sitting. And regardless of whether I’m walking or sitting, my forearms are the same distance from the keyboard - a position where the smallest physical effort is needed to write code. so we followed most of the applicable good-design guidelines from the Science of Great UI (although I’m still thinking about extending the platform, literally widening the path so I have more room to stand before sitting down).
Overall I’m pleased with the desk, and I’m excited to be able to simultaneously write code and get my exercise (did I mention I’m obsessed with efficiency)? So it’s time to get back to work.
By the way, if you would like to see me write code live from this desk, check out my live streaming channel, CodeRushed, on Twitch.
Let me know what you think (and if you have any questions/suggestions)!
Free DevExpress Products - Get Your Copy Today
Mark Miller (DevExpress)