Using Online Course Sample Projects

Back in October 2016, I announced the availability of sample project source code to accompany our online training classes.
We have had lots of positive feedback about this step, but there have also been a few common stumbling blocks that I would like to address in this post.
General: Unpacking
Please always unpack complete zip files! You have a choice between individual video demo projects and complete packages for a course, but in any case a zip file should always be unpacked completely. If you extract individual files or folders from the zip file, you can easily miss requirements and see compile-time errors as a result.
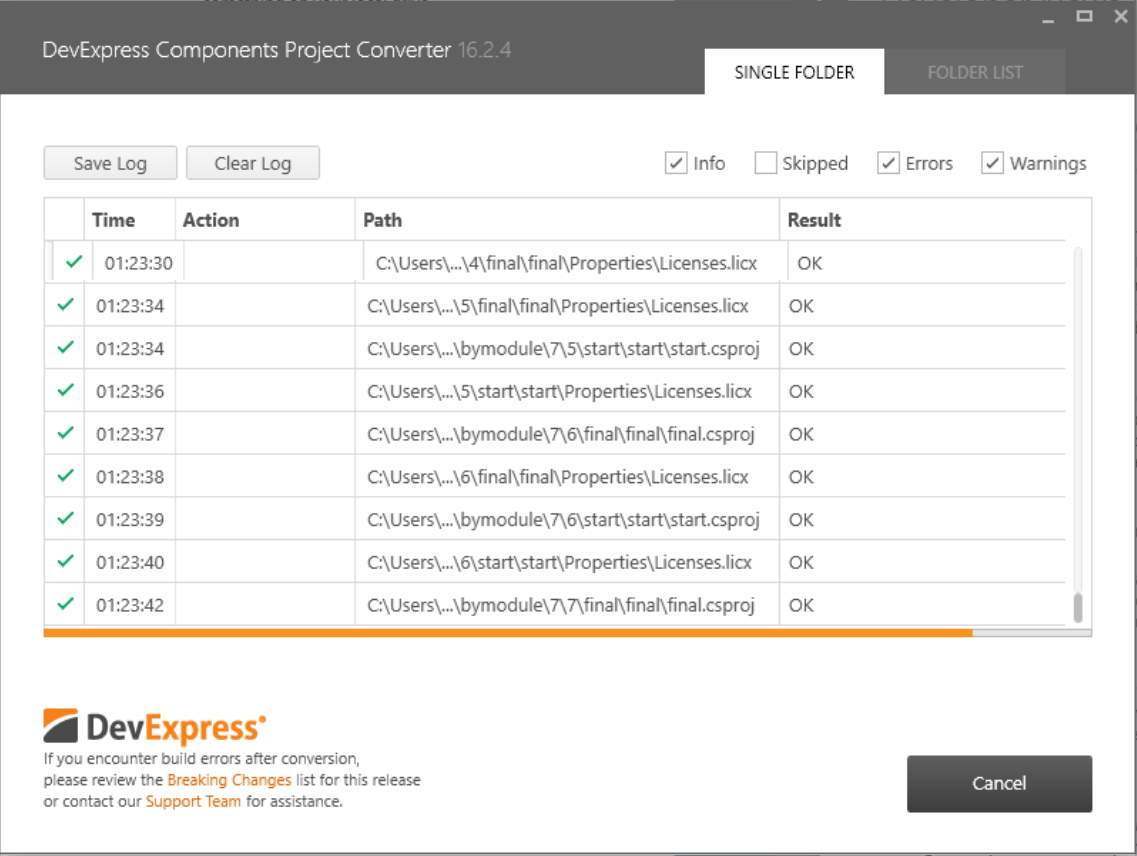
General: Use the Project Converter
The first recommended step after unpacking is to convert all projects to the version of the DevExpress products you have installed. Run Visual Studio and access the DevExpress drop-down menu, and then the Project Converter sub-menu. Inside that menu, you will find one or more project converter items for the major DevExpress versions you have installed on your machine. Select the one for the version you want to use and run it.
In the window titled DevExpress Components Project Converter, use the Browse button on the Single Folder page and find the folder where you extracted the zip file.
Alternatively, if you have extracted several individual zip files, find the root folder where all the extracted code is.
Click the Upgrade button. The project converter automatically finds all the relevant files in the entire selected path hierarchy and converts them as needed. Depending on the performance of your machine, the process make take up to a few minutes, so be patient and wait for it to complete.
Finally click the Finish button to close the project converter.
General: Build the project first
After you have opened a solution file in Visual Studio, please build the project first. A few Visual Studio designers, especially on the WinForms and WebForms platforms, may not work correctly if the project has never been built. Additionally, this step serves as a basic check of your setup, assembly reference versions and other details.
WPF Course: Database connections
Many of the projects for the WPF course require database access. The video about the demo data layer setup describes the structure used for the course, which is based on Entity Framework.
Adapting the configuration to your database setup
Out of the zip file, all projects are configured using the SqlConnectionFactory default setup. You can find the configuration in the app.config files of the projects that access data. The relevant part of the config file is this:
<entityFramework>
  <defaultConnectionFactory
    type="System.Data.Entity.Infrastructure.SqlConnectionFactory, EntityFramework" />
  <providers>
    <provider invariantName="System.Data.SqlClient"
      type="System.Data.Entity.SqlServer.SqlProviderServices, EntityFramework.SqlServer" />
  </providers>
</entityFramework>
This standard configuration expects an instance of SQL Server to be available at .\SQLEXPRESS, i.e. the standard local instance name of a SQL Server Express installation. To save time when working with the sample code, I recommend installing a version of SQL Server Express. (Although this is freely available from Microsoft, finding the correct download links can be a challenge - thanks to Scott Hanselman for this overview: http://downloadsqlserverexpress.com/)
If you need to use a different SQL Server connection string, the configuration block must be changed to the following, replacing <YOUR CONNECTION STRING HERE> with your connection string.
<entityFramework>
  <defaultConnectionFactory
    type="System.Data.Entity.Infrastructure.SqlConnectionFactory, EntityFramework">
    <parameters>
      <parameter value="<YOUR CONNECTION STRING HERE>"></parameter>
    </parameters>
  </defaultConnectionFactory>
  <providers>
    <provider invariantName="System.Data.SqlClient"
      type="System.Data.Entity.SqlServer.SqlProviderServices, EntityFramework.SqlServer" />
  </providers>
</entityFramework>
As another alternative, you can utilize SQL Server LocalDB, which is installed with recent versions of Visual Studio. Your configuration should look like this:
<entityFramework>
  <defaultConnectionFactory
    type="System.Data.Entity.Infrastructure.LocalDbConnectionFactory, EntityFramework">
    <parameters>
      <parameter value="mssqllocaldb"/>
    </parameters>
  </defaultConnectionFactory>
  <providers>
    <provider invariantName="System.Data.SqlClient"
      type="System.Data.Entity.SqlServer.SqlProviderServices, EntityFramework.SqlServer" />
  </providers>
</entityFramework>
In case you require further options for your connection setup, please read Microsoft’s documentation of the Entity Framework configuration system.
Creating demo data
Once you have configured your connection correctly, but before you run one of the sample projects, make sure you have the demo database populated with data. There are two different demo databases used by the sample projects, each of which needs to be populated with demo data once in order to run all the samples successfully. In any of the solutions, expand the Data Layer solution folder (if it doesn’t exist, that solution doesn’t use a database) and you’ll find a project called Populate.
The other projects on the same level give away the name of the demo database used by that project: you’ll see either EventsDB or CountryDB. If you have previously populated the particular database used by that sample, you don’t have to do it again.
Make sure the Populate project is configured for data access correctly (check App.config) and run it. There will be some details in a console window, and after a short while the process will complete. Now you have the demo data in place and you can run the main project of the solution!
ASP.NET WebForms and WinForms Courses: Database connections
Some of the samples for these two courses work with databases in SQL Server Compact Edition format. In a clean Windows system with a current Visual Studio version installed, these samples will always work correctly. We have seen situations in the past where old installations of SQL Server CE collided with new ones, and in these cases the system had to be cleaned up by removing the old versions (using the standard “uninstall” process provided by the packages). Several years have gone by, however, without these issues, so unless you are running a really old Windows installation that has seen a large number of previous Visual Studio installations (or others that include SQL Server CE), it is highly unlikely for you to encounter this problem. Please let us know if you have any trouble.