Reporting — Create and Modify DevExpress Reports in Visual Studio Code (VS Code) on macOS and Linux (CTP)

DevExpress Reports — our cross-platform reporting suite — allows you to generate report documents in applications targeting any .NET-based platform, deployable on any supported operating system. Over the past few months, we've focused on enhancing the report generation process within multiple environments, while maintaining independence from the host operating system itself. Before we dig into specifics, a word or two about Visual Studio Code and why chose it over available alternatives.
For the past three years, Visual Studio Code (VS Code) has consistently held the top spot as the preferred IDE among members of the global developer community (this conclusion is based on Stack Overflow developer surveys). Wide adoption was one reason we chose to target VS Code. Another was Microsoft's recent announcement regarding Visual Studio for Mac.
The DevExpress Visual Studio Code Report Designer Extension
As its name implies, our VS Code Report Designer extension allows you to create and edit DevExpress Report documents within the Visual Studio Code IDE. In this blog post, I'll guide you through the setup process on macOS and illustrate how you can leverage the extension's capabilities to develop and modify existing reports.

Note: The current DevExpress VS Code Extension is available as a Community Technology Preview (CTP). The primary goal for this release cycle is to gather feedback and refine our long-term development strategies. We've included a short survey at the end of this blog post. If cross-platform development is of importance to you, please take a moment to complete the survey and help us shape the future of our VS Code Extension.
The Technology Underlying our VS Code Extension
If you've incorporated DevExpress Reporting tools within a web app in the past, you will recognize similarities between the DevExpress Web Report Designer and our VS Code Extension.
Our Web Report Designer is implemented using JavaScript, with server-side logic executed in .NET. We integrated this designer into Visual Studio Code, allowing the backend to quietly run when you open a workspace with the backend config file. When you double-click a *.REPX (Report Template File), a new IDE dock panel renders the web page with the Report Designer. This implementation is based on .NET 7 and leverages our Skia-based cross-platform drawing engine (allowing you to preview report documents within the IDE itself).
Prerequisites
Here's what you'll need to execute the DevExpress VS Code Report Designer on your machine:
- C# VSCode Extension
- .NET Runtime Install Tool VSCode Extension
- .NET 7 SDK
- DevExpress NuGet Feed API Key (Licensed or Trial)
- DevExpress VSCode Report Designer Extension
In the following sections of this article, I will use Docker to showcase runtime results. We offer various pre-configured Dockerfiles in the form of a sample project: How to Use the SkiaSharp-Based DevExpress Drawing Engine. We created these Dockerfiles to address potential challenges in both development and deployment processes. The Docker container created from these files installs all necessary native libraries during initialization.
To display document print preview in VS Code, or if developing/executing reports on macOS/Linux locally, make certain to install all native dependencies on your development machine (on macOS, you must use homebrew for this purpose):
- libicu
- libc
- fontconfit
- libjpeg
Please refer to the Enable the Drawing Engine help topic for additional information.
Set Up
Download the Extension and Specify Relevant Settings
Once you've confirmed that your machine meets all prerequisites:
- Search for the extension within the Visual Studio Code extensions tab to install it:

- Or download the *.VSIX file for the DevExpress VS Code Report Designer Extension using the following Visual Studio Code Marketplace link: Download DevExpress VS Code Report Designer Extension. Once you've obtained the file, open VS Code and navigate to the extensions tab. Click the end-ellipsis icon to display its context menu, and select"Install from VSIX...":

Once you install the extension, click the gear icon in the bottom-right corner to modify settings:
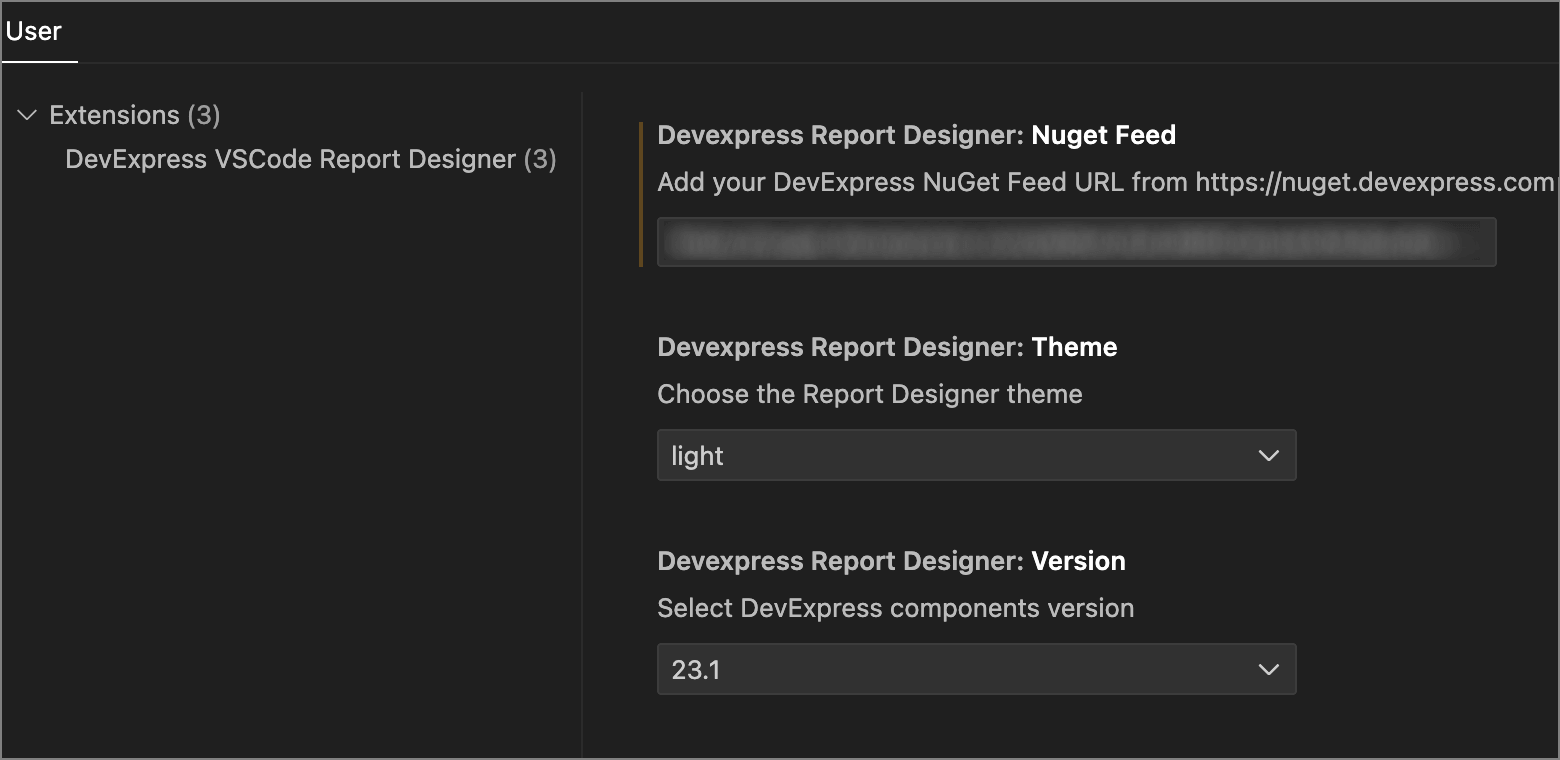
- Enter your DevExpress NuGet feed API key.
- Select the Report Designer visual theme (view the list of available themes here: Themes and Styles).
- Leave the default value for
Versionsetting.
Prepare the Environment
Note: You can use your own sample project or open an empty folder in Visual Studio Code to test functionality.
I will utilize the following GitHub repository for demonstration purposes: How to Use the SkiaSharp-Based DevExpress Drawing Engine. To follow the steps in this article, hit F1, enter git clone, and provide VS Code with the repository URL to clone it to your machine. Once the directory (with the sample project) opens up in Visual Studio Code, add the new reporting.config.json file to it or generate this file using the DX Reporting: Start Designer VS Code command.

The extension reads the contents of this file before the backend process starts. Refer to the list of supported Report Designer settings below:
DataBindingMode(Expressions | DataBindings | ExpressionsAdvanced) — Sets up Report Designer data binding mode.SqlConnectionStrings— Defines the collection of available SQL-based data sources. Make certain to use theXpoProviderprefix within the connection string. Refer to our Database Systems help topic for additional information in this regard.JsonConnectionStrings— Defines the collection of available JSON data sources.ReportsDirectory— Stores a path to the directory with report templates.ReportUrlsMap— Stores a collection of report names associated with report template files.
A sample config file will look as follows:
{
    "DataBindingMode": "Expressions",
    "SqlConnectionStrings":{
        "Northwind_Connection": "XpoProvider=MSSqlServer;...."
    },
    "JsonConnectionStrings":{
        "Nwind JSON Data": "Uri=nwind.json",
        "Dummy 100 Users": "Uri=https://dummyjson.com/users/"
    },
    "ReportsDirectory" : "PredefinedReports",
    "ReportUrlsMap":{
        "Report1": "Report1.repx",
        "newReport": "newReport.repx"
    }
}
Once you add the file to the opened directory, re-open VS Code to initialize the Report Designer extension OR manually call the DX Reporting: Start Designer command. The IDE will notify you about Report Designer initialization:

Create a New DevExpress Report
At this point, we are ready to add a new report to the sample project. The extension adds a new DX Reporting: New Report command to Visual Studio Code. Simply press F1 once again to use this command and specify a new report name.

VS Code will automatically open the newly created report and render the DevExpress Report Designer with a blank report:

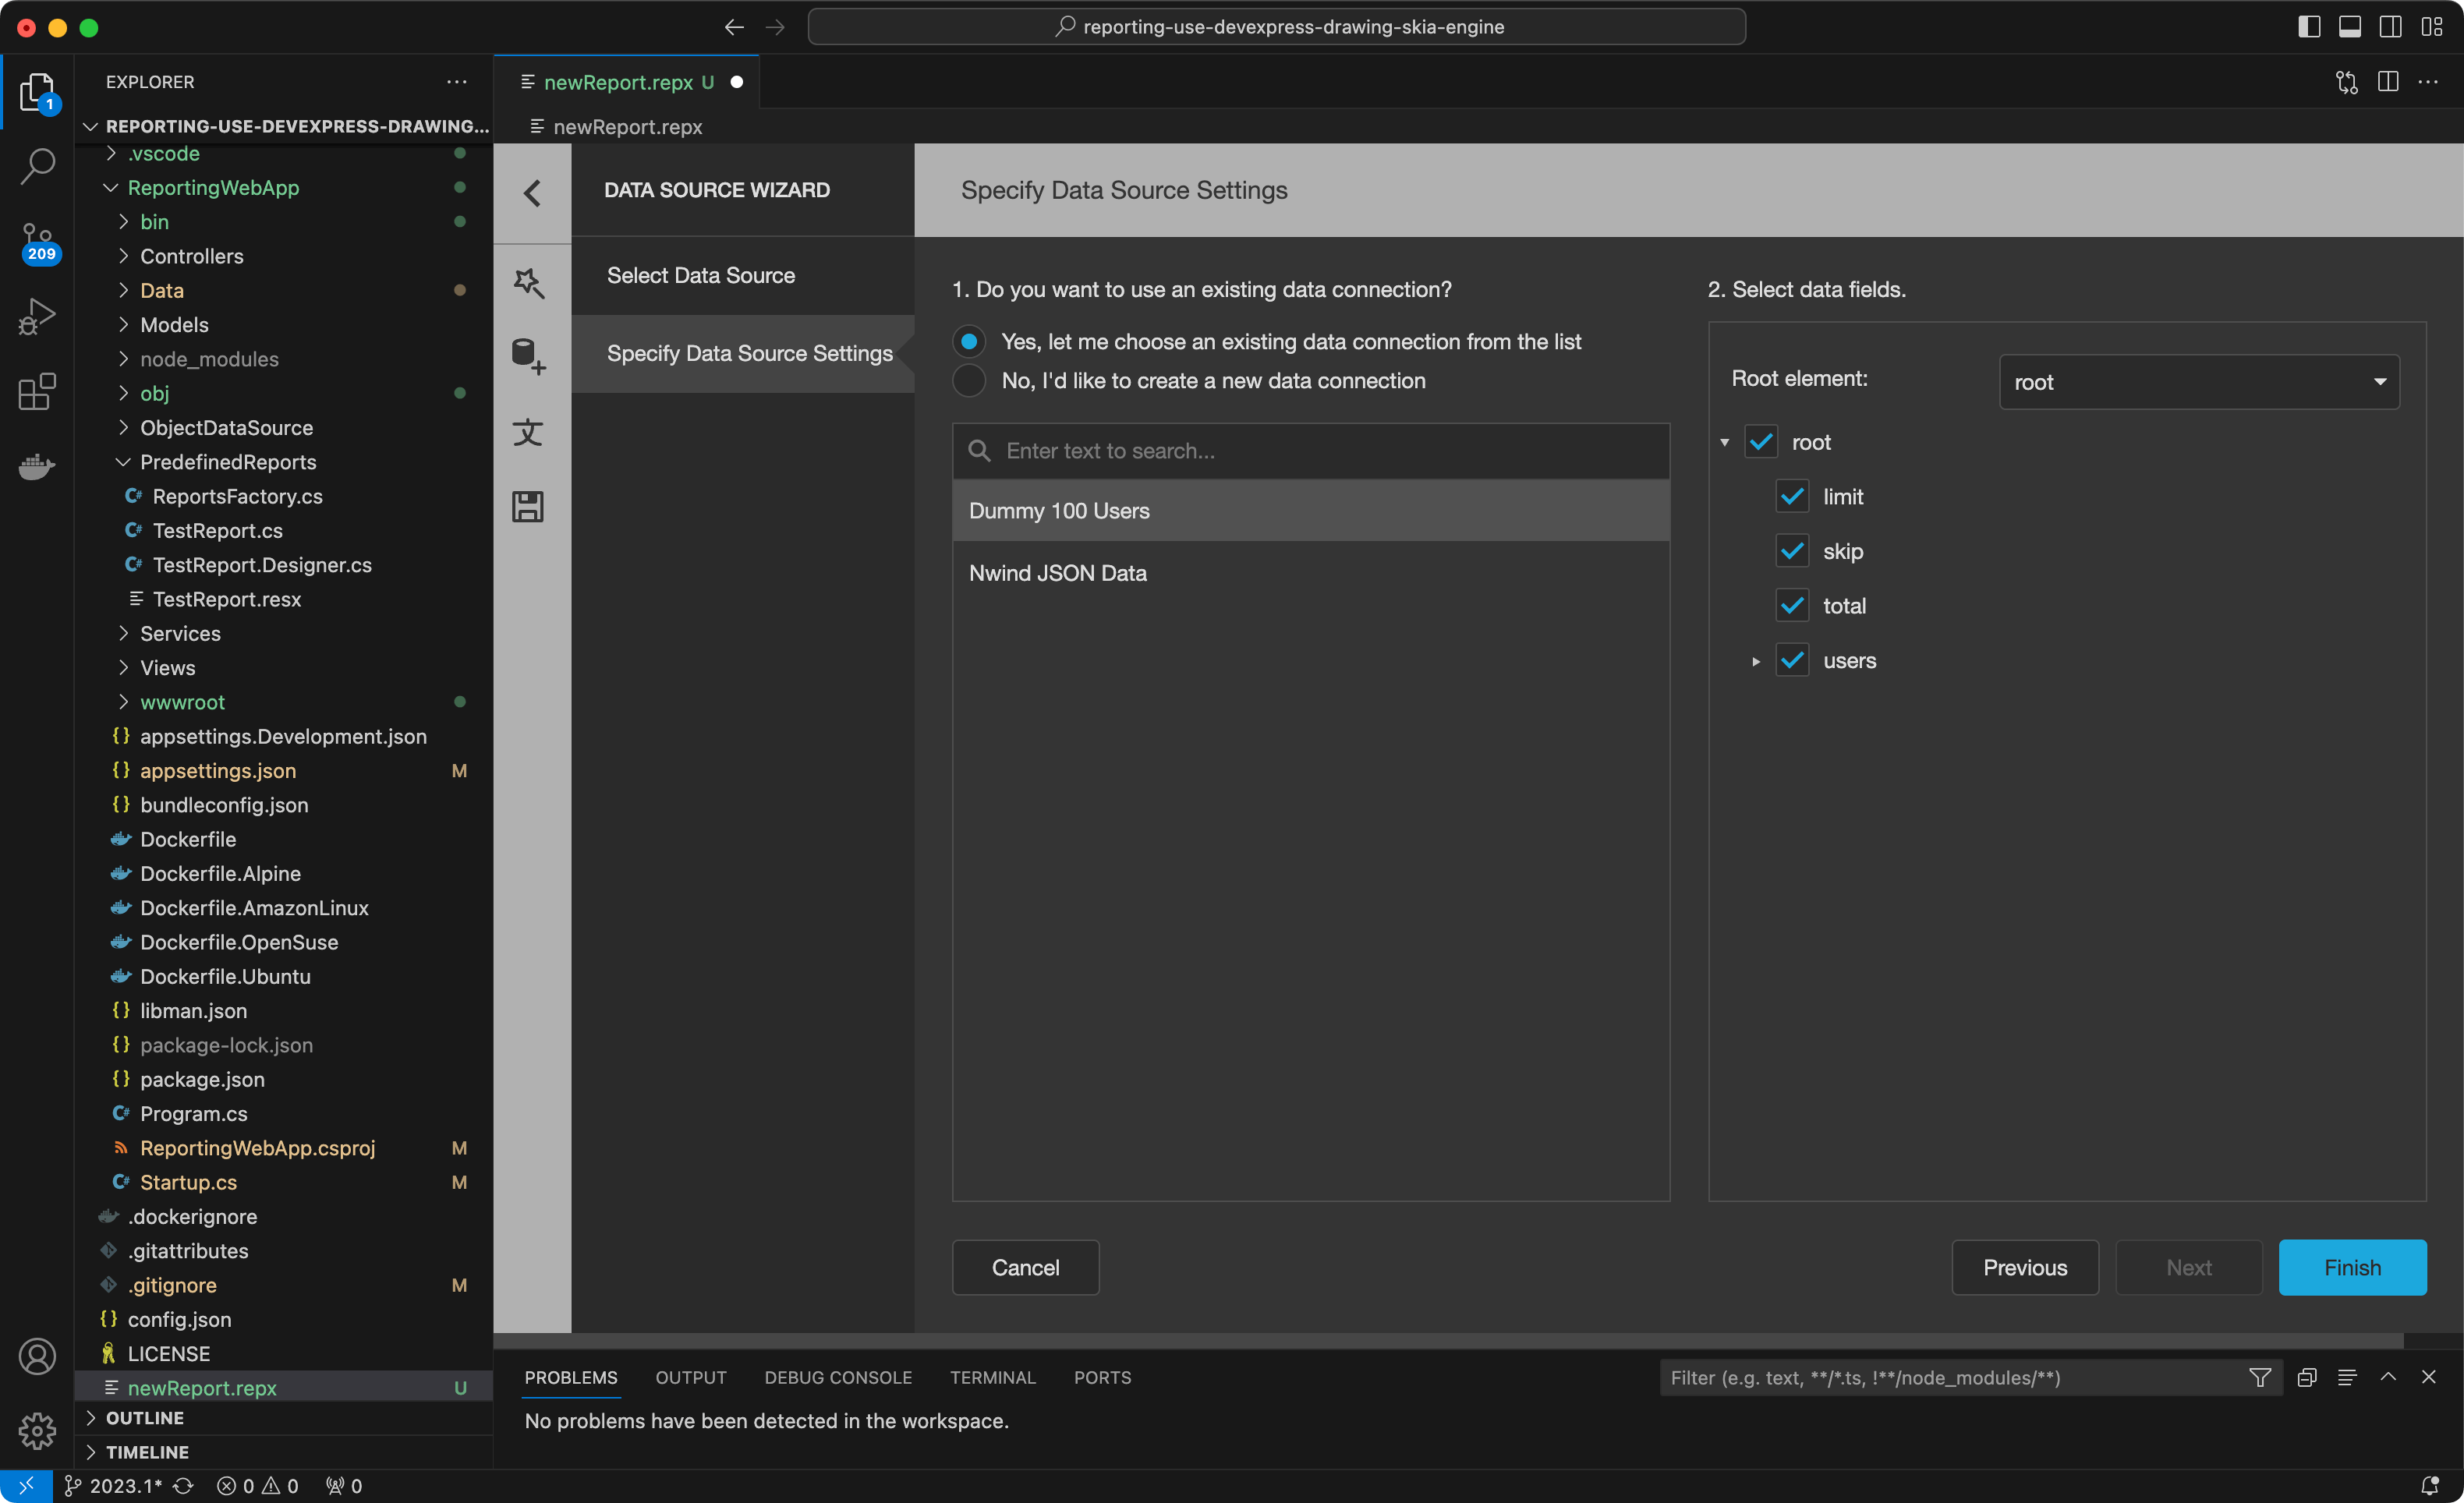
At this stage, we can add a data source to this report and design it using our built-in Report Wizard. We will select the data source tab on the right, and then click the "Add Data Source" button to invoke the Data Source Wizard:

For purposes of this example, we'll use a sample "Dummy 100 Users" JSON data source I set up earlier in the reporting.config.file. We'll select the available data source and click "Finish" to complete this operation:
Next, we'll navigate to the Report Designer main menu and select Design in Report Wizard... from the menu to start the Report Wizard:

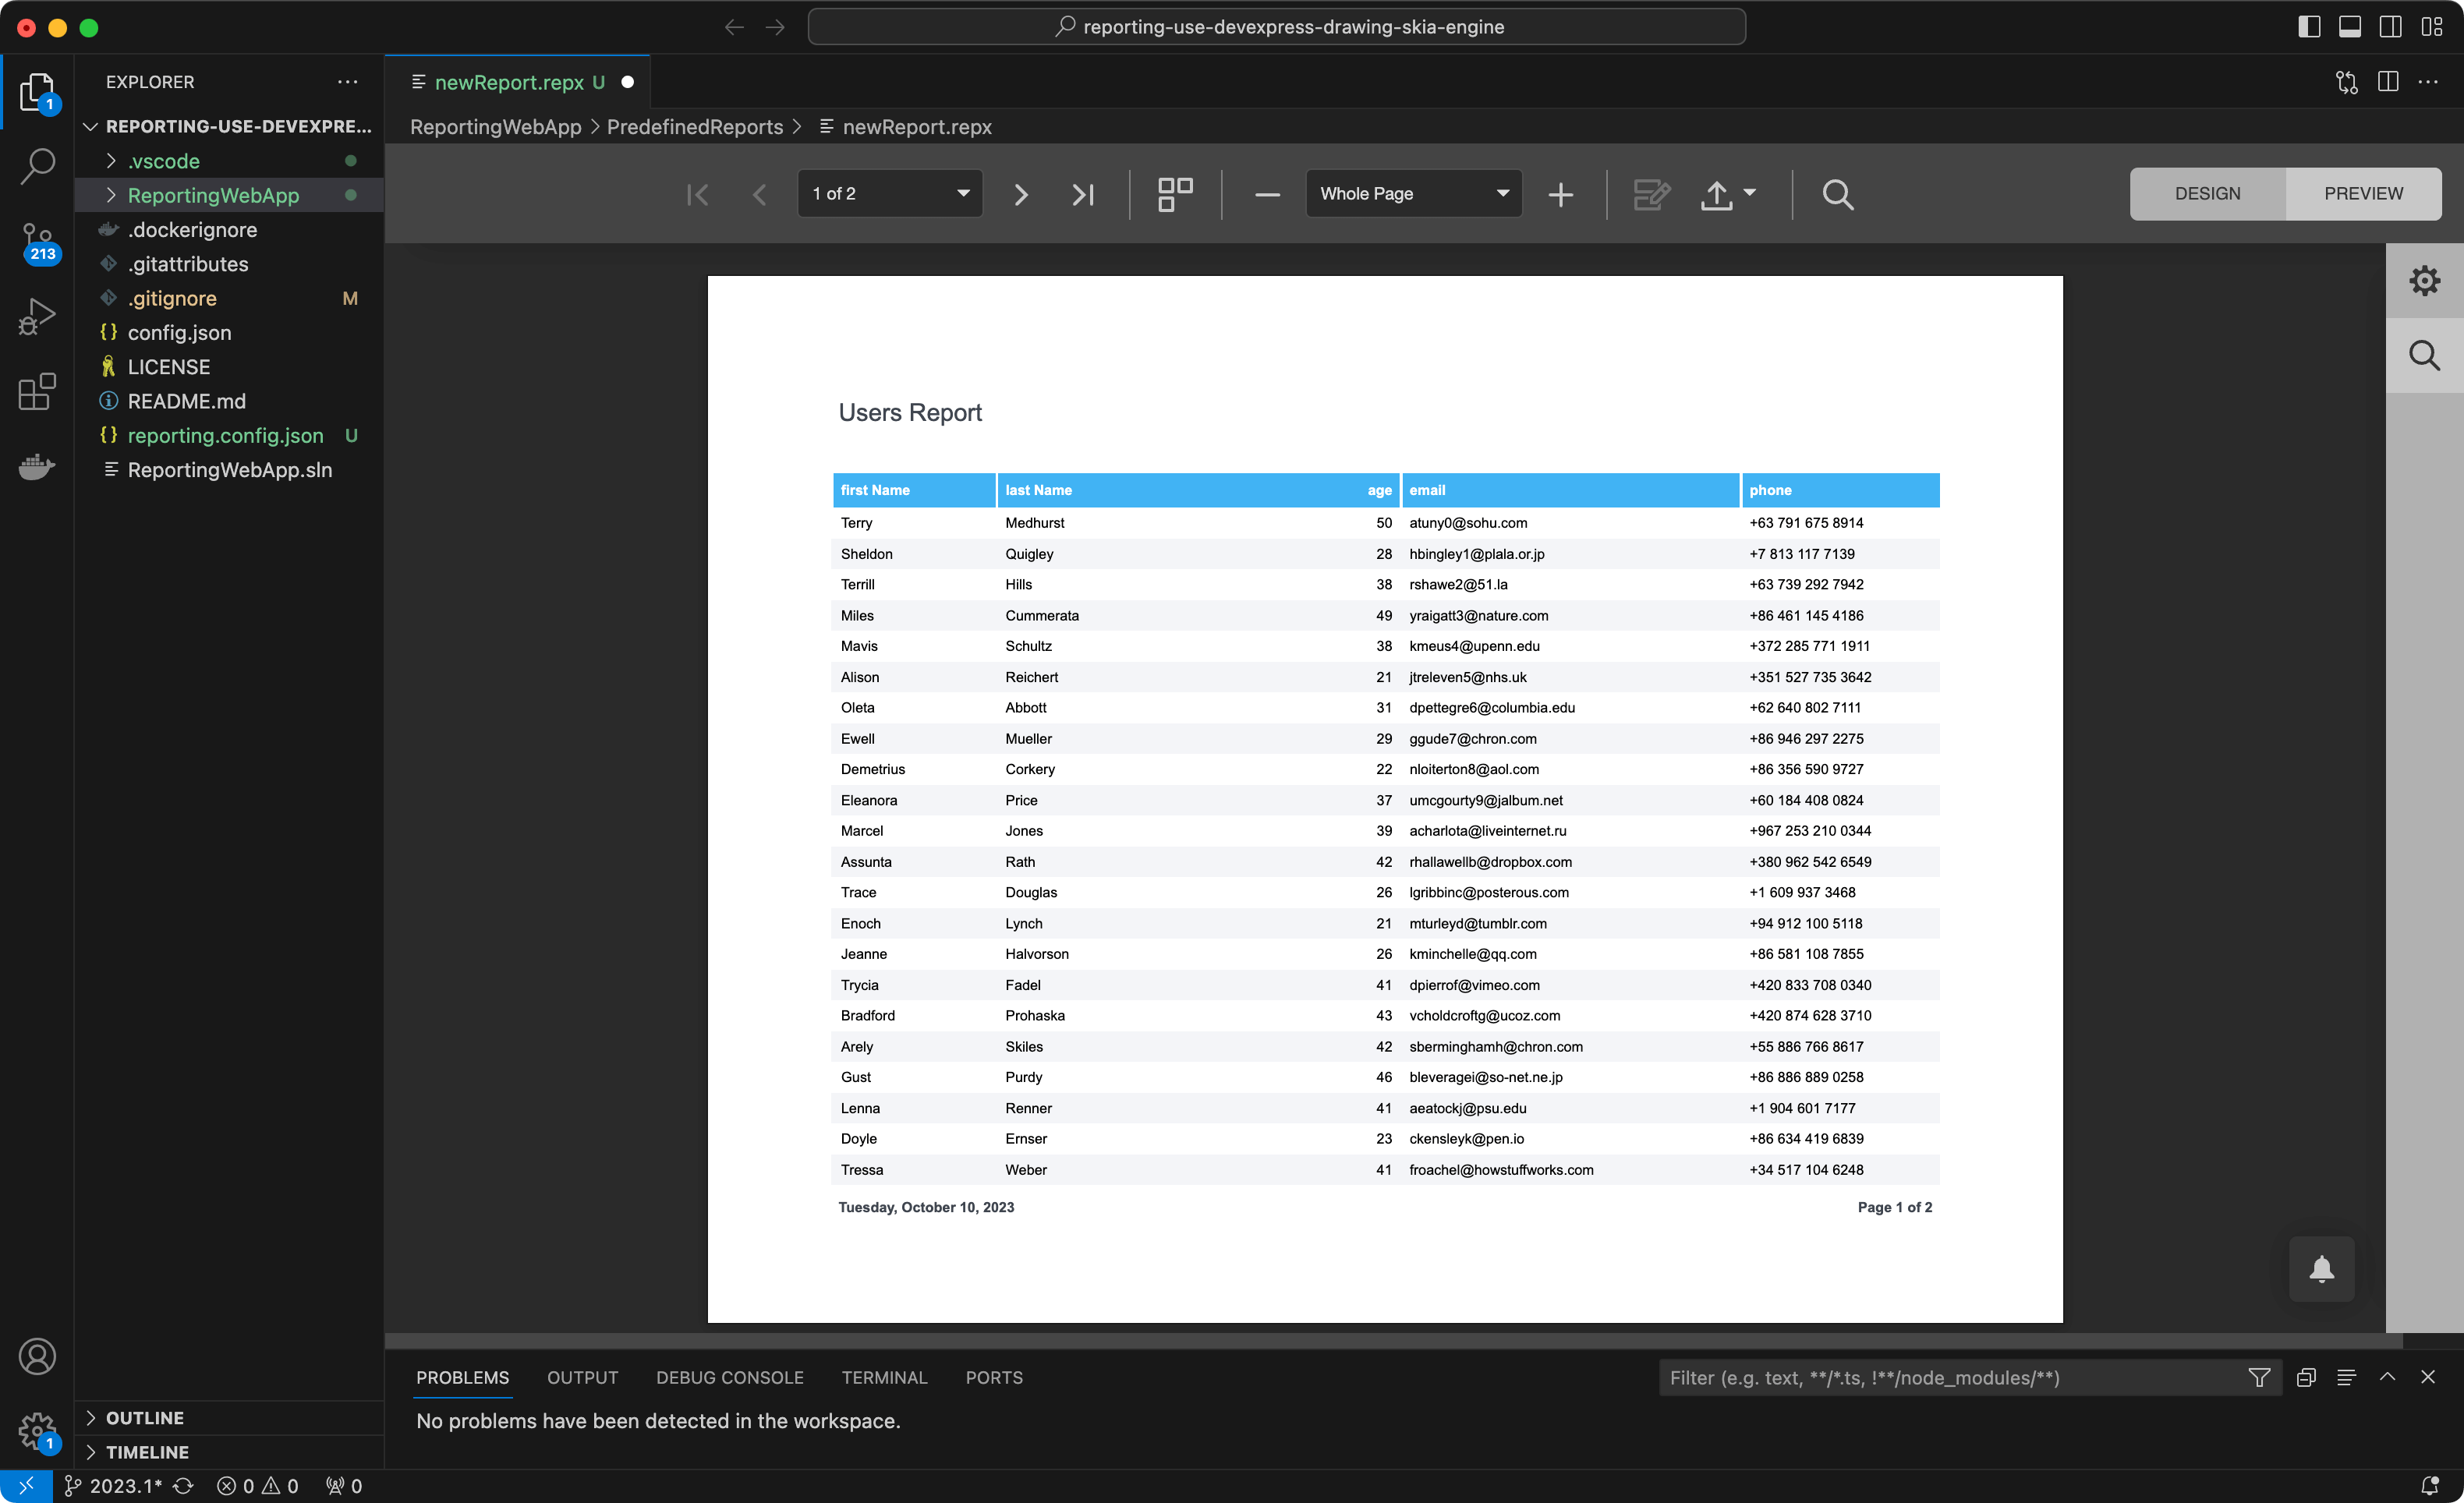
We'll follow wizard prompts to finish the report generation process. If you are following this post, please make certain to save the report template file using the "Save" shortcut (Command+ S in macOS). When you do, you should see the following on-screen:

To view results, we simply need to press the "Preview" button. As you would expect, you can print and export the report document from the built-in print preview window:

Run the Sample App
At this stage, we must modify a few project code files to load this report layout to the XtraReport class at runtime. First, we must move the "newReport.repx" file to the PredefinedReports directory. Once complete, we'll need to make the following changes:
HomeController.cs -> Viewer method
Change the name of the report being opened in the Document Viewer to newReport:
public IActionResult Viewer([FromServices] IWebDocumentViewerClientSideModelGenerator clientSideModelGenerator,
[FromQuery] string reportName) {

    var reportToOpen = string.IsNullOrEmpty(reportName) ? "newReport" : reportName;
    var model = new Models.ViewerModel {
    ViewerModelToBind = clientSideModelGenerator.GetModel(reportToOpen, WebDocumentViewerController.DefaultUri)
};
    return View(model);
}
ReportsFactory.cs
Replace code as follows to load the report template from the PredefinedReports directory:
public static class ReportsFactory
{
    public static string ReportsPath { get; set; }
    public static Dictionary<string, Func<XtraReport>> Reports = new Dictionary<string, Func<XtraReport>>()
    {
        ["TestReport"] = () => new TestReport(),
        ["newReport"] = () => XtraReport.FromFile(Path.Combine(ReportsPath + "/PredefinedReports/newReport.repx"))
    };

}
Startup.cs
Modify the class constructor to pass the IWebEnvironment.ContnetRootPath variable to the ReportsFactory class:
public Startup(IConfiguration configuration, IWebHostEnvironment environment) {
    Configuration = configuration;
    ReportsFactory.ReportsPath = environment.ContentRootPath;
    AppDomain.CurrentDomain.SetData("DataDirectory", environment.ContentRootPath);
}
ReportDbContext.cs -> InitializeDatabase method
Add the JSON data source to the collection of data sources registered in the application:
...
var Dummy100UsersConnectionName = "Dummy 100 Users";
if(!JsonDataConnections.Any(x => x.Name == Dummy100UsersConnectionName)) {
    var newData = new JsonDataConnectionDescription {
        Name = Dummy100UsersConnectionName,
        DisplayName = "Dummy 100 Users",
        ConnectionString = "Uri=https://dummyjson.com/users/"
    };
    JsonDataConnections.Add(newData);
}
...
Finally, we'll need to make certain that the report template file is copied to the application output directory each time we build the application. To accomplish this, we'll need to add the following to the "*.csproj" file:
<ItemGroup>
    <None Remove="PredefinedReports\*.repx" />
  </ItemGroup>
  <ItemGroup>
    <Content Include="PredefinedReports\newReport.repx">
      <CopyToOutputDirectory>PreserveNewest</CopyToOutputDirectory>
    </Content>
  </ItemGroup>
With these modifications, we can switch to the terminal window within VS Code and run our Docker container:
export DX_NUGET=https://nuget.devexpress.com/Your_API_Token/api
DOCKER_BUILDKIT=1 docker build -t reporting-app --secret id=dxnuget,env=DX_NUGET .
docker run -p 8080:80 reporting-app:latest
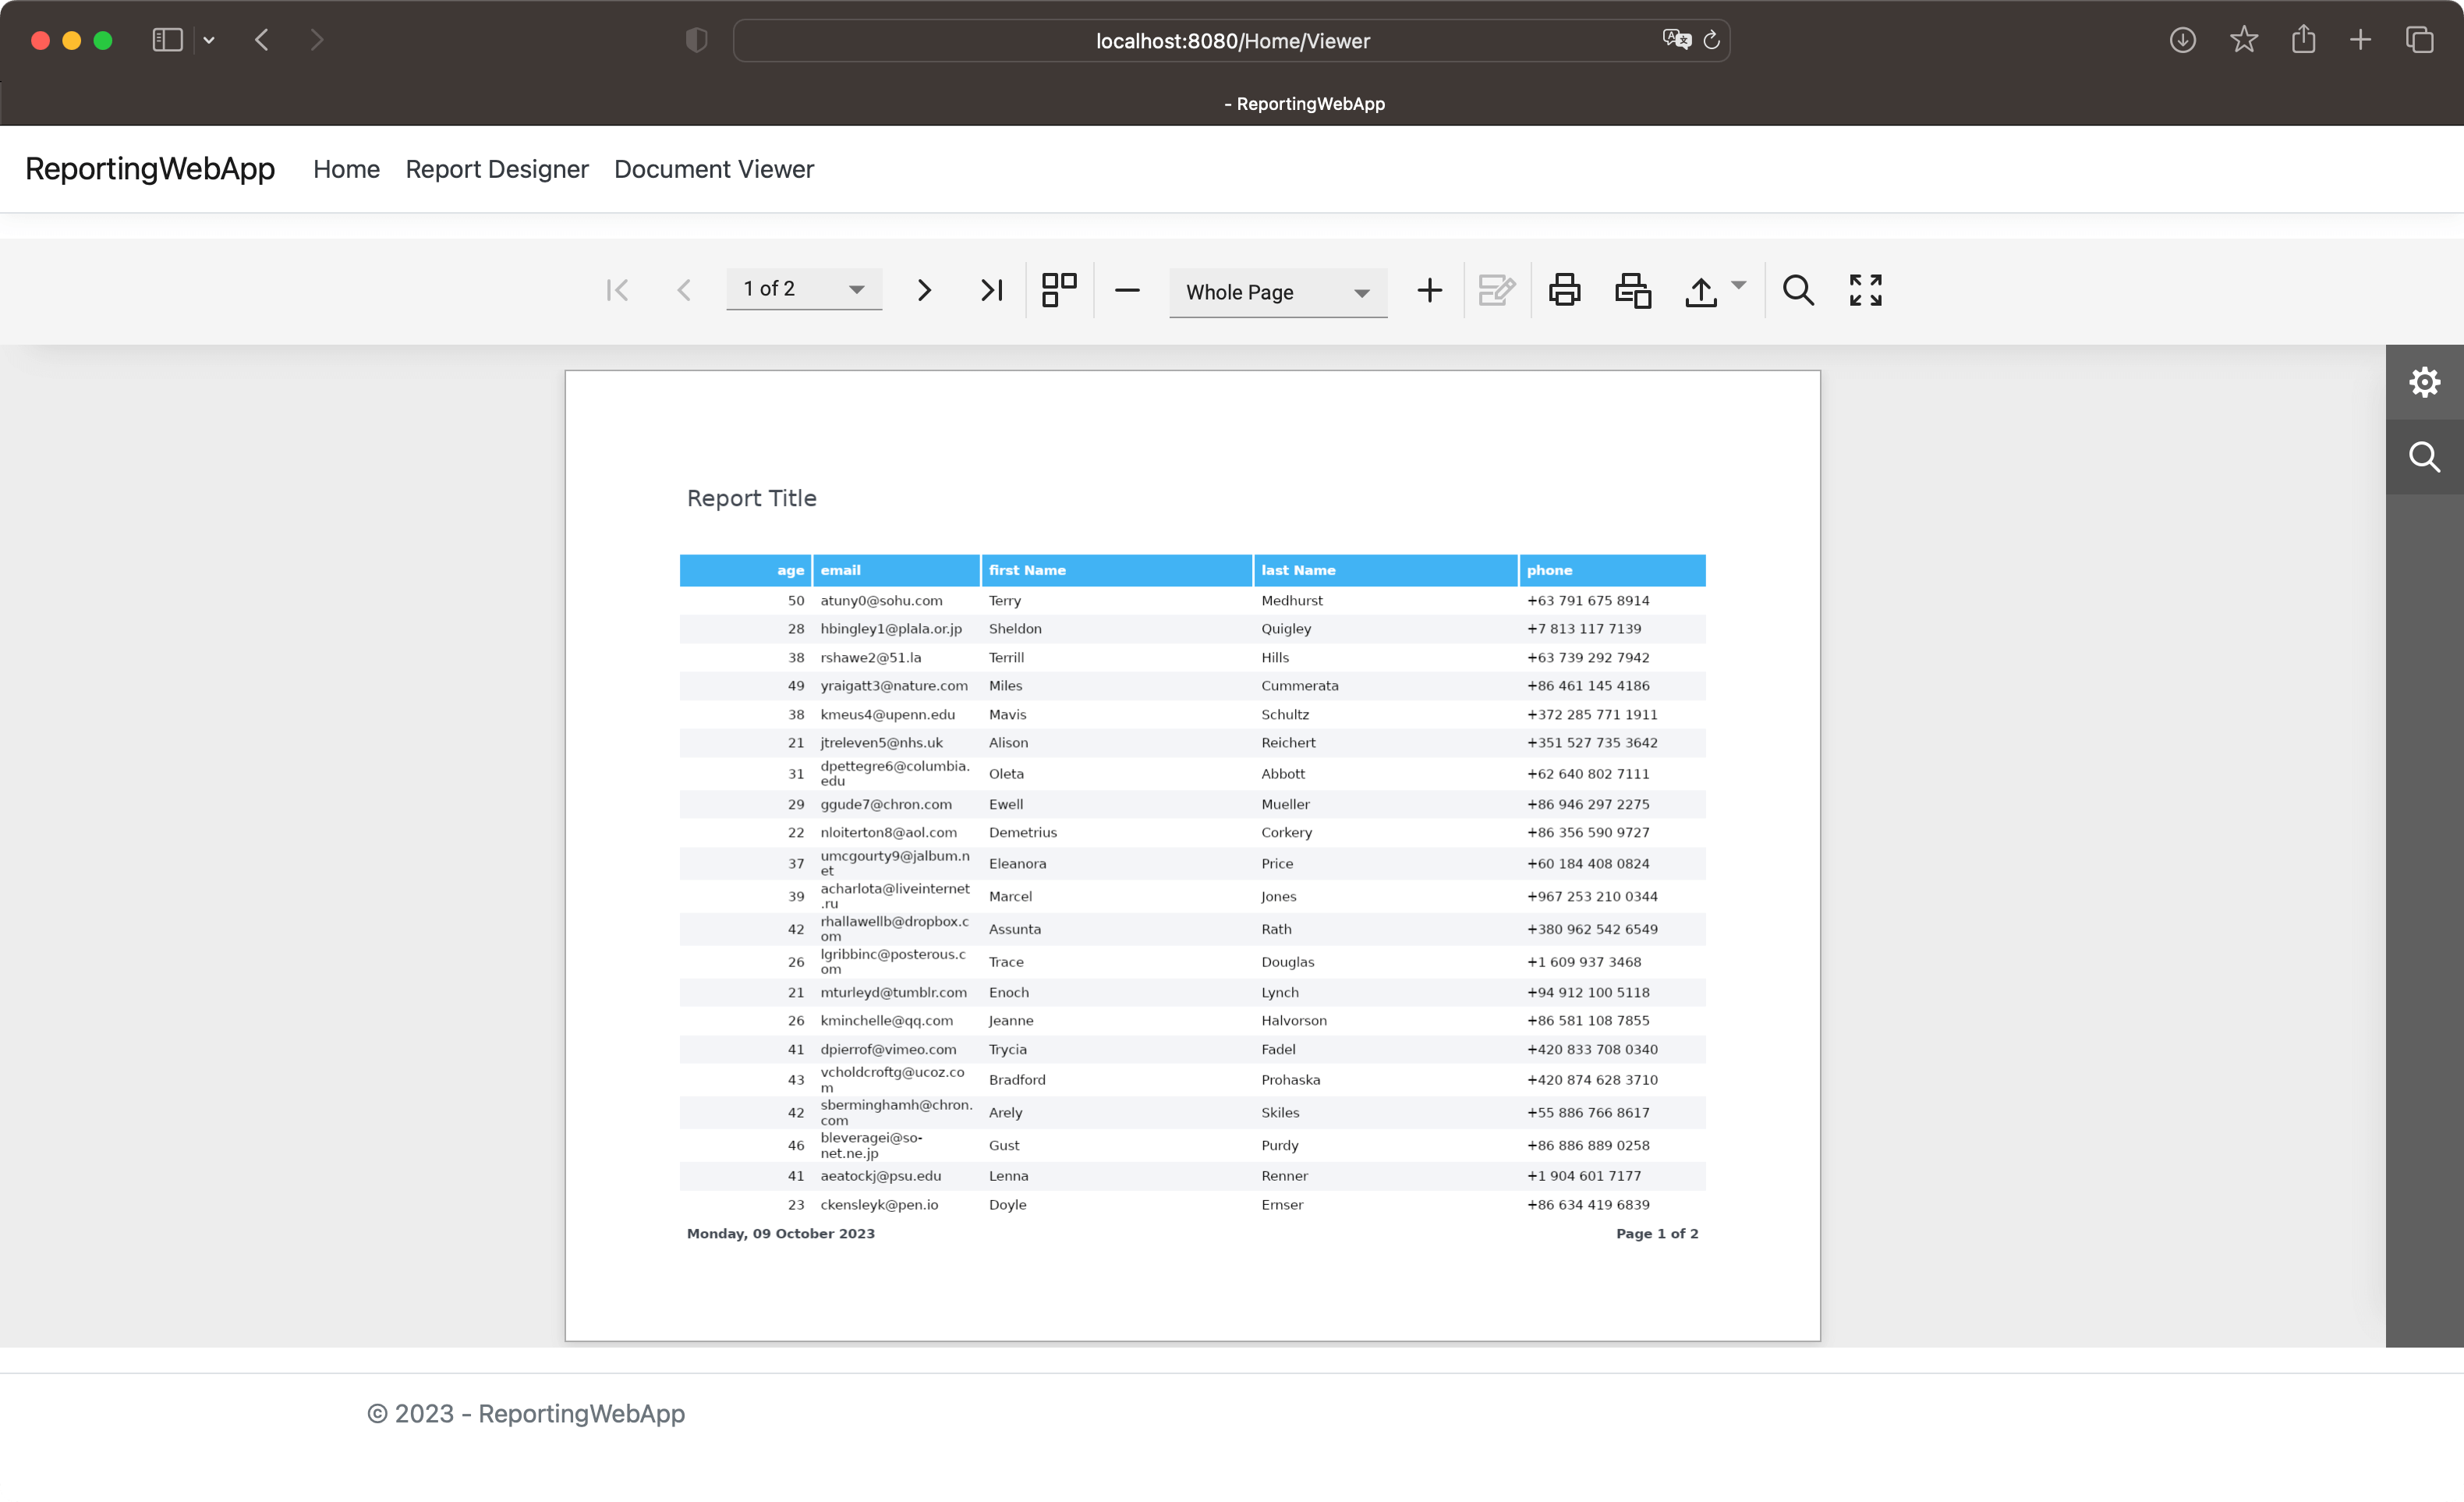
The application page will be available at the following URL: http://localhost:8080/. Click the "Document Viewer" link at the top to display a print preview of the report we just created in Visual Studio Code.
Your Feedback Matters
We want to hear your thoughts... If cross-platform report development is of importance to you, please take a few moments to complete the short survey below.
Free DevExpress Products - Get Your Copy Today
 Dmitry Tokmachev (DevExpress)