In this blog post, I will describe how to create a WinUI MVVM application from scratch and in doing so, reveal the power of DevExpress WinUI MVVM Framework.
Originally, we created the MVVM Framework for the WPF platform. Afterwards we found that the techniques developed in this framework could easily be used in WinForms, so we ported the framework there. In v22.1, we optimized our MVVM Framework for WinUI keeping the core functionality the same. If you use our WPF or WinForms Controls, you won't face any issues when migrating to WinUI.
Let's start with creating a bare view model. You can choose of the following view model types:
- Compile-time generated view model
- ViewModelBase - descendant view model
- A simple class with an implementation of the INotifyPropertyChanged interface
I will use the first option as it keeps your view model code clean, compact, and helps you avoid typos.
Add the DevExpress.Mvvm.CodeGenerators and DevExpress.WinUI NuGet packages to your project (note that you need to obtain the free offer feed or install our components to access the DevExpress.WinUI package). Once the packages have been added, create a view model class and assign the GenerateViewModel attribute to it:
using DevExpress.Mvvm.CodeGenerators;

[GenerateViewModel]
public partial class MainViewModel {
    [GenerateProperty]
    string userName;

    [GenerateCommand]
    void Register() {
        Debug.WriteLine($"{UserName} was successfully registered!");
    }
}
Note that you need to make the class partial and also add the DevExpress.Mvvm.CodeGenerators namespace.
The сompile-time generator automatically creates a view model counterpart with INotifyPropertyChanged support:
partial class MainViewModel : INotifyPropertyChanged {
    public event PropertyChangedEventHandler? PropertyChanged;

    protected void RaisePropertyChanged(PropertyChangedEventArgs e) => PropertyChanged?.Invoke(this, e);

    public string? UserName {
    	get => userName;
        set {
            if(EqualityComparer.Default.Equals(userName, value)) return;
            userName = value;
            RaisePropertyChanged(UserNameChangedEventArgs);
        }
    }
    DelegateCommand? registerCommand;
    public DelegateCommand RegisterCommand => registerCommand ??= new DelegateCommand(Register, null);
    static PropertyChangedEventArgs UserNameChangedEventArgs = new PropertyChangedEventArgs(nameof(UserName));
}
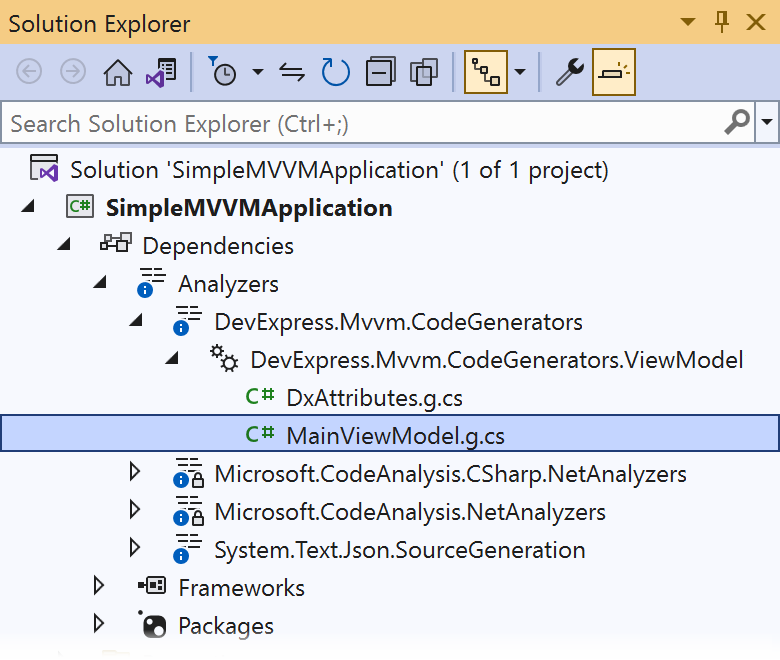
You can view the generated class in your project: Dependencies -> Analyzers -> DevExpress.Mvvm.CodeGenerators -> DevExpress.Mvvm.CodeGenerators.ViewModelGenerator -> MainViewModel.g.cs
Add the CanRegister method to your view model to determine when the Register command can be executed. Note that WinUI commands don't use CommandManager, therefore you need to manually refresh the CanExecute state using RaiseCanExecuteChanged:
public partial class MainViewModel {
    //...
    void OnUserNameChanged() {
        RegisterCommand.RaiseCanExecuteChanged();
    }
    bool CanRegister() => !string.IsNullOrEmpty(UserName);
}
The code generator will automatically incorporate OnUserNameChanged and CanRegister in the UserName property and Register command.
The view model has the UserName property that stores a user's name and the RegisterCommand method that registers the user. Let's create a simple UI to work with the view model. Add a TextBox and a Button to the main window and bind them to the view model's property and command:
<StackPanel>
    <TextBox Text="{x:Bind ViewModel.UserName, Mode=TwoWay, UpdateSourceTrigger=PropertyChanged}"/>
    <Button Content="Register" Command="{x:Bind ViewModel.RegisterCommand}"/>
</StackPanel>
As you may have noticed, I've used x:Bind instead of Binding. x:Bind is a relatively new markup extension introduced in UWP. It uses type information at compile-time to optimize the binding, therefore it's preferable to use it when possible. When you use x:Bind in a window or user control, the default binding source is the window itself, so it's necessary to define the view model as the window property:
public sealed partial class MainWindow : Window {
    public MainViewModel ViewModel { get; } = new MainViewModel();
    public MainWindow() {
    	this.InitializeComponent();
    }
}
Now our simple MVVM application can send information from the view to the view model and execute the view model's command. Let's extend it to show a message box when a user clicks the Register button. I will use a UI service in order not to access visual elements directly from the view model. This will help us maintain a clean MVVM pattern. Add the MessageBoxService to the view and bind its ServiceClient property to your view model:
<Window ...
    xmlns:dxc="using:DevExpress.WinUI.Core">
    <StackPanel>
        <dxc:Interaction.Behaviors>
            <dxc:MessageBoxService ServiceClient="{x:Bind ViewModel}"/>
        </dxc:Interaction.Behaviors>
        <TextBox Text="{x:Bind ViewModel.UserName, Mode=TwoWay, UpdateSourceTrigger=PropertyChanged}"/>
        <Button Content="Register" Command="{x:Bind ViewModel.RegisterCommand}"/>
    </StackPanel>
</Window>
Then, add the ImplementISupportUIServices parameter to the GenerateViewModel attribute and use the MessageBoxService in the Register method:
using DevExpress.Mvvm;
using DevExpress.Mvvm.CodeGenerators;

[GenerateViewModel(ImplementISupportUIServices = true)]
public partial class MainViewModel {
    [GenerateProperty]
    string userName;
    IMessageBoxService MessageBoxService { get => ServiceContainer.GetService<IMessageBoxService>(); }
    [GenerateCommand]
    void Register() {
        MessageBoxService.ShowAsync($"{UserName} was successfully registered!", "Registration");
    }
}
Now, a user will see a message box once they click the button. Note that your view model doesn't access any visual elements directly. Instead, the services mechanism is used as an interlayer.
Let's enhance the user experience by invoking the Register command when a user hits the Enter key. WinUI buttons don't have the IsDefault property, so it's necessary to process key events to catch the moment when Enter is pressed. Luckily, our MVVM suite has the KeyToCommand behavior that can invoke a command when specified keys are used. Add the KeyToCommand behavior to the Interaction.Behaviors collection and set its KeyGesture and Command properties:
<StackPanel>
    <dxc:Interaction.Behaviors>
        <dxc:KeyToCommand KeyGesture="Enter" Command="{x:Bind ViewModel.RegisterCommand}"/>
        <!--...-->
    </dxc:Interaction.Behaviors>
    <!--...-->
</StackPanel>
KeyToCommand is a behavior that's ready to use, however, you can easily create a custom behavior for your needs to avoid writing similar code-behind in different views.
You can download a complete example at the following GitHub repository: Simple MVVM application on WinUI.
To get more MVVM examples, please refer to the MVVM section in our WinUI Demos.
Recap
In the blog, you learned how to create a simple MVVM application in WinUI with the following techniques:
Free DevExpress Products - Get Your Copy Today
The following free DevExpress product offers remain available. Should you have any questions about the free offers below, please submit a ticket via the
DevExpress Support Center at your convenience. We'll be happy to follow-up.