The Keyboard Arrives.
The keyboard is here. We’ve already created a set of features to bind to it in part 2 (and this series starts with a prototype in part 1).
If you’ve seen me write code with an Xbox guitar before, you may have noticed how easy it was to navigate through the code. It turns out that guitars are way more intuitive at moving around code than regular keyboards are. The Xbox guitar has an up/down strum switch, and two groups of fret keys arranged in a straight line moving out from the strum key. So for navigation, I treated the fret keys like multipliers, from smallest distance moved to greatest distance moved. So to move toward the end of the file, I would strum down. With no fret keys pressed, the caret would simply move right. Depending on which fret keys were engaged, I could jump through the uppercase characters in a camel-cased identifier, through words, home/end, line up/down, up/down between methods, page up/down, as well as other special moves such as dropping and collecting markers or navigating through the history of edits. Similarly, creating and extending selections was easy. I just held down the blue fret key in combination with the other fret keys to extend the selection by the specified distance. As a result, navigating through code and refactoring with with the Xbox guitar was nirvana, and much easier and intuitive than trying to navigate with a standard keyboard.
Of course, for entering text, the guitar doesn’t work well. And the transition time to switch to a guitar every time I need to navigate through code is too great to make it practical. However with this keyboard… I’m hoping to recreate and approach some of that nirvana in something everyone can experience.
So at this point, I’m pretty excited.
Hardware Review
Upon taking the keyboard out of the package, there are few things I immediately notice. The keyboard is about 10-15% heavier and larger than I expected. This is not a showstopper for me, but something to keep in mind in case I ever collaborate on the design a custom programmer’s keyboard – something I’ve been thinking about a lot, lately.
The second thing I notice is that pressing the keys doesn’t feel the same as pressing the keys on my Microsoft Natural keyboard. It’s a subtle difference, and I don’t have great words to describe it, so here’s a totally subjective graph showing the different forces I feel against my fingertips as I press the keys down:
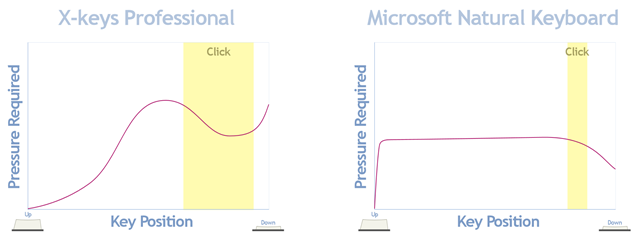
With the X-keys professional, a little more force seems to be required to push the key. As the key approaches the down state, resistance increases, then seems to ease off and the key travels faster, followed by greater resistance as the key approaches its furthest down position. The Microsoft keys, by contrast, require slightly less force (and the force required is consistent pretty much throughout the entire stroke).
The yellow bands in the graphs above show the areas where switch contact appears to be made (and current flows through the switch below that key). With the Microsoft Natural Keyboard it feels like contact is always made in the same spot. But I don’t get the same feeling of precision with the X-keys Professional.
I should emphasize that the differences are subtle and most developers are unlikely to notice them.
I’m able to rationalize both of these issues as acceptable compromises in light of the productivity gains I’m anticipating, and knowing that I’m unlikely to be hitting these keys as frequently or as rapidly as the keys on my QWERTY keyboard from Microsoft.
The rest of the keyboard however, neatly meets expectations. I can pull out keys and replace them with tall keys, wide keys, or even large square keys. I can also replace existing keys with flat key blockers.
The keys themselves have transparent plastic covers that are easy to remove for labeling. Even though the key tops come off easily when pulled straight up, they don’t come off accidentally in response to the sheering force of my hand and fingers brushing rather aggressively against the keyboard, and they don’t come off from normal use. Nice.
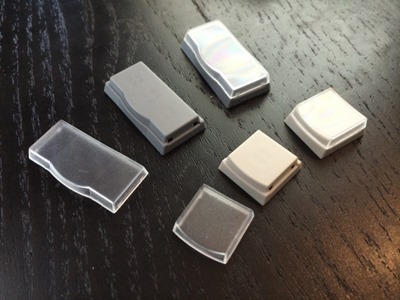
I immediately start on the layout designed in the first post in this series, adding key blockers, tall keys, and wide keys.


The black key blockers snap solidly into place and give me exactly that tactile feedback I am looking for.
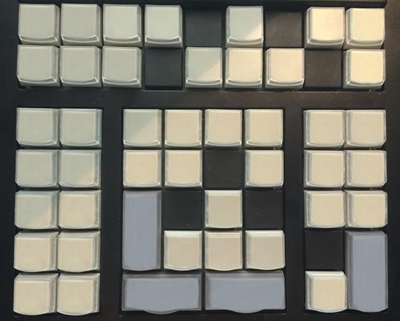
That was easy. Next I install the software….
Software/SDK Review
The included software is thorough, flexible, and ambitious, allowing you to bind multiple collections of recorded macros to the keys. Key binding collections are swapped in or out depending on which application has focus. Recorded macros can include individual key up or down transitions (not just key presses). However, I found the UI had some discoverability and clarity issues. The software also must be running to use the keyboard – a requirement I wasn’t really interested in.
So with the included software jettisoned, I opened up their SDK to build my own options/setup pages. I don’t want to bind recorded keyboard macros to each key. Instead I want to bind actual Visual Studio and CodeRush commands (including the new features we build as part of this blog series).
The SDK includes a C# example application that shows how to iterate through all the connected keyboards, connect to one, and setup two different callbacks: One that is called every time the data changes (a key is pressed or released), and another that is called when an error occurs (such as the keyboard getting unplugged from the USB port).
When data changes, your callback receives an array of nine bytes. Each byte corresponds to one of the nine columns of buttons on the device. Each of those bytes contain individual bits which are set corresponding to the seven keys in that column where a button is pressed.
I was up and running with the SDK in about an hour.
Labeling the Keys
Based on our design so far, the keys labels look like this (click this image for a full-size version):

When printing this out, adjust the scale if necessary to ensure that the “1 cm” and/or “1 inch” labels are the correct length.
I put some effort into keeping the graphic conventions consistent. For example, keys with blue backgrounds directly manipulate selections. Keys with arrows are navigation keys. Keys with blue arrows can be combined with the Shift key to extend the selection in the corresponding direction and distance. You can shrink any extended selection with the minus key:

After some trial and error with the labels, I discovered that if I get the label shape to closely match the key shape (with the rounded corners and the lower curve), they will stay correctly oriented under the transparent tops without the need for any adhesive. This makes assembly and replacement/redesign easy.
After printing, you simply:
1. Cut out each key label…
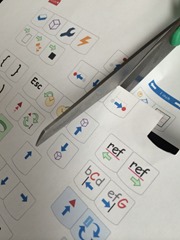
2. Remove the transparent cover…
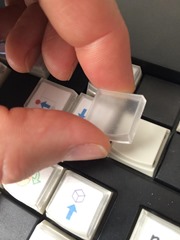
3. Position the label on the key….
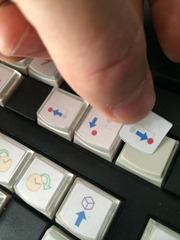
4. Replace the transparent cover…
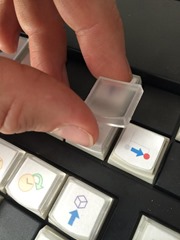
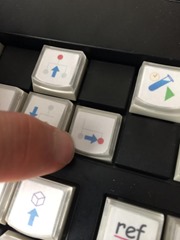
If you want to create your own key labels, here’s a template you can open inside any image editor (copy and paste the individual key templates as needed to match your design):
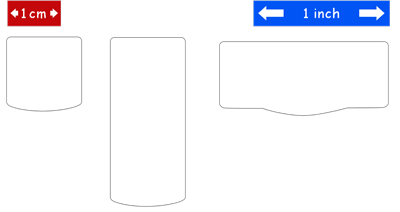
(click the image above to see the full-size version)
When printing, scale if needed to ensure the red and/or blue reference rectangles match their indicated lengths.
Building the X-keys Plug-in
To make this all work stand-alone (eliminating the need to install the X-keys software), I built an X-keys plug-in for CodeRush in Visual Studio. The plug-in consists of three parts. The X-keys Engine, the Layout options page, and the Shortcuts options page.
X-keys Engine
This simple engine maps the input from the custom keyboard to CodeRush or Visual Studio commands. The engine holds a buffer of keys pressed and ensures those keys are evaluated in the UI thread. This engine also adds support for repeating keys when held down, something the original software and SDK do not support.
To customize keyboard behavior, I built two options pages….
The Layout Options Page
The Layout page lets you create a model of the physical key layout you decide to build. You can manually decide which keys will be blocker keys (the plastic black inserts that replace buttons), or you can click the Auto-detect Blockers button if the keyboard is plugged in which will scan the keyboard for any keys currently down and assign the Blocker attribute to each (blocked keys are always in the down position).
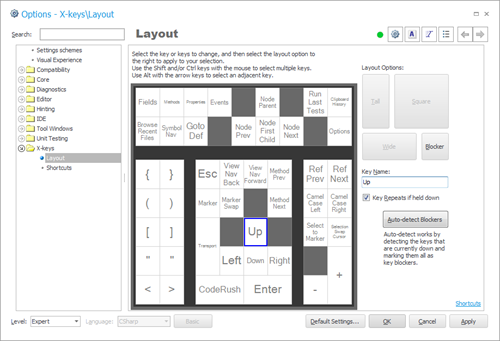
Any key that isn’t blocked can be given a Key Name. This makes the settings on the Shortcuts easier to read. If you don’t name the keys, then the shortcuts options page will show the column/row data code (e.g., you’ll see “0.0.64.64.0.0.0.00” instead of “CodeRush”).
The other important thing to do is to specify any tall, wide, or large square keys. This is necessary because when you install a tall or wide key, you are physically connecting the key to two adjacent button stems. In a perfect world, those two keys would always fire at the same time whenever the large button above them was pressed. But in our world, either of those buttons could fire first when the key is pushed down, and either one might fire individually when the key is released. The X-keys engine that runs as part of this CodeRush plug-in exploits your layout settings, converting noise caused by two or more grouped keys making contact (e.g., when a tall or wide button is being pressed and released) into a single solid signal.
You can download my layout settings here. Save to the X-keys subfolder inside your CodeRush settings folder. For example:
C:\Users\YourName\AppData\Roaming\CodeRush for VS .NET\1.1\Settings.xml\X-keys
The Shortcuts Options Page
The X-keys Shortcuts options page is similar to the CodeRush Shortcuts dialog, allowing for organized shortcut folders, searching, and a rich context that permits a single key to have different behavior depending on where you are in the code.
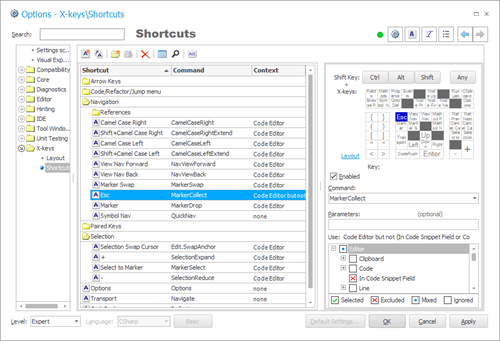
Each binding includes an optional combination of shift key modifiers (Ctrl, Alt, and/or Shift). If you want a key to fire a command when any combination of the Ctrl, Alt, or Shift keys are down, click the “Any” button. Leaving all Shift Key buttons in the up (unchecked) position means you are matching only against the X-keys key.
Source to the X-keys engine, which includes the two options pages shown above, is available here:
https://github.com/MillerMark/UltimateDevKeyboard
Binding our First Features
With the X-keys CodeRush plug-in installed in Visual Studio, now it’s time to bind the Smart Paired Delimiters feature we wrote yesterday to the actual keyboard.
On the X-keys/Shortcuts page, I want to keep shortcut bindings organized, so I create a new shortcut folder called “Paired Keys”.
Inside this folder I create new shortcuts for each of the ten keys we have dedicated to our paired key feature. There are twelve shortcuts in all; I’m going to allow the Shift key to modify the double-quote keys so they behave like single-quote keys.
To create a new binding:
- Click the New Shortcut button on the Shortcuts toolbar.
- Press the key you want to bind this to on the X-keys keyboard. Optionally select any needed Shift Key options.
- Specify the Command and any needed parameters for the shortcut.
- Specify the Context under which this shortcut binding is valid.
The command for all of these features is the same: SmartPairedDelimiters
The context for all of these bindings is also the same: Focus must be in the Code Editor.
The parameters are all different. Refer to the screenshot below (click for full screen).
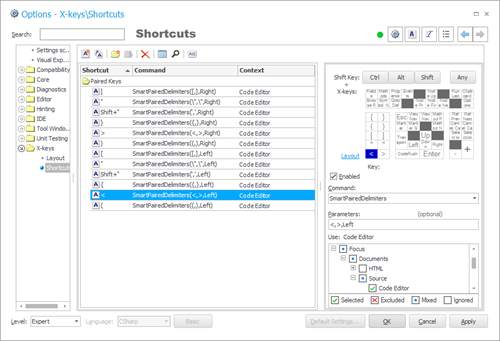
Pro Tip: Once you get the command and context specified for one shortcut, use the Duplicate Shortcut button. Then you simply press the new X-keys key, and change the parameters as needed.
Note: If you want to change a shortcut, just give focus to the mini keyboard layout control on this page, and then press the replacement key on the X-keys keyboard.
If you don’t want to enter all these by hand, you can download my shortcut settings for the Paired Key bindings here. Unzip to your CodeRush settings folder.
Now Let’s Give it a Try
So with our new bindings in Visual Studio, let’s try out the smart delimiter features.
Here’s an animated GIF showing some of my results:
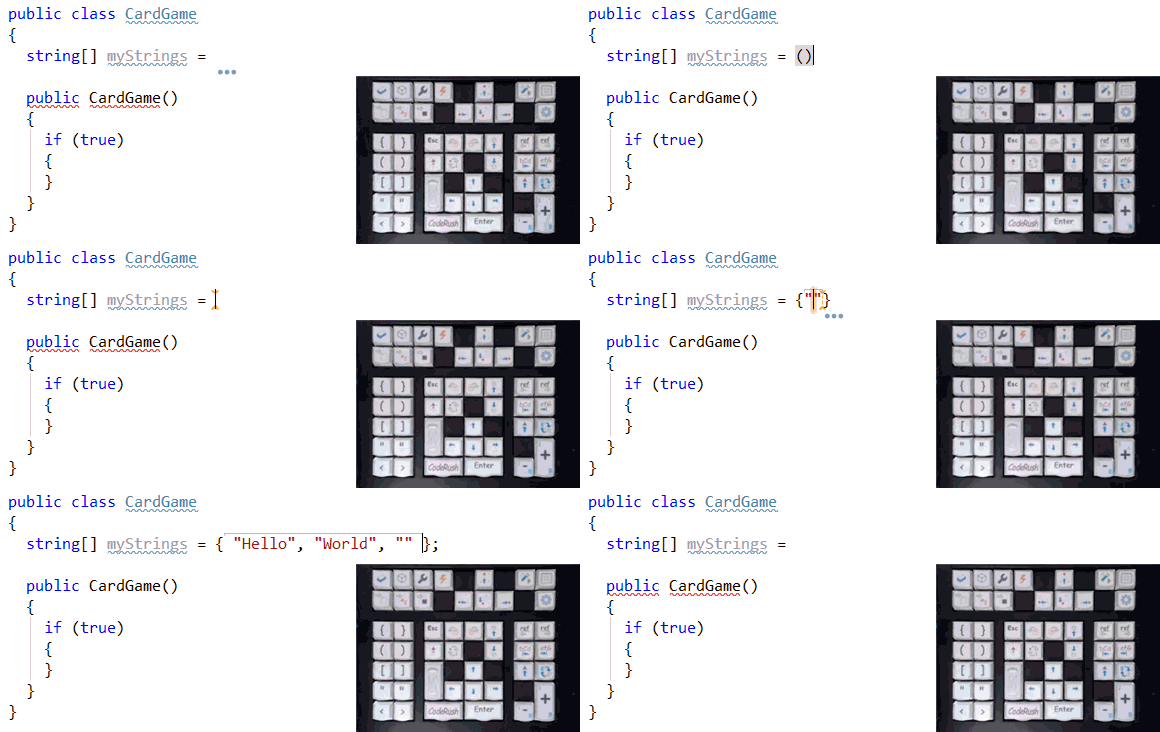
And just as we designed, pressing the paired delimiter key on the left places the caret inside the delimiters (inside an orange rectangular field - pressing Enter gets you out of the field), and pressing the paired delimiter key on the right places the caret after the delimiter pair.
Let’s Take it to the Next Level
So far, it’s not bad. I’m definitely getting the sense I would be faster and less error prone using these dedicated feature keys instead of trying to make the same thing happen on my Microsoft keyboard. But I’m also getting the feeling that we’re not done with these keys yet. There are several features I’m considering, and since it’s so easy to try this out, instead of telling you what I’m would like to do sometime in the nebulous future (e.g., tomorrow perhaps?), I’m going to do it right now.
I’m a C# developer, and in C# an if-statement needs braces if it has more than one child statement to execute. However if it only has one child, those braces are optional. In addition to being a developer, I’m also a UI guy, so I like the code clean and easy to read. So when an if-statement has only one child, I don’t want any braces around it.
The challenge with the if-statement and maintaining clean code, is that frequently a single child statement will need sibling statements, or you might have several child statements that can be consolidated into a single line of code (such as through Extract Method), which means the previously-needed braces are now redundant.
So the feature I want to build right now (and bind to these dedicated brace keys) is something that instantly removes redundant braces or instantly wraps them around a single child statement. This will save time and keystrokes on an action I find myself taking regularly in the code.
- Bring up the X-keys/Shortcuts options page.
- Right-click the Paired Keys shortcut folder and select New Folder.

- Enter a folder name of “Redundant Braces” and click OK.
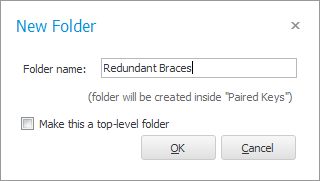
- Click the New Keyboard Shortcut button.

- Press the Close Brace (“}”) key on the X-keys keyboard.
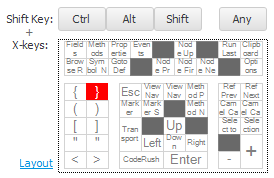
- Enter the command “Refactor” with the parameters “Remove Redundant Block Delimiters”.

You can bind to any refactoring by putting its name in the Parameters text box like this.
- I want this binding to simply work when I press the “}“ key (when the Remove Redundant Block Delimiters refactoring is available). But we already have a different behavior associated with this key, so we’ll need to use context to determine which action to take. In the Context Picker, scroll down to the bottom of the available contexts and click the “Refactoring is Available” context so it has a single green check in it.
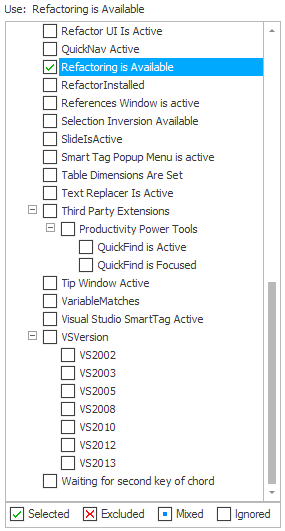
- Right-click the “Refactoring is Available” context and choose Parameters…
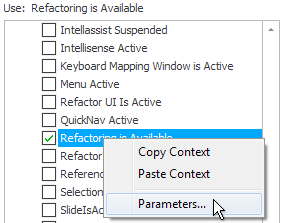
- Enter “Remove Redundant Block Delimiters” and click OK.
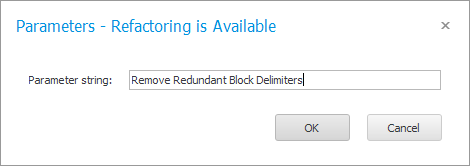
Now this shortcut binding will only work when it’s possible to remove redundant braces.
- Let’s also constrain this binding so it only works when the code editor has focus:
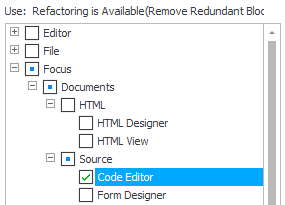
- We have one more thing to do before we’re done. We need to disambiguate this new shortcut binding from the other “}“ shortcut added earlier. Fortunately this will be easy. First, right-click the context tree list and choose “Copy Context”.
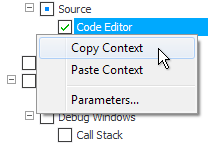
- Now select the other “}” binding.
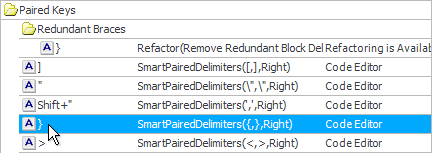
- Right-click this binding and choose “Paste Context”.
- In the context picker, scroll down to the Refactoring is Available context, and click it once more to turn it into a red “X”.
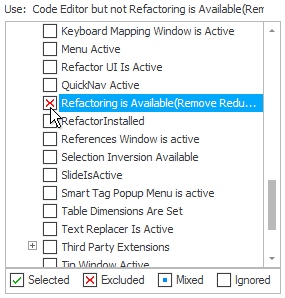
This new context means our SmartPairedDelimiters binding will only work when the editor has focus but the Remove Redundant Block Delimiters refactoring is not available.
- Now, let’s create an alternate binding for the “{“ key in the same manner, this time bound to the “Add Block Delimiters” refactoring (essentially repeating steps 4-14, changing parameters to the command and the context to “Add Block Delimiters”).
- Click OK to save your changes.
Let’s try it out.
OK, so this is pretty cool. One key gives me access to three different useful functionalities, depending upon context.

Next Time
Tomorrow we’ll bind a number of keys to existing CodeRush and Visual Studio features (and improve some existing Visual Studio features to make them even easier to use). See you tomorrow.
Free DevExpress Products - Get Your Copy Today
The following free DevExpress product offers remain available. Should you have any questions about the free offers below, please submit a ticket via the
DevExpress Support Center at your convenience. We'll be happy to follow-up.