.NET MAUI — Incorporate CRUD Operations in Your Mobile App with DevExpress CollectionView

Whether developing a mobile app to control a manufacturing process or designing an online shopping app, your solution will likely need to incorporate CRUD-related operations. As you know, CRUD stands for four basic operations that can be initiated against data storage systems:
- Create – Add new records.
- Read – Browse and view data.
- Update – Refresh data to keep it up to date.
- Delete – Remove unnecessary/unwanted data.
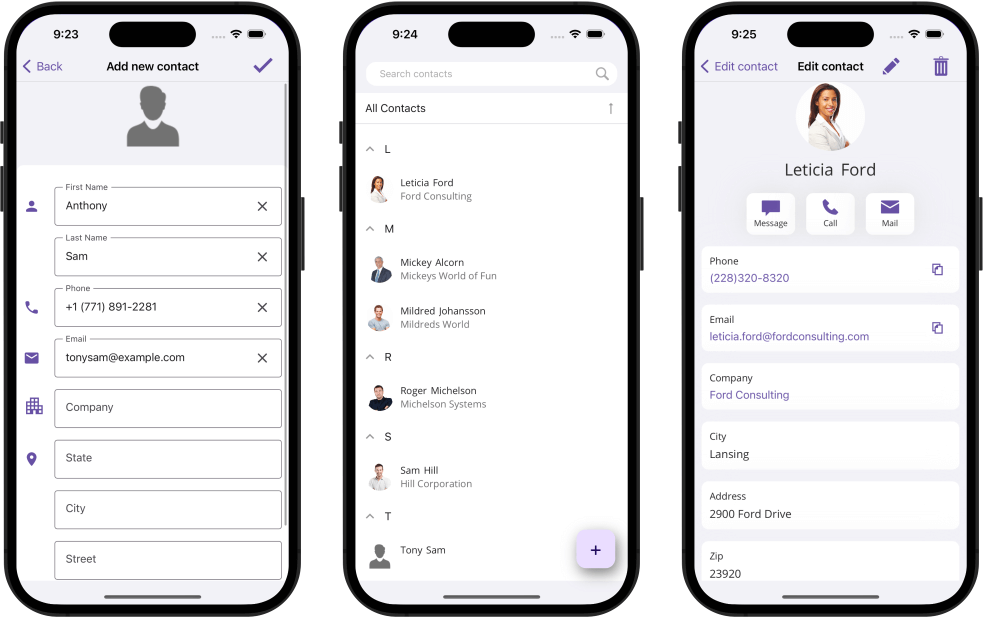
To help address a variety of CRUD-specific usage requirements, we added new APIs and edit forms to our .NET MAUI Data Grid View and Collection View in our last major update cycle (v23.1). In this post, I'll describe how to design an app with CRUD capabilities - an app that follows mobile UX best practices:
Note: Visit our GitHub repo to download the complete source code for this post: Incorporate CRUD Operations
While CRUD operations are a necessity in most business apps, they can be challenging to implement. In general, CRUD-related functionality requires implementation of one or more of the following:
- Create a database connection and bind data to the UI.
- Integrate navigation within the app to switch between detail, editing, and new item forms.
- Obtain the latest available instance of an edited record/item and pass it to the edit form as a parameter.
- Validate data locally.
- Make certain changes can be saved to the database – save operations may fail at the database level because of data constraints or poor connections.
- Prevent the source from being updated when database validation fails.
- Save data and refresh views.
As you'll soon see, DevExpress .NET MAUI DXCollectionView APIs will help you automate most of these requirements. Let's take a look at these requirements in greater detail using our demo application as an example.
Connect to a Database and Bind CollectionView
For this particular example, we will use SQLite powered by Entity Framework Core. Here are the steps needed set up a connection to the SQLite database:
- Add the Microsoft.EntityFrameworkCore.Sqlite NuGet package to the project.
- Define the Model class:
public class Contact { public string FirstName { get ; set; } public string LastName { get; set; } //... } - Define the DbContext class:
public class ContactsContext : DbContext { public DbSet<Model.Contact> Contacts { get; set; } public ContactsContext() { //Initiates SQLite on iOS SQLitePCL.Batteries_V2.Init(); this.Database.EnsureCreated(); } //Sets up the location of the SQLite database on the physical device: protected override void OnConfiguring(DbContextOptionsBuilder optionsBuilder) { string dbPath = Path.Combine(FileSystem.AppDataDirectory, App.DbFileName); optionsBuilder.UseSqlite($"Filename={dbPath}"); base.OnConfiguring(optionsBuilder); } } - Copy the database file to the AppData folder so that the mobile app can access it:
CopyWorkingFilesToAppData(DbFileName).Wait();
//...
public async Task<string> CopyWorkingFilesToAppData(string fileName) {
   string targetFile = Path.Combine(FileSystem.Current.AppDataDirectory, fileName);
   if (File.Exists(targetFile))
       return targetFile;
   using Stream fileStream = await FileSystem.Current.OpenAppPackageFileAsync(fileName);
   using FileStream outputStream = File.OpenWrite(targetFile);
   fileStream.CopyTo(outputStream);
   return targetFile;
}
At this point, we'll need to bind DXCollectionView to the loaded entities.
In general, you should assign an object that implements the IList, IList<T>, IEnumerable, or IEnumerable<T> interface to the ItemsSource property whenever you wish to populate the DXCollectionView with data. In this example, the app obtains data from the Contacts dataset:
<dxcv:DXCollectionView x:Name="collectionView" ItemsSource="{Binding Contacts}" … /> Configure the Detail View
In most modern mobile apps, detailed item information is not displayed within a single row (limited screen real-estate means less info is visible and horizontal scrolling is not a the very common on mobile devices). For these reasons, we will display detailed information on a separate page.
When implementing this page, we'll need to implement a view form from scratch, create a view model, and pass parameters during navigation. DXCollectionView will do most of the heavy-lifting for us and allow us to navigate to a default-generated detail form (using the ShowDetailForm command). If the default form does not meet your specific requirements, you can create your own form and assign it to DXCollectionView via the DetailFormTemplate property:
<dxcv:DXCollectionView x:Name="collectionView"
                      ItemsSource="{Binding Contacts}"
                      DetailFormTemplate="{DataTemplate local:DetailInfoPage}">
          <!--…-->
</dxcv:DXCollectionView>
For a DetaiInfoPage implementation, refer to the following code file: DetailInfoPage.xaml.
Configure Edit and New Item Views
In addition to view forms, you can create and invoke custom forms to configure a new item and edit existing records.
In most scenarios, edit and new item forms look similar. As such, we can re-use a single form for both use cases and assign the same form object to the DXCollectionView’s DetailEditFormTemplate and DetaiNewItemFormTemplate properties.
<dxcv:DXCollectionView x:Name="collectionView"
                      ItemsSource="{Binding Contacts}"
                      DetailEditFormTemplate="{DataTemplate local:ContactEditingPage}"
                      DetailNewItemFormTemplate="{DataTemplate local:ContactEditingPage}">
          <!--…-->
</dxcv:DXCollectionView>
The CollectionView displays both edit and new item forms when the corresponding command is invoked. For example, users can click the floating plus button to invoke the New Item form. To implement a button such as this, I created a SimpleButton object, configured its visual settings, and then bound its Command property to the DXCollectionView’s ShowDetailNewItemForm command:
<dxco:SimpleButton Command="{Binding Source={x:Reference collectionView}, Path=Commands.ShowDetailNewItemForm}" >
</dxco:SimpleButton>
The DXCollectionView passes a DetailEditFormViewModel object as a BindingContext for the forms. This object contains item information you can use to design edit forms. In addition to the source item itself (the Item property), the DetailEditFormViewModel contains additional info and useful API members. For example, the IsNew property allows you to determine whether the current form is purposed for new item configuration; DeleteCommand and SaveCommand allow you to delete the current item and save item changes to the source.
I used the DataFormView component to implement a custom edit form passed to DetailEditFormTemplate and DetailNewItemFormTemplate. The DataFormView allows users to configure source item field values using editors in the DataFormView.Items collection. To implement a similar approach, bind the DataFormView's DataObject property to the DetailEditFormViewModel's Item property. To bind a DataFormView editor to a specific item property, specify the editor’s FieldName option:
<dxdf:DataFormView x:Name="dataForm" DataObject="{Binding Item}">
    <dxdf:DataFormTextItem FieldName="FirstName" .../>
    <!--…-->
</dxdf:DataFormView>
When implementing the edit form, I used the BottomSheet component instead of a standard drop-down list (to display a list of companies). Bottom sheets offer a better user experience in mobile apps:
<dxdf:DataFormComboBoxItem FieldName="Company" ItemsSource="{Binding DataControlContext.Companies}" PickerShowMode="BottomSheet"/>
DXCollectionView allows you to use the Unit Of Work design pattern even though the logic can be spread across different Views. When used with Entity Framework, Unit of Work usually implies that a new DBContext instance is created each time you execute a database transaction. This helps you maintain data consistency even when it’s edited by several users. For example, in the CreateDetailFormViewModel event handler, I create a new ContactsContext for each edited item. This allows you to cancel item changes if something goes wrong when saving changes to the data source. The Unit of Work pattern also allows you to always retain the actual copy of the item and prevent 2 or more users from editing the same item. Note that I pass this ContactsContext object to the context parameter of the DetailEditFormModel’s Context parameter to use it when saving to the source.
In this sample, users will need to tap the floating plus button to add a new contact. To implement this button, I used a SimpleButton object. Once a user taps the button, the CollectionView invokes the New Contact form defined via the DetailNewItemFormTemplate property.
<dxco:SimpleButton Command="{Binding Source={x:Reference collectionView}, Path=Commands.ShowDetailNewItemForm}"
                      Text="+"
                      Margin="18" Grid.RowSpan="2"
                      VerticalOptions="End" HorizontalOptions="End"
                      Style="{StaticResource fabStyle}">
</dxco:SimpleButton>
Validate Data Locally
When basic editing is complete, it's time to think about local validation (to help users correct errors before sending data to the database). The DataFormView doesn't post changes to the edited item until you call the Commit method. This allows you to validate all properties simultaneously and if validation succeeds, apply changes. To introduce this capability, call the Validate method followed by Commit:
void SaveItemClick(object sender, EventArgs e) {
    if (!dataForm.Validate())
        return;
    dataForm.Commit();
    ViewModel.Save();
}
DataFormView ships with a time-saving validation technique allowing you to apply a validation rule universally. For example, I applied the Required attribute to display an error message when text has not been entered in the First Name text box:
[Required(ErrorMessage = "First Name cannot be empty")]
public string FirstName {
    get => firstName;
    set {
        firstName = value;
        RaisePropertiesChanged();
    }
}
For advanced scenarios, you can handle the ValidateProperty event and implement custom logic as needed. For example, the code snippet below validates the Email property:
<dxdf:DataFormView x:Name="dataForm" ValidateProperty="dataForm_ValidateProperty"...>
void dataForm_ValidateProperty(object sender, DataFormPropertyValidationEventArgs e) {
    if (e.PropertyName == "Email" && e.NewValue != null) {
        MailAddress res;
        if (!MailAddress.TryCreate((string)e.NewValue, out res)) {
            e.HasError = true;
            e.ErrorText = "Invalid email";
        }
    }
}
Handle Database Validation Errors and Save Data
In addition to invalid data input, mobile apps can encounter database level errors/constraints. Examples include connection failures or inappropriate user permissions. To deliver the best mobile user experience, you should check whether your data is successfully saved to the database. Should a save operation fail, you should roll back data item changes and return to the previous item state.
To incorporate this capability, you can handle the Collection View’s ValidateAndSave event. The general idea is to call the SaveChanges method and handle errors in a try/catch block. If EntityFramework fails to save data, it will raise an exception,and you will be able to process it in the catch block. It's sufficient to set e.IsValid to prevent DXCollectionView from updating the item in the list. When I edit an item, I use the ContactsContext instance previously created in the CreateDetailFormViewModel event handler. We receive that context object from ValidateAndSave event arguments. We call the DbContext.SaveChanges() method to post changes to the database. If an exception occurs, we set the IsValid to false. If the SaveChanges operation succeeds, the CollectionView automatically refreshes its data.
Summary
Mobile CRUD operations require you to implement specific logic for different views and view models. With its ability to pass information between views and display/edit data, our .NET MAUI DXCollectionView CRUD API will help cut-down a lot of tedious work related to CRUD operations. Automatically generated views are best used in straightforward usage scenarios, whereas custom views offer an unlimited set of customization options.
If interested in implementing authorized data access, don't forget to check out the following blog post: .NET MAUI — Authorize EF Core CRUD Operations and Download Reports with OData Web API
