WinForms Data Layout Control: Data Annotation Attributes (Shipping in v15.1)
For those unaware of our WinForms Data Layout Control, here is a quick summary of its newest feature (Data Annotation Attributes) and how you can build forms and layout individual controls directly from your data source. As I hope you'll discover, this tool is extremely useful - especially when working with detail forms...
Once bound to a data source, the Layout Control retrieves data fields automatically and builds its layout with the appropriate editors (based on the underlying data type). By default, when binding to a simple business object (see Person class below), the DevExpress Data Layout Control automatically generates a linear layout, wherein layout items (controls) are arranged in one column.

With our most recent update, the Data Layout Control ships with Data Annotation Attribute support (https://documentation.devexpress.com/#WindowsForms/CustomDocument114039) - useful for the automatic generation of complex layouts from a business object. To get started with this new capability, you simply need to mark the bound object's properties using dedicated attributes and assign the object as the control's data source. When building the layout, the control will automatically recognize these attributes and will provide display names and specify layout order item, arrange items into groups and tabbed groups, specify a control's read-only state, assign masks to editors, etc.
Let's dig into this new feature and use specific annotation attributes in the Person class to see the feature in action. First thing we'll do is prevent the ID field from being automatically generated by the Data Layout Control. We'll apply the Display attribute with the AutoGenerateField parameter set to false for the ID field.
To assign custom captions to layout items, we'll use Display attribute with the Name parameter. For the Image field, we';; specify an empty string to hide the label...
By default, single line text editors are generated by the Data Layout Control for editing a bound object's fields. You can change editor types used via the DataType attribute. For instance, the following code specifies use of a multiline Memo editor for the Description field.
And here's the form...

The Display attribute with GroupName parameter allows you to combine items into groups (borderless, standard or tabbed groups). The following code positions the Email and Skype fields into a borderless group inside the Job tab.
const string EmailAndSkype = "<Root>/<Photo->/<FirstAndLastName>/{Tabs}/Job/<EmailAndSkype->";
The form will now look as follows...

Notice that GroupName parameter addresses a target group that is nested in another group. Group names are separated by the slash character. By default, the Layout Control adds auto-generated items to the bottom of the parent group in a vertical orientation and to the right in a horizontal orientation. Of course, you may want to arrange items in the generated layout using a custom order. To do this, you'd apply the Display attribute with the Order parameter.
Display(Name = "", GroupName = Photo, Order=0)]
A look at the final form...

I hope you can see how easy it is to create a ready-to-use form layout by applying Data Annotation attributes to the data object's fields. In addition to layout-aware and editor-specific attributes, the Data Layout Control supports a set of data validation attributes (StringLengthAttribute, RangeAttribute, RequiredAttribute, etc.). In the following example, the Range attribute is used to check whether the BirthDate value is in the specified interval.
public class Person {
const string RootGroup = "<Root>";
const string Photo = RootGroup + "/" + "<Photo->";
const string FirstNameAndLastName = Photo + "/" + "<FirstAndLastName>";
const string TabbedGroup = FirstNameAndLastName + "/" + "{Tabs}";
const string ContactGroup = TabbedGroup + "/" + "Contact";
const string BDateAndGender = ContactGroup + "/" + "<BDateAndGender->";
const string HomeAddressAndPhone = ContactGroup + "/" + "<HomeAddressAndPhone->";
const string JobGroup = TabbedGroup + "/" + "Job";
const string HDateAndSalary = JobGroup + "/" + "<HDateAndSalary->";
const string EmailAndSkype = JobGroup + "/" + "<EmailAndSkype->";
const string GroupAndTitle = JobGroup + "/" + "<GroupAndTitle->";
[Key,Display(AutoGenerateField =false)]
public int ID { get; set; }
[Display(Name = "Last name :", GroupName = FirstNameAndLastName, Order = 2)]
public string LastName { get; set; }
[Display(Name = "First name:", GroupName = FirstNameAndLastName, Order = 1)]
public string FirstName { get; set; }
[Display(Name = "", GroupName = Photo, Order=0)]
public Image Image { get; set; }
[Display(Name = "Phone :", GroupName = HomeAddressAndPhone)]
public string Phone { get; set; }
[Display(Name = "E-Mail :", GroupName = EmailAndSkype, Order=5)]
public string Email { get; set; }
[Display(Name = "Skype :", GroupName = EmailAndSkype)]
public string Skype { get; set; }
[Display(Name = "Home address :", GroupName = HomeAddressAndPhone)]
public string AddressLine1 { get; set; }
[Display(Name = "Work address :", GroupName = JobGroup)]
public string AddressLine2 { get; set; }
[Display(Name = "About :", GroupName = RootGroup), DataType(DataType.MultilineText)]
public string Description { get; set; }
[Range(typeof(DateTime), "1/1/1900", "1/1/2000", ErrorMessage = "Birthday is out of Range")]
[Display(Name = "Birthday :", GroupName = BDateAndGender, Order = 3)]
public DateTime BirthDate { get; set; }
[Display(Name = "Gender :", GroupName = BDateAndGender)]
public Gender Gender { get; set; }
[Display(Name = "Group :", GroupName = GroupAndTitle, Order = 6)]
public string Group { get; set; }
[Display(Name = "Hire date :",GroupName=HDateAndSalary, Order=4)]
public DateTime HireDate { get; set; }
[Display(Name = "Salary :", GroupName = HDateAndSalary)]
public decimal Salary { get; set; }
[Display(Name = "Title :", GroupName = GroupAndTitle)]
public string Title { get; set; }
}
And before I forget, here's an image of a form layout generated from a business object using our Layout Control -- with data validation enabled.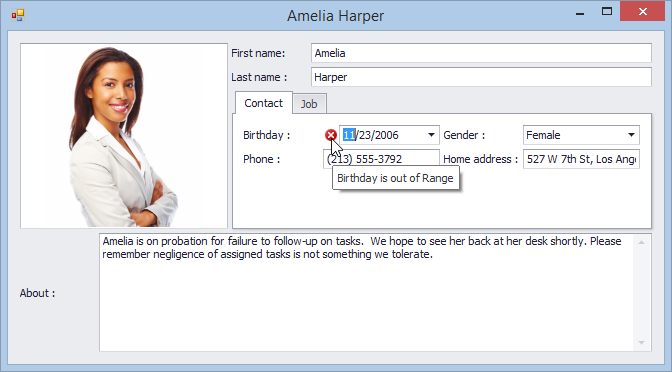
Free DevExpress Products - Get Your Copy Today
 Ray Navasarkian (DevExpress)