WinForms Tips & Tricks - Custom Draw within the Gantt Control

As you may already know, we included a community tech preview (CTP) of the DevExpress WinForms Gantt Control in our v19.2 release cycle.
Our deepest thanks to everyone who has evaluated the control – we’ve received great feedback and are working hard to sort through your usage scenarios. Between now and v20.1, we’ll refine and extend this control so you can deliver amazing user experiences…without writing a single line of code. For those of you who cannot wait for v20.1, I wanted to describe how you can leverage the Gantt control’s CustomDraw events to emulate major Gantt-related features today.
Custom Draw Events
The DevExpress WinForms Gantt Control includes the following Custom Draw events:
- CustomDrawTask - allows you to manually paint standard tasks, summary tasks, and milestones within the Diagram region of the control.
- CustomDrawTaskDependency - use this event to customize task dependencies (arrows that lead from one task bar to another).
- CustomTaskDisplayText - allows you to customize task captions.
- CustomDrawTimescaleColumn - allows you to customize the working region of the Diagram panel.
By combining these events, you can introduce features we have yet to integrate into the control (draw a critical path, split a task, mark a deadline, etc). Yes, we will deliver some of these as out-of-the-box features in 2020…for those who cannot wait for next year, here are a few ways you can customize our WinForms Gantt via custom draw today.
Critical Path
A critical path is a sequence of very important project tasks with zero delay between them. If you are ready to integrate our WinForms Gantt in a software project and you cannot wait until our next major update, you can use a combination of the CustomDrawTask and CustomDrawDependency events to manually highlight task bars associated with a critical path, and the arrows that connect them.
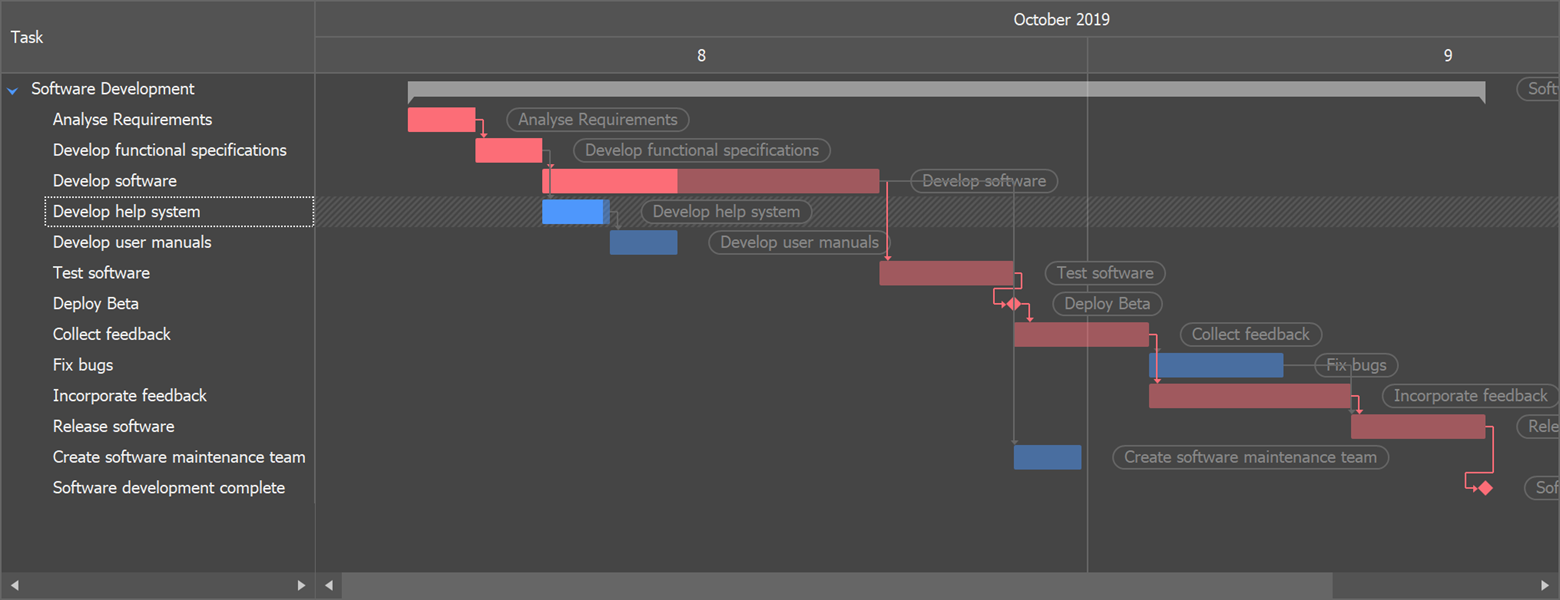
HashSet<int> criticalPathIds = new HashSet<int> { 1, 2, 3, 6, 7, 8, 10, 11, 13 };
ganttControl.CustomDrawTask += (sender, e) => {
    int taskId = Convert.ToInt32(e.Node.GetValue("Id"));
    if(criticalPathIds.Contains(taskId)) {
        e.Appearance.BackColor = DXSkinColors.FillColors.Danger;
        e.Appearance.ProgressColor = DXSkinColors.FillColors.Danger;
    }
};
ganttControl.CustomDrawTaskDependency += (sender, e) => {
    int predecessorId = Convert.ToInt32(e.PredecessorNode.GetValue("Id"));
    int successorId = Convert.ToInt32(e.SuccessorNode.GetValue("Id"));
    if(criticalPathIds.Contains(predecessorId) && criticalPathIds.Contains(successorId)) {
        e.Appearance.BackColor = DXSkinColors.FillColors.Danger;
    }
};
Split Task
A split task is an interrupted task (at a givent moment of time) that resumes at a later point in time. In the figure below, “Develop Software” is a 3-hour task divided in half by a 2-hour pause.

When using custom draw events, you need to know which task will be split along with its delay. With this information, you’ll be able to edit the task completion date/duration in your data source. In this example, “Develop Software” is defined as a 5-hour task in the data source.
ganttControl.CustomDrawTask += (sender, e) => {
    var splitInfo = e.Info.Node.GetValue("SplitInfo") as SplitInfo;
    if(splitInfo != null) {
        e.Appearance.BackColor = DXSkinColors.FillColors.Danger;
        e.Appearance.ProgressColor = DXSkinColors.FillColors.Danger;
        e.DrawShape(splitInfo.Start, splitInfo.Start + splitInfo.Duration);
        e.DrawRightText();
        e.Handled = true;
    }
};
A more effective approach is to store task durations and start\end dates within your data source and insert pauses wherever they are needed. To support this approach, our Gantt Control must be able to recalculate all tasks and dynamically update its TreeList and Diagram panels accordingly. This functionality requires “auto-scheduling” support – a feature we’ll incorporate next year.
Custom Task Text
The next sample illustrates how to replace a task’s caption with custom text strings (“High Priority” or “Normal Priority”). These custom captions are drawn on either left or right side of the task by using the CustomTaskDisplayText event.

HashSet<int> criticalPathIds = new HashSet<int> { 1, 2, 3, 6, 7, 8, 10, 11, 13 };
ganttControl.CustomTaskDisplayText += (sender, e) => {
    int taskId = Convert.ToInt32(e.Node.GetValue("Id"));
    if(criticalPathIds.Contains(taskId)) {
        e.RightText = "High priority";
    }
    else {
        e.RightText = string.Empty;
        e.LeftText = "Normal priority";
    }
};
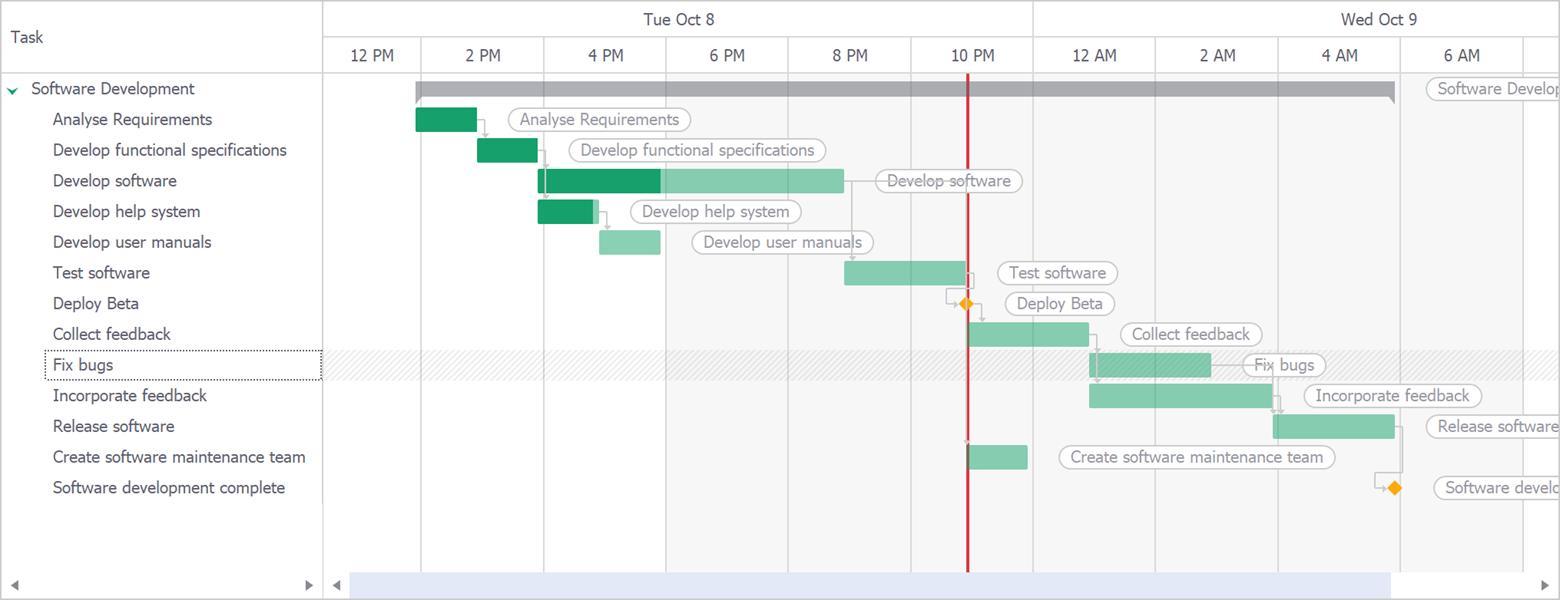
Striplines
A stripline is a colored timescale column that highlights a specific period in time (for instance, a weekend). In the figure below, a stripline highlights a custom 4-hour interval.

You can implement striplines by re-drawing timescale columns via the CustomDrawTimescaleColumn event.
DateTime striplineStart = DateTime.Now.AddHours(5);
DateTime striplineEnd = striplineStart.AddHours(4);
Color striplineColor = Color.FromArgb(128, 255, 224, 166);
ganttControl.CustomDrawTimescaleColumn += (sender, e) => {
    GanttTimescaleColumn column = e.Column;
    float stripLineStartPoint = (float) Math.Max(e.GetPosition(striplineStart), column.Bounds.Left);
    float stripLineEndPoint = (float) Math.Min(e.GetPosition(striplineEnd), column.Bounds.Right);
    e.DrawBackground();
    RectangleF boundsToDraw = new RectangleF(
        stripLineStartPoint, column.Bounds.Y,
        stripLineEndPoint - stripLineStartPoint, column.Bounds.Height);
    if(boundsToDraw.Width > 0)
        e.Cache.FillRectangle(striplineColor, boundsToDraw);
    e.DrawHeader();
    e.Handled = true;
};
Deadlines
In the following image, “Deploy Beta” follows a fixed deadline.
Much like our previous code snippet, deadlines are drawn via the CustomDrawTimescaleColumn event, but in this instance, we need to paint a thin rectangle instead of populating the entire column with a custom color.
DateTime deadLine = TaskStorage.GetFinishDateFromTask("Deploy Beta");
ganttControl.CustomDrawTimescaleColumn += (sender, e) => {
    GanttTimescaleColumn column = e.Column;
    if(column.StartDate <= deadLine && column.FinishDate >= deadLine) {
        e.DrawBackground();
        float x = (float) e.GetPosition(deadLine);
        float width = 4;
        RectangleF deadLineRect = new RectangleF(x, column.Bounds.Y, width, column.Bounds.Height);
        e.Cache.FillRectangle(DXSkinColors.FillColors.Danger, deadLineRect);
        e.DrawHeader();
        e.Handled = true;
    }
};
Your Feedback Matters
All code samples from this article are available in our Gantt Control live demo. If you have other Gantt Control requirements, please comment below. We will do our best to offer work-arounds until we incorporate the feature directly within the control.
Free DevExpress Products - Get Your Copy Today
 The DevExpress Team